11
Assembly &
Installation
Personal protection
equipment including
hard hat, safety glasses,
safety shoes, and gloves
are recommended during
assembly, installation,
operation, maintenance,
service, removal, or
movement of the earth
auger. Do not allow long
hair, loose fitting
clothing, or jewelry to be
around moving and/or
rotating parts.
Prepare the Vehicle
Read and understand the manual for your vehicle before assembling or installing the EP
Auger System. The vehicle must be equipped with auxiliary hydraulics and either a quick
attach, dipperstick, or bucket for use with the bolt-on bucket mount.
The use of the earth auger may require the addition of counterweights to ensure the weight of
the attachment does not exceed the rated capacity of your vehicle.
Recommended Tools
Remove pallet, banding, and any other packaging materials from the earth auger.
Inspect product for damage.
Proceed to the section below that matches your mounting style.
STEP 1:
STEP 2:
Do not exceed the vehicle's rated operating load.
If necessary, use sufficient counterweights.
• Box cutter/metal snips
Because of the weight of
some components, and
because some
components are difficult
to balance, two people
are required for safe
assembly and installation
of this equipment.
Assembly &
Installation
Skid-Steer, Euro/Global,
& John Deere 200-500
Series Quick Attach
Mounted Earth Auger
Additional factors that influence clearance between cradle and drive unit include:
• Length of auger
• Maximum tilt angle of vehicle
• Angle of hole being drilled
• Slope of ground
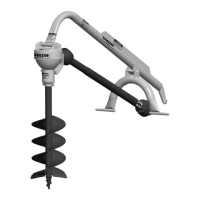
The cradle mounting bolt holes closer to
the drive unit set the carry angle at 15°.
The bolt holes further from the drive unit
set the carry angle at 30°.
It is recommended to install the cradle in the 15° carry angle, provided the cradle
does not come into contact with the drive unit housing during drilling operations.
Damage may occur if the cradle comes into contact with the drive unit housing
during drilling operations.
Bolt left and right cradle arms (1, 2) and cradle center plate (3) together with 3/8"
carriage bolts (4) and 3/8" nuts (5). Tighten by hand only.
STEP 1:
3
2
5
1
4
Recommended Tools
• 1-1/8" wrench • 1-7/16" wrench • 1/2" wrench (2) • Torque wrench
• 1-1/8" socket • 9/16" socket • 7/8" wrench • 1" wrench
30°
15°
The quick attach mount allows the cradle to be installed in two different positions, allowing
the drive unit to lie at either a 15° or 30° carry angle during transport. The 15° carry angle
provides better operator visibility while transporting the earth auger, but reduces the clearance
between cradle and drive unit housing during drilling operations.