Verifying Data from the ISS Sensors
10
Verifying Data from the ISS Sensors
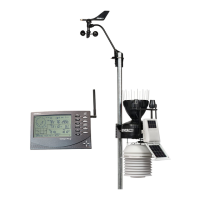
Use these steps to verify reception of ISS data at the wireless Vantage Pro2 console
and to test the operation of the ISS sensors.
1. Press and hold DONE until the Current Weather screen displays, if the console is
in Setup Mode.
Sensor readings from the ISS should display on the screen.
2. Near the center of the screen, look for the outside temperature.
3. Spin the wind cups to check wind speed, pressing WIND if necessary to alternate
between speed and direction in the compass rose.
4. Turn the wind vane, and allow 5 seconds for the wind direction display to stabilize
before moving it again.
Approximately one minute after power-up the outside relative humidity reading
should be displayed on the console.
5. If the ISS contains a UV sensor and/or solar radiation sensor, press 2ND and then
press RAIN YR for current ultraviolet readings or press 2ND then press RAIN
DAY for solar radiation readings.
The UV reading displays in the center of the console. The solar reading displays in
the bottom right corner of the console display. UV and solar readings should be
zero or close to zero if the ISS is inside. Zero is a valid reading — dashes are dis-
played if no data comes from the sensors.
6. Current weather data displayed on the console confirms successful communica-
tion.
Once the ISS has been powered and the console has successfully received accurate
readings from all the sensors, prepare the ISS for installation. Continue on to
“Preparing the ISS for Installation” on page 15 for more information.
If the communication problems still exist between the wireless ISS and the console,
see “Troubleshooting Wireless ISS Reception.”
Troubleshooting Wireless ISS Reception
If the console isn’t displaying data from the ISS, perform the following steps:
1. Verify that the console is powered and is not in Setup Mode.
2. Make sure that all ISS sensor cables are firmly connected to the SIM and the ISS
battery is properly installed.
3. Walk around the room with the console, standing for a few moments in various
locations, to see if you are picking up signals from the ISS. Look on the screen’s
lower right corner. An “X” toggles on and off when the console receives a trans-
mission.
4. If you do not see the “X” slowly blinking, no matter where you stand with the con-
sole, put your ISS in Test Mode.
• The DIP switch #4 on the SIM is the Test Mode
switch. Switch it to the ON position, using a ball-
point pen or paper clip.
• An LED indicator light on the SIM flashes each
time the ISS transmits, which is about once every
2.5 seconds.
1234
ON
Setting for Test Mode
DIP Switch #4 = ON

 Loading...