9
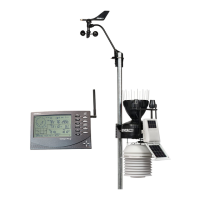
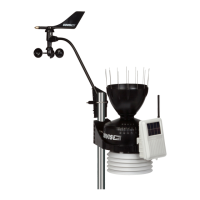
Wireless ISS Assembly
The ISS has a wireless connection to a Vantage Pro2 wireless console. Once the
anemometer has been installed and the sensors have been checked, the ISS must
be powered and a wireless communication channel must be established
between the ISS and the console. Follow the steps below for powering the ISS
and establishing a connection to the console.
• Applying Power to a Wireless ISS
• Verifying Communications with the Console
• Verifying Data from the ISS Sensors
• Troubleshooting ISS Reception
Applying Power to a Wireless ISS
1. Insert the 3-volt lithium battery into the SIM.
Once powered, the ISS immediately begins transmitting data to the console.
Be sure to match the “+” sign on the battery with the “+” sign on the SIM. See
“SIM Board Display and Contents” on page 29.
The SIM stores energy from the solar panel for power at night. The battery is
an alternative power source the SIM uses when it is depleted of energy.
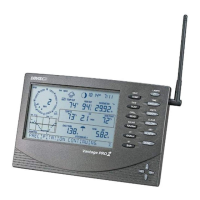
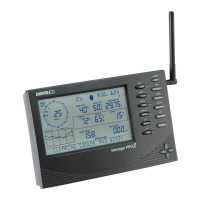
Checking Transmitter ID
A Vantage Pro2 console can receive data
from up to eight different wireless stations.
The default Transmitter ID for the ISS and
console is 1.
In most cases it will not be necessary to
change the Transmitter ID. The console and ISS should begin communicating
automatically when power is applied.
Note: If it is necessary to change the Transmitter ID, remember to use the same ID for the ISS and con-
sole. See “SIM Board Display and Contents” on page 29 for locating the components and points
of interest on the SIM board.
Verifying Communication with the Console
1. Power the console if it does not already have power. Refer to the Vantage Pro2
Console Manual and apply power to the console.
The console automatically enters Setup Mode when powered up.
2. If the console is not in Setup Mode, press and hold DONE then press the
down arrow.
The message RECEIVING FROM... and STATION NO. followed by the
Transmitter IDs that the console detects displays on the console screen.
3. Look for the ISS Transmitter ID. The number 1 displays unless the Transmit-
ter ID has been changed. If the console displays the ISS Transmitter ID, the
ISS is detected.
Note: If the console does not display the number of the ISS Transmitter ID setting, see “Troubleshooting
Wireless ISS Reception” on page 12 for more information. It can take several minutes for the con-
sole to acquire and display all the available Transmitter IDs.
4. Press and hold DONE to view ISS data once the ISS Transmitter ID displays.
1234
ON
Settings for Transmitter ID 1:
DIP Switch 1 = OFF
DIP Switch 2 = OFF
DIP Switch 3 = OFF

 Loading...