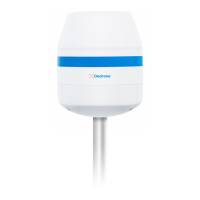
Integrate the RF-360 in your DroneTracker Dedrone
16 v0.4 IM-Inst-RF360en
For further information consult chapter “First Steps” of the integrated online help in the
DroneTacker user interface.
1
Start your web-browser and enter the address of your DroneTracker Server.
For an optimal use, Dedrone recommends Chrome or Firefox.
2
Log in the DroneTracker UI as an administrator or configurator. The default login
credentials are:
User: admin Password: dedrone
The DroneTracker user interface appears.
3
Choose OPTIONS > Site Configuration.
4
Choose [Add] > Dedrone RF Sensor.
The window Discovered Sensors appears.
5
Select the desired RF-360 and choose [OK].
The RF-360 appears in the Site Explorer.
6
To sort the RF-360 in the Site Explorer, drag and drop the element to the desired position.
7
Choose [Save changes].
The window Site Configuration disappears.
8
Choose OPTIONS > Map Editor and choose the RF-360.
9
An accurate alignment of the sensor and configuration in the
DroneTracker are prerequisites for a good direction finding result.
If the sensor was aligned via a prominent landmark, drag and drop the sensor symbol to
the installed position and move the arrow to the chosen prominent landmark.
If the sensor was aligned via a GPS device, choose the element on the map and enter the
noted values in the fields Latitude, Longitude and Azimuth.
10
To lock the settings, choose the option Lock settings.
11
Choose [Save changes].
The window Map Editor disappears.
Requirements:
` RF-360 is installed
` The power supply is working and the button at the RF-360 illuminates blue
` RF-360 is connected to the network
` The IP address of the DroneTracker Server is known
Procedure: