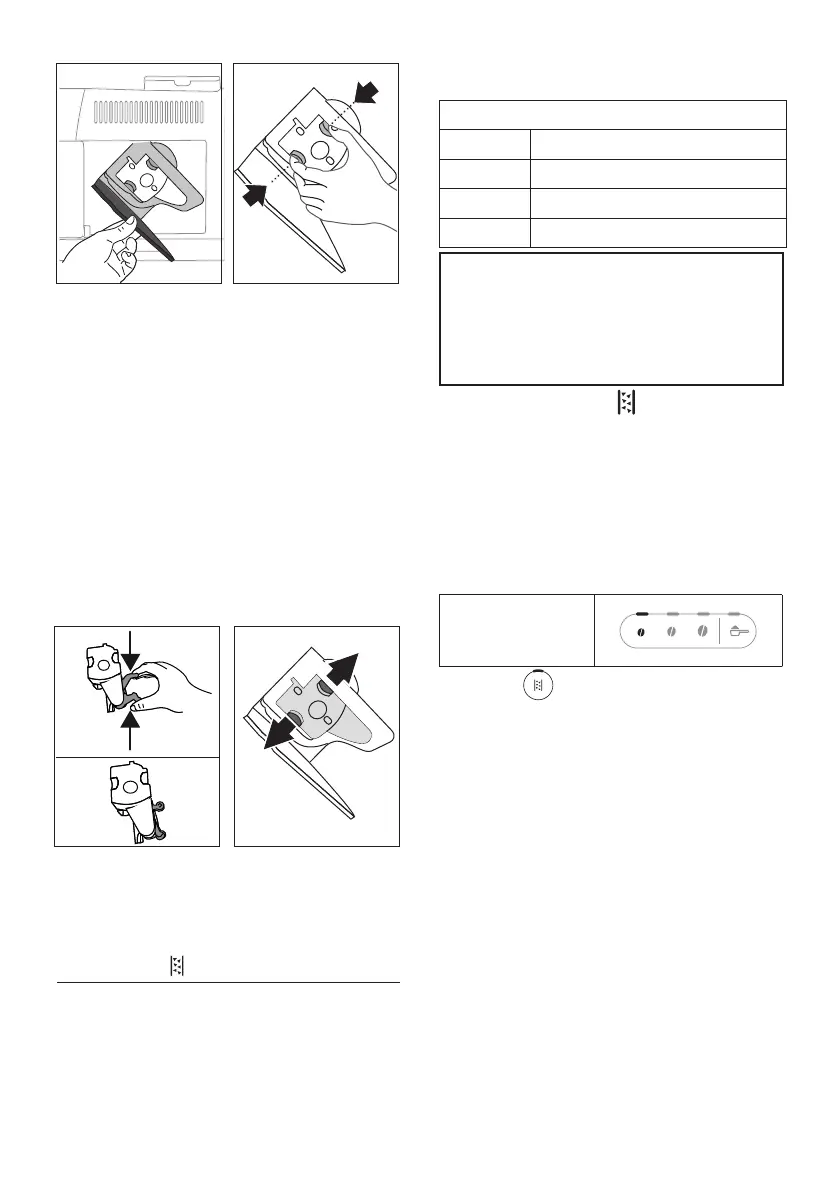
19
PUSH
41 42
PUSH
5. Immerse the infuser in water for about 5 minutes, then
rinse under the tap;
Important!
RINSE WITH WATER ONLY
NO DETERGENTS NO DISHWASHER
6. Do not use detergents when cleaning the infuser, as they
could damage it.
7. Use a brush to remove any coee residues left in the infus-
er housing, which can be seen through the infuser door;
8. After cleaning, replace the infuser by sliding it into its
housing, then apply pressure to the PUSH symbol until it
clicks into place;
Please note:
If the infuser proves dicult to insert, adapt it (before inser-
tion) to the right position by pressing the two levers (g. 43).
43 44
PUSH
9. Once inserted, make sure the two coloured buttons have
snapped out (g. 44);
10. Close the infuser door;
11. Put the water tank back.
16. DESCALING
• Before use, read the instructions and the labelling on the
descaler pack.
• Use only descaler supplied by De’Longhi. Using unsuit-
able descaler and/or performing descaling incorrectly
may result in faults not covered by the manufacturer’s
guarantee.
• Descaler can cause damage to delicate surfaces. If the
product is accidentally spilt, dry immediately.
To descale
Descaler De’Longhi descaler
Container Recommended capacity: 2l
Time ~30min
Accessory Hot water spout (D5)
Important:
If the water softener lter is installed, it must be re-
moved before adding the descaler solution.
Thereafter, reinstate the lter at the start of step 3
Descale the machine when the indicator lights up on the
control panel (C4). This same indicator will blink while the des-
cale cycle is in progress.
Please note:
• Once the descaling cycle has begun, it cannot be inter-
rupted and must be concluded with the full rinse cycle.
With this in mind, make sure there is sucient descaler.
Proceed as follows:
1. Make certain that the water spout (D5) is tted;
Step 1: Descaling
action
2. Press the button (B5) and hold for at least 5 sec-
onds, until the relative Led starts blinking rapidly. The
mild intensity Led lights up to indicate that step 1 of the
descale cycle is in progress;
3. Empty the drip tray (A14) and the grounds container
(A10) and reposition them; empty the water tank com-
pletely (A9) and remove the softener lter (if installed);
4. Pour the descaler into the tank, lling to level A (which
corresponds to a 100ml pack) marked on the side (back)
of the tank (g. 45); next, add water (one litre) up to
level B (g. 46); nally, reposition the water tank in the
machine;