8
17
11. The appliance delivers hot water, then stops automatically;
12. When the ow stops, the lter indicator light extinguish-
es: the lter is now active and the machine can be used.
Please note:
• If the Led of the button (B6) blinks rapidly, press
the button. This will cause the internal circuits of the
machine to start lling up, expelling the air bubbles
that have been formed and allowing the installation to
proceed.
• With installation completed, the drinks Leds blink to
indicate that the machine is heating up in readiness for
normal use.
4.1 Replacing the lter
Replace the lter (D4) when the indicator (C1) lights up.
1. Remove the water tank (A9) and the exhausted lter;
2. Follow the operations described in the previous section to
activate the lter;
3. See instructions in section “12. Settings menu” to set the
machine and repeat steps 9 to 12 of the preceding section.
Please note:
After two months (see date indicator), or after 3 weeks if the
appliance has not been used, the lter should be replaced even
if the warning message has not yet been displayed.
4.2 Removing the lter
If the intention is to use the appliance without the lter (D4),
its removal must be indicated in the machine settings.
1. Remove the water tank (A9) and the exhausted lter;
2. See instructions in section “12. Settings menu” to set the
machine accordingly.
Please note:
After two months (see date indicator), or after 3 weeks if the ap
-
pliance has not been used, the lter should be replaced even if the
warning message has not yet been displayed.
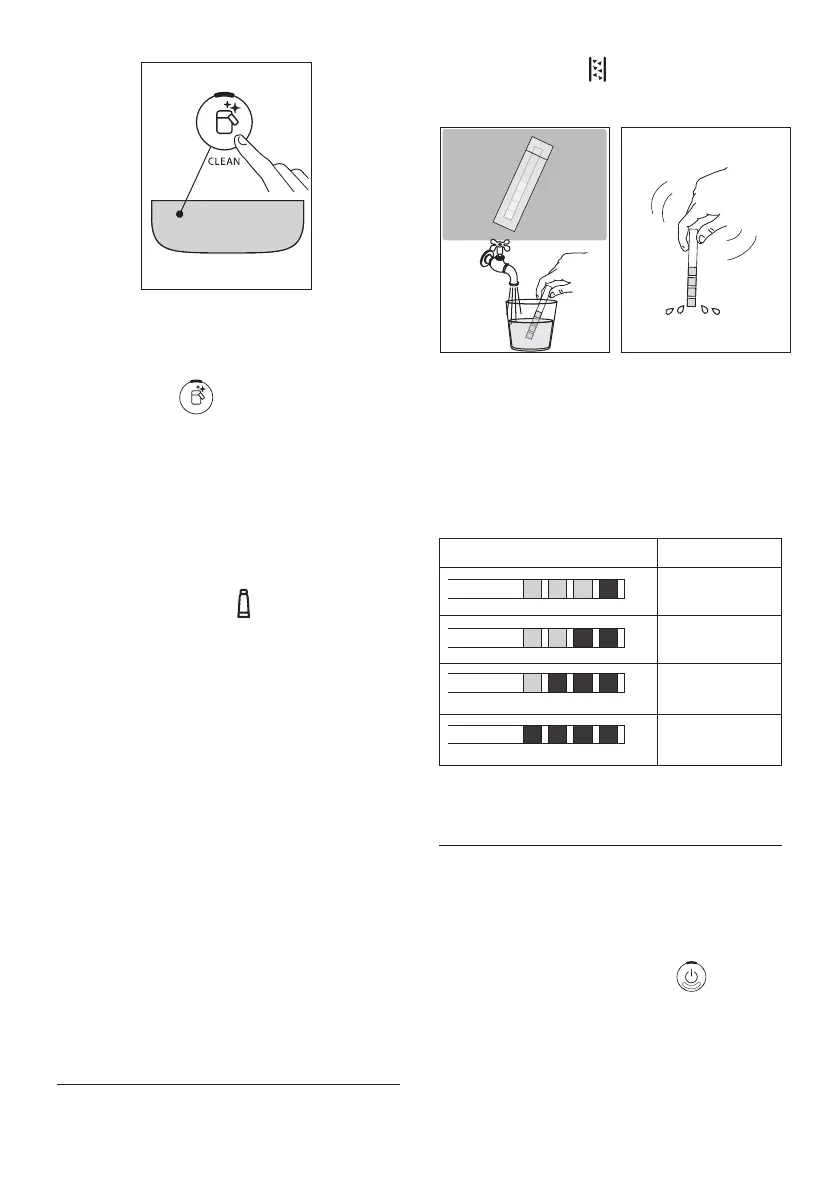
5. MEASURING WATER HARDNESS
Setting the water hardness as soon as possible will enable the
machine to optimize the frequency of descaling. This means
that the descale indicator (C5) will light up as necessary
according to the actual hardness of the local water supply.
Proceed as follows:
18 19
1. If a total hardness test strip (D1) is supplied with the
model of machine in question, remove it from its wrapper.
2. Immerse the strip completely in a glass of water for about
one second (g. 18).
3. Remove the strip from the water and shake lightly (g.
19). After about a minute, 1, 2, 3, or 4 red squares appear,
depending on the hardness of the water. Each square cor-
responds to one level.
Total Hardness Test Hardness
1
Low
2
Medium
3
Medium/High
4
High
See instructions in section “12. Settings menu” to set the ma-
chine accordingly.
6. TURNING THE APPLIANCE ON
Danger of scalding!
During the rinse, a little hot water ows from the coee spouts
(A16). Take care to avoid contact with splashes of water. To
avoid the need for frequent emptying of the drip tray (A14),
place a container under the spouts to collect the rinse water.
• To switch on the machine, press the button (B1):
the Led of the on/o button lights up and the drinks Leds
blink on the control panel (B) to indicate that the machine
is warming up.
During this step, the machine performs a rinse cycle. Besides
heating up the boiler, this also serves to circulate hot water
through the internal circuits so they too are brought up to
temperature.
 Loading...