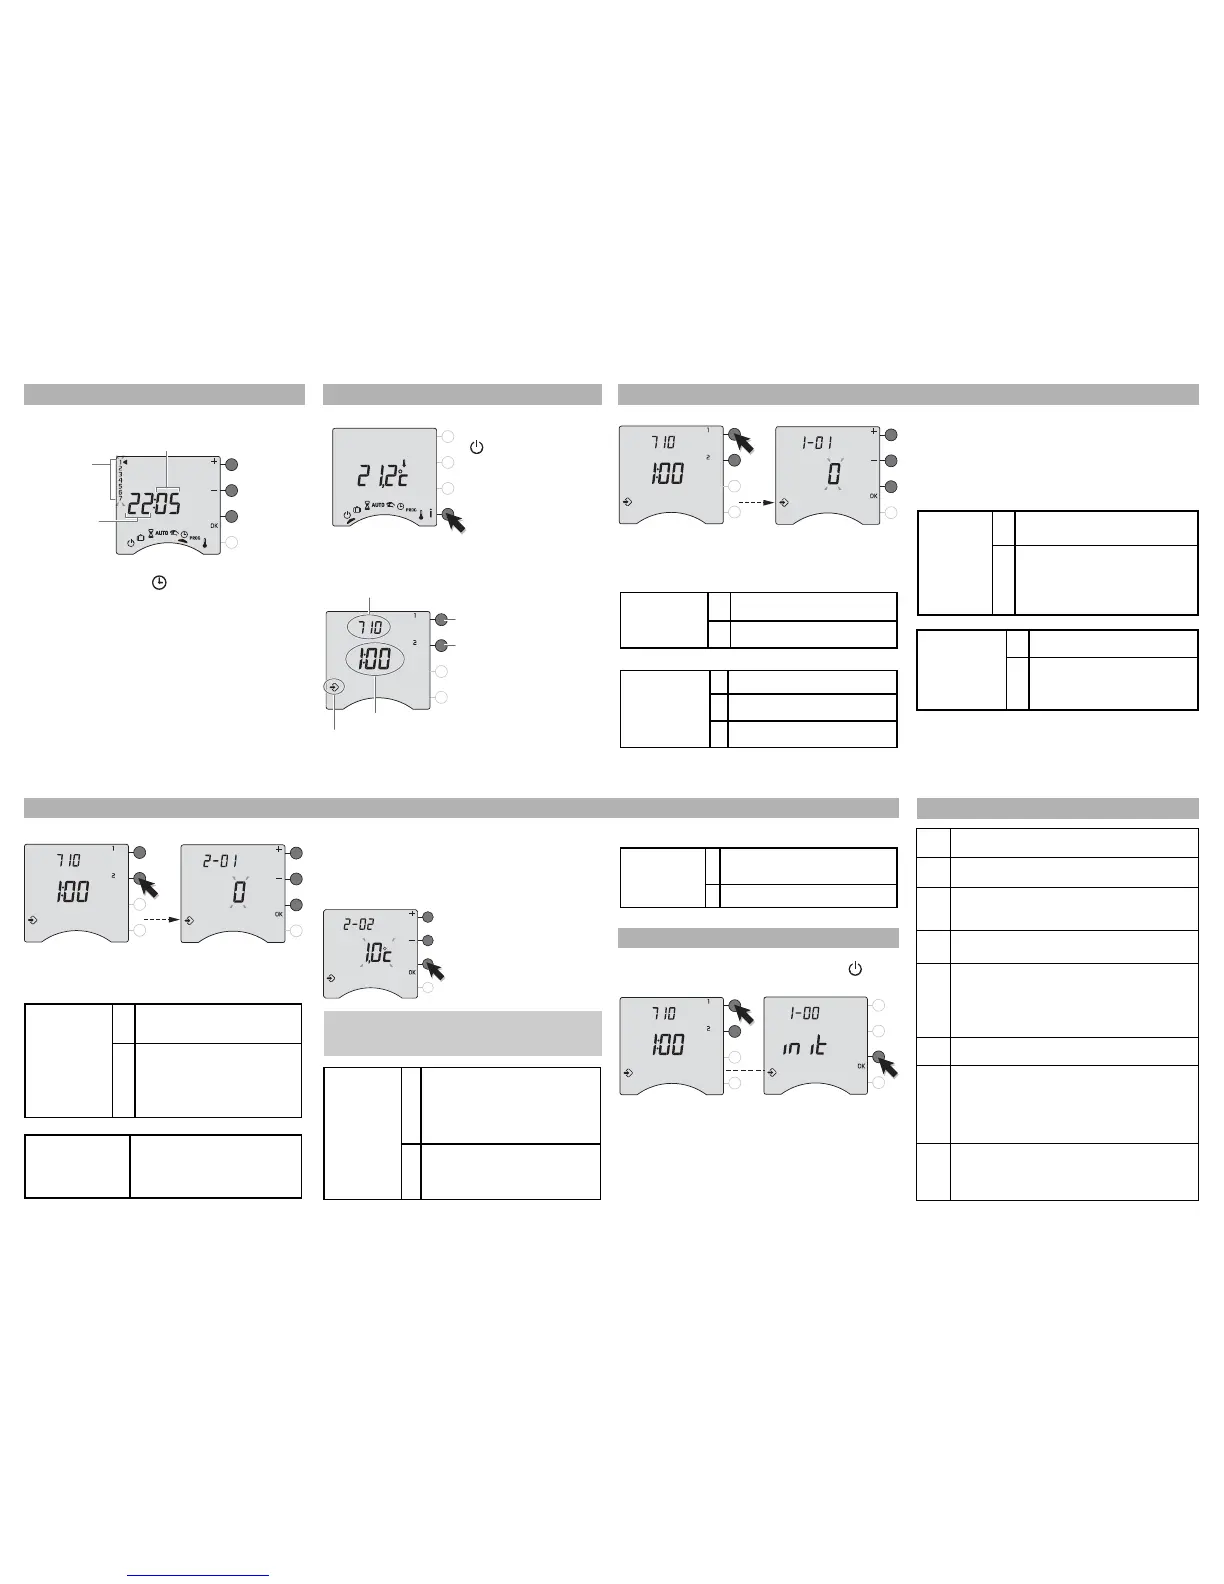
To go to the configuration menus:
turn the selector dial to
, then press and hold
the i button for 5
seconds.
The unit will propose 2 configurations to choose
from:
4. Configuration
After each menu has been
configured, the unit returns
to the choice of menus.
To exit the onfiguration,
turn the selector dial to the
right.
5. Basic configurations (menu 1)
Press button 1,
To change the various settings, press the + or - but-
tons, then press OK to confirm the change and go to
the next setting.
With electric heating or hot water heater with
thermostatic valve, the Comfort temperature can be
provided by adjusting the thermostat of each radiator.
In this case, only Setback and Frost Protection
temperatures are set by the TYBOX.
Menu available only in TYBOX 711
Returning to the factory configuration is possible for
each of the menus.Turn the selector dial to , then
press and hold the i button for 5 seconds.
Follow the same steps for the other menus.
To exit the mode, turn the selector dial to another
mode.
7. Return to the factory configuration
8. Summary table of configurations
1-01
Type of program
0 = weekly 1 = daily
1-02
Programming increments
0 = 1 hour 1 = 30 minutes 2 = 15 minutes
1-08
Controlling the Comfort temperature
0 = controlled by the TYBOX
1 = by each radiator or convector
1-09
Circulator pump anti-seizing
0 = off 1 = on
2-01
Modification authorization
0 = program and settings may be changed
1 = program not modifiable and set-point temperature
settings limited (Comfort:16 to 22°C, Setback:13
to 19°C, Frost Protection:5 to 11°C)
2-02
Correction of the temperature measured
by -5°C to +5°C in increments of 0.1°C
2-04
Automatic mode temperature display option
0 = Set-point temperature display
1 = Room temperature display
2-09
(Menu available only in TYBOX 711)
Contact type for control
0 = NO contact
1 = NC contact
To change the various settings, press the + or - buttons,
then press OK to confirm the change and go to
the next setting.
6. Advanced configurations (menu 2)
Press button 2.
If there is a difference between the temperature noted
(thermometer) and the temperature measured and
displayed by the unit, function 2-02 modifies the way
the probe takes measurements so as to compensate
for this difference.
Example:
If the temperature displayed
by the unit is 19°C and
the temperature measured
is 20°C, add 1°C to the
display and confirm by
pressing OK.
Important:
In order to change this setting, the unit has to have
been running for at least 2 hours beforehand.
When you turn the unit on for the first time, you will
need to set the time.
Turn the selector dial to .
The days flash.
Press + or - to change the day, then press OK
to confirm and continue on to the next setting.
Repeat the operations to set the hours and minutes.
To leave the “setting the time” mode, turn the selector
dial.
3. Starting up - Setting the time
2-01
Modification
authorization for
the user
0
Program and set-point (from 5 to
30°C) modification authorized
1
Program and set-point setting
modification unauthorized
(Comfort: 16 to 22°C,
Setback: 13 to 19°C,
Frost Protection: 5 to 11°C)
2-04
Automatic mode
temperature
display option
0
Continuous set-point temperature
display (by default).
With this option, press
i to display the
room temperature.
1
Continuous room temperature display.
With this option, press
i to display the
set-point temperature.
1-01
Choice of
programming
0
Weekly (by default)
1
Daily
1-08
Controlling
the Comfort
temperature
0
Comfort temperature set by the
TYBOX (by default)
1
Comfort temperature set on each
radiator or convector.
In this option the screen displays
ConF
1-09
Circulator pump
anti-seizing
0
Anti-seizing off (by default)
1
Anti-seizing on(circulator pump
operates for 1 minute every 24
hours)
2-09
Contact type
for control
0
NO contact (by default)
(closed = heating on)
1
NC contact (open = heating on)
1-02
Choice of
programming
increments
0
1-hour increments (by default)
1
30-minute increments
2
15-minute increments
2-02
Correction of the
temperature
measured
Correction possible from -5°C to
+5°C inincrements of 0.1°C. Press
the + or - buttons to make changes,
and confirm with the OK button.
Press the button of the
menu you wish to rest, and
hold the button for 5 seconds
(example for menu 1).
Then press the OK button
to confirm the reset.
Unit reference (for example, TYBOX 710)
Minutes
Hours
Days
(1: Monday…
7: Sunday)
5 sec.
Unit version
Configuration
mode
Basic configurations
Advanced configurations
 Loading...