Do you have a question about the Delta 31-780 and is the answer not in the manual?
Learn the tool's application, limitations, and peculiar hazards before use.
Ensure all guards are in place and functioning correctly for safe operation.
Always wear safety glasses to protect eyes during operation.
Remove all keys and wrenches before turning the tool on.
Maintain a clean and uncluttered work area to prevent accidents.
Do not use power tools in damp/wet locations or expose to rain. Keep area well-lit.
Ensure children and visitors stay a safe distance from the work area.
Secure workshop with padlocks or by removing starter keys.
Operate the tool at its designed rate for better and safer performance.
Use the correct tool for the job; do not force attachments.
Avoid loose clothing, jewelry; wear non-slip footwear and hair covering.
Wear safety glasses conforming to ANSI Z87.1. Use face/dust mask if needed.
Clamp or use a vise to hold work for safer operation and free hands.
Maintain proper footing and balance at all times to avoid overreaching.
Keep tools sharp, clean, and lubricated for best and safest performance.
Always disconnect power before servicing or changing accessories.
Use only Delta-recommended accessories to avoid hazards.
Lock the switch in the "OFF" position to prevent unauthorized use.
Do not stand on the tool to prevent injury from tipping or contact.
Check damaged parts for proper operation, alignment, and function before use.
Feed work into the blade or cutter against its direction of rotation only.
Turn off the tool and wait for it to stop before leaving it unattended.
Do not operate the tool while under the influence of drugs, alcohol, or medication.
Ensure the tool is disconnected from the power supply during motor work.
Be aware of dust hazards from wood; use ventilation and dust collection.
Some dust contains chemicals harmful to health; use ventilation and safety equipment.
Do not operate until the tool is fully assembled and installed per instructions.
Obtain advice from qualified personnel if you are not familiar with tool operation.
Use a dust mask due to potential health hazards from wood dust.
Always keep fingers clear of the rotating sanding drum.
Ensure the sanding drum is undamaged and securely fastened before use.
Do not perform layout or setup on the table while the sander is operating.
Ensure the workpiece is clear of the sanding drum before turning the unit on.
Operate the tool at its designed rate for better and safer performance.
Do not use the machine for wet sanding due to electrical shock hazard.
Use correct table insert and maintain minimal opening to prevent pinching.
Do not sand near flammable liquids, vapors, or gases.
Use the sander on a stable surface with ample room for workpiece handling.
Make sure sanding drums and washers are securely tightened.
Always feed the workpiece against the direction of the sanding drum's rotation.
Remove all debris from the table before sanding the workpiece.
Ensure the workpiece is properly supported, especially small pieces.
Do not sand pieces that are too small to be held safely by hand.
Wear proper hearing protection to safeguard your hearing.
Disconnect power and wait for spindle to stop before any servicing or adjustments.
Refer to National Safety Council, ANSI, and OSHA for more safety information.
Unpack the tool, remove protective coating, and clean unpainted surfaces.
Assemble the 50-780 stand using provided hardware and parts.
Attach the plastic feet to the bottom of each leg of the stand.
Turn the machine upside down on a clean, firm surface.
Remove the bottom plug to access the socket head screw.
Attach the spindle adapter to the motor shaft, noting it has a left-hand thread.
Position wrenches for tightening the spindle adapter onto the motor shaft.
Tighten the spindle adapter onto the motor shaft securely.
Reinstall the plug that was removed earlier for access.
Align and fasten the sander to the 50-780 stand using the provided hardware.
Place the 1-3/4" drum washer onto the spindle adapter.
Slide sleeve onto drum and attach to spindle adapter with a left-hand thread screw.
Position the table insert over the abrasive sleeve and onto the table.
Utilize the side compartments for storing workpieces or accessories.
The sander has a 1-1/2" I.D. dust chute for the dust bag.
Squeeze clamp, slide dust bag over dust chute, and release clamp.
Use the base holes to secure the sander to a supporting surface if it tends to move.
Use a separate circuit with proper wire gauge and a 20 Amp fuse for the tool.
The sander is wired for 120V, 60Hz AC, with a 1725 RPM motor.
Ensure the tool is properly grounded via a grounding plug and outlet.
Temporary adapters may be used, but a grounded outlet is preferred.
Use 3-wire, grounded cords of appropriate gauge for tool current and length.
Use the on/off switch located on the base to start or stop the sander.
Lock the switch toggle in the "OFF" position to prevent unauthorized use.
Always disconnect the tool from the power source before changing parts.
Remove the table insert as the first step in changing sleeves or drums.
Remove the old abrasive sleeve and sanding drum using the socket wrench.
Slide the new abrasive sleeve onto the sanding drum.
Reattach the drum assembly and replace the table insert.
Always disconnect the tool from the power source before making adjustments.
Turn machine over and place on a firm surface to access the spindle assembly.
Remove the machine's outer case to access the spindle assembly.
Center the spindle shaft within the bracket using adjustment screws and locknuts.
Reattach the machine's outer case using the previously removed screws.
Sand inside curves by feeding workpiece against drum rotation for smooth results.
Disconnect the tool from the power source before performing maintenance.
Turn machine over, loosen screws, and remove cover to access gear housing.
Remove old grease and repack the gears in the housing.
Reinstall the gear housing cover after repacking the gears.
Call 1-800-223-7278 for information on parts, service, or warranty assistance.
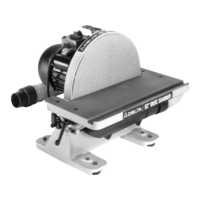
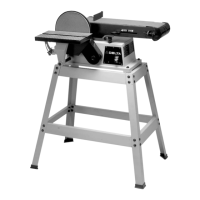
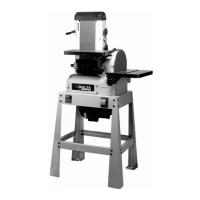
The Delta BOSS Bench Oscillating Spindle Sander, Model 31-780, is a woodworking tool designed for sanding various materials, particularly for intricate shapes and curves. This benchtop unit is engineered to provide a smooth finish while minimizing score marks and preventing clogging of the sanding drum, thanks to its oscillating action. The sander is intended for use on a solid supporting surface, or it can be attached to an optional accessory stand (Model 50-780) for enhanced stability and convenience.
The core function of the Delta BOSS sander is to shape and smooth wood and wood products using abrasive sleeves mounted on sanding drums. The unique feature of this sander is its oscillating spindle, which moves up and down while rotating. This dual action ensures that the abrasive sleeve contacts the workpiece at different points, distributing wear evenly across the sleeve and preventing the formation of deep grooves or burn marks on the material. This results in a faster, smoother sanding process and extends the life of the abrasive sleeves.
The sander is equipped with a motor that provides a specific number of oscillating strokes per minute, ensuring efficient material removal. It is designed to be used with various sizes of sanding drums and corresponding abrasive sleeves, allowing for versatility in handling different workpiece sizes and curve radii. The table insert, which surrounds the sanding drum, is crucial for maintaining a minimum opening to prevent fingers from being pinched and to support the workpiece effectively.
Dust collection is an integrated feature of the sander. A dust chute is provided to which a dust bag can be attached, helping to keep the work area clean and reducing exposure to wood dust, which can be injurious to health. For optimal dust removal, the use of wood dust collection systems is recommended, especially in well-ventilated areas.
Operating the Delta BOSS sander involves several key steps and safety considerations. Before any operation, the sander must be properly assembled, including attaching the spindle adapter, sanding drum, abrasive sleeve, and table insert. The spindle adapter has a left-hand thread, requiring counterclockwise rotation for fastening. The table insert features arrows indicating its top surface, ensuring correct placement.
The sander can be used as a benchtop tool or mounted on the optional 50-780 stand. If used without the stand, it should be fastened to a firm supporting surface to prevent tipping or movement during operation. The stand itself is assembled using carriage bolts, flat washers, and nuts, with specific instructions for brace placement to ensure structural integrity.
The on/off switch is conveniently located on the sander base. To turn the sander "ON," the switch is moved to the up position, and for "OFF," it is moved down. A critical safety feature is the ability to lock the switch in the "OFF" position by removing the switch toggle. This prevents unauthorized use and accidental starting. If the toggle is removed while the sander is running, the tool can be turned off but cannot be restarted until the toggle is reinserted.
When sanding, it is crucial to feed the workpiece against the direction of the sanding drum's rotation. This ensures proper material removal and control over the workpiece. The oscillating action is particularly beneficial for sanding inside curves, providing a consistent finish. Users are advised to use clamps or a vise to secure the workpiece when practical, freeing both hands to operate the tool safely. Extra caution is necessary when sanding small pieces, and the sander should not be used for pieces too small to be held by hand.
The sander is wired for 120-volt, 60 Hz alternating current and requires a properly grounded electrical connection. The use of 3-wire extension cords with grounding-type plugs and receptacles is mandatory. Proper cord gauge selection is also important to prevent power loss and overheating.
Regular maintenance is essential for ensuring the longevity and safe operation of the Delta BOSS sander. One key maintenance task involves checking and changing the grease in the gear housing after approximately 100 hours of use. Accessing the gear housing requires disconnecting the tool from the power source, turning the machine over, loosening two screws, and removing the cover. After removing old grease, new grease should be applied, and the cover replaced.
Adjusting the spindle assembly is another maintenance feature that addresses excessive play or increased noise levels after extended use. This adjustment involves disconnecting the tool, turning it over, and carefully removing the case. The shaft must be positioned inside the center of a bracket, which is adjusted by loosening locknuts and tightening or loosening adjusting screws until the shaft is centered. After adjustment, the locknuts are tightened, and the case is reattached.
Changing abrasive sleeves and sanding drums is a routine maintenance task. This process requires disconnecting the tool from the power source, removing the table insert, and using the supplied socket wrench to remove the arbor screw (which has a left-hand thread). The old abrasive sleeve and sanding drum can then be removed from the spindle assembly, and a new sleeve can be slid onto the drum before reattaching the assembly to the spindle adapter.
Keeping the work area clean and maintaining the tool in top condition are general maintenance practices emphasized in the manual. This includes keeping tools sharp and clean, following lubrication instructions, and regularly checking for damaged parts. Any guard or part that is damaged should be properly repaired or replaced to ensure the tool operates safely and performs its intended function. The manual also provides contact information for parts, service, warranty, or other assistance, highlighting the availability of a complete line of accessories, including various sanding spindle kits and abrasive sleeves in different grits.
| Type | Oscillating Spindle Sander |
|---|---|
| Motor Power | 1/2 HP |
| Dust Collection | Yes |
| Table Tilt | 0-45 degrees |
| Motor | 120V, 60 Hz |
| Spindle Sizes Included | 1/2, 1-1/2, 2 inches |