EasyManua.ls Logo

Delta 31-255x - User Manual

Delta 31-255x
3 pages
Print Icon
To Next Page IconTo Next Page
Loading...
1
Delta 31-255x, 18-36” drum sander
1. Introduction - The Delta model 31-255x is an 18” x 36” drum sander with a two speed drive. The unit
can be fitted with an optional outboard shaft that accommodates an accessory pneumatic drum for
contour sanding. The system will provide accurate sanding for wood up to 18” wide in a single pass, or
36” wide in two passes.
2. Safety:
a) Obtain advice from the supervisor on duty if you are not familiar with the procedures used with
this equipment.
b) A dust collector must be attached to this machine.
c) This machine is designed to sand wood or wood-like products only. Sanding or grinding metal
can result in fire, injury and/or damage to the product.
d) Check the feed belt tracking periodically to prevent belt run-off.
e) Clear the sanding area and the infeed/outfeed tables of all objects prior to starting the machine.
Be sure that all tools, gauges and wrenches are removed form the work area.
f) Do not sand pieces of material that are shorter than 7” long or thinner than 1/32” thick.
g) Support all sanding work pieces with a table or additional support at table height when they
extend past the infeed/outfeed conveyor.
h) Dress properly. Do not wear loose fitting clothing, jewelry or gloves. Contain long hair. Keep
clothing away from moving parts of the machinery.
i) Prevent the workpiece from contacting the sanding belt before starting the machine.
j) Sand with the grain of the wood.
k) Disconnect the machine from the power source before installing, removing or adjusting drum
belts, conveyor belts or accessories.
l) Some wood dust is irritating and can cause respiratory problems. Wear a dust mask or filter
system if you are sensitive to wood dust.
m) Never leave the machine running unattended.
3. Operation
a) Prior to any work, inspect the drum abrasive for tears and damage. If necessary, clean with an
abrasive cleaning stick. Members abusing the machine and causing damage to the sandpaper
should pay $10 for a replacement strip (2”w x 13’-2½”).
b) Connect the dust collection system to the 4” opening in the drum cover
c) Set table height for the stock to be run as follows:
1) Using the thickness scale located next to the On-Off switch, set the table to a thickness
slightly greater than the stock to be sanded.
2) Turn on the infeed conveyor belt to a slow speed. Do not turn on the drum at this time.
3) Open the drum cover and feed the stock into the machine on the infeed conveyor.
4) Once the stock is under the drum, slowly raise the infeed table until the drum begins to
rotate.
5) Remove the stock from the outfeed table and close the drum cover.
d) Turn on the drum motor using the On-Off switch located below the switch shield on the left side
of the machine. Move the switch up to the on position, and down to the off position. Normal
operating speed for the drum is 2210 surface feet per minute. This is proper for general purpose
sanding, stock removal, surfacing and rough finishing.
Note: If fine finishing is to be done on hardwoods, the drum abrasive should be changed to 120
grit, the drum speed changed to 3300sfpm and feed depths limited to no more than 0.004” (1/16
th
of a turn of the wheel at a time). This process should be repeated for 150 and 220 grit abrasive.
Question and Answer IconNeed help?

Do you have a question about the Delta 31-255x and is the answer not in the manual?

Summary

Safety Precautions

Supervisor Consultation and Area Preparation

Obtain supervisor advice, clear the sanding area, and remove all tools and gauges.

Machine and Material Safety

Use a dust collector, sand wood only, and do not use short or thin pieces.

Personal Safety and Operation Rules

Dress properly, avoid contact before starting, sand with grain, disconnect power, and never leave unattended.

Operation of the Drum Sander

Pre-Operation Setup and Initial Feed

Inspect drum abrasive, connect dust collection, set table height, and start infeed conveyor.

Sanding Process and Speed Adjustments

Feed stock, raise table to rotate drum, remove stock, and adjust drum speed for finish.

Fine Finishing Grit and Speed Changes

Use 120 grit abrasive, 3300sfpm speed, and limited feed depth for fine finishing hardwoods.

Infeed Belt and Stock Handling

Turn on infeed belt, place stock, listen to drum motor, adjust speed, and increase as work progresses.

Belt Tracking and Width Considerations

Observe infeed belt tracking, suspend if off, and run narrow stock at an angle for even wear.

Machine Cleaning and Maintenance

Periodically clean the drum belt and clean the machine at the end of the work session.

Changing Drum Abrasive Belt

Abrasive Belt Selection

Choose from 36g, 80grit, 120 grit, 180 grit, or 220 grit based on sanding needs.

Procedure for Replacing Abrasive

Disconnect power, open cover, release clips, remove old strip, cut and install new strip with tapered ends.

Post-Installation Abrasive Check

After running one workpiece, re-tension the drum abrasive belt.

Overview

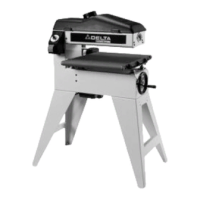
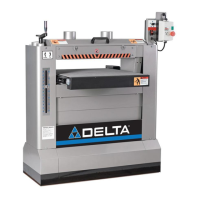
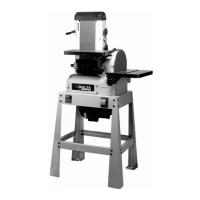
The Delta 31-255x is an 18" x 36" drum sander designed for precise sanding of wood and wood-like products. It features a two-speed drive system and can accommodate an optional outboard shaft for an accessory pneumatic drum, enabling contour sanding. This system allows for accurate sanding of material up to 18" wide in a single pass, or 36" wide in two passes.

Safety Guidelines:

Before operating, users unfamiliar with the equipment should seek advice from the supervisor. A dust collector must be attached to the machine during operation. The sander is exclusively for wood or wood-like products; sanding metal can cause fire, injury, or product damage. The feed belt tracking should be periodically checked to prevent run-off. Before starting, ensure the sanding area and infeed/outfeed tables are clear of all objects, tools, gauges, and wrenches. Do not sand material shorter than 7" long or thinner than 1/32" thick. All sanding workpieces extending past the infeed/outfeed conveyor must be supported at table height. Operators should dress appropriately, avoiding loose clothing, jewelry, or gloves, and containing long hair to prevent entanglement with moving parts. The workpiece must not contact the sanding belt before starting the machine. Always sand with the grain of the wood. Disconnect the machine from the power source before installing, removing, or adjusting drum belts, conveyor belts, or accessories. Wood dust can be irritating and cause respiratory problems, so a dust mask or filter system should be worn if sensitive to wood dust. Never leave the machine running unattended.

Operation Procedures:

Before any work, inspect the drum abrasive for tears and damage, cleaning it with an abrasive cleaning stick if necessary. Users causing damage to the sandpaper may be charged $10 for a replacement strip (2"w x 13'-2½"). Connect the dust collection system to the 4" opening in the drum cover.

To set the table height:

  1. Use the thickness scale next to the On-Off switch to set the table slightly greater than the stock thickness.
  2. Turn on the infeed conveyor belt to a slow speed (drum off).
  3. Open the drum cover and feed the stock into the machine on the infeed conveyor.
  4. Once the stock is under the drum, slowly raise the infeed table until the drum begins to rotate.
  5. Remove the stock from the outfeed table and close the drum cover.

Turn on the drum motor using the On-Off switch (up for on, down for off) located below the switch shield on the left side of the machine. The normal operating speed for the drum is 2210 surface feet per minute, suitable for general purpose sanding, stock removal, surfacing, and rough finishing.

For fine finishing on hardwoods, change the drum abrasive to 120 grit, increase the drum speed to 3300 sfpm, and limit feed depths to no more than 0.004" (1/16th of a turn of the wheel at a time). This process should be repeated for 150 and 220 grit abrasive.

Turn on the infeed belt conveyor by rotating the "Table Feed Knob" clockwise ¼ turn. Place stock onto the infeed table and guide it under the pressure rollers. Carefully listen to the drum motor sound; reduce the infeed conveyor speed by rotating the dial counter-clockwise 1/8th turn at the first indication of the drum slowing. As work progresses, the infeed conveyor speed can be increased slightly if there's no strain, but each thickness adjustment requires repeating the previous step.

Observe the infeed belt position on the slider bed after each pass to ensure straight tracking. If it moves left or right, suspend operations and consult the Supervisor on Duty, as failure to correct tracking will damage the conveyor belt (Cost: $40.00). For stock 9" or less in width, run it at an angle through the machine to ensure even wear across the drum belt. Periodically clean the drum belt with an abrasive cleaning stick. At the end of each session, clean the drum abrasive, conveyor belt, and blow dust from the two motors and drives.

Maintenance Features (For Supervisors Only):

Changing the Drum Abrasive:

Standard abrasive is 80g or 120g Alumina-Zirconia belting (blue), which reduces burning, especially on Maple, Cherry, or Mahogany, due to its self-cleaning, cooler running, and pitch tolerance.

To replace a damaged drum belt or change to a finer grit (review section 3.d.1 before changing grit):

  1. Disconnect power and dust collection.
  2. Open the drum cover.
  3. Press the spring-loaded abrasive clip at each end of the drum.
  4. Withdraw the sandpaper belt from the clip and carefully unwind it from the drum.
  5. Release the clip at the other end and store the abrasive strip if undamaged.
  6. Cut a new strip of the desired grit, 13'-2 ½" long. Cut a taper on each end extending 15-¾" from the end, using the previous strip as a pattern to ensure correct taper direction. If tapers are backward, the strip is useless. (When looking at the strip from the end, the right edge should be straight as cut at the factory, and the taper should go from the bottom right corner, up and to the left a distance of 15-¾". It will be necessary to clip off 1"-2" (trial & error) of the pointed tip on each end of the strip so that it will engage the drum clip properly.)
  7. Install the new strip: Insert the point into one drum clip with the tapered edge along the drum end. Rotate the drum to wrap the strip tightly and closely, without overlapping. Insert the other end into the opposite drum clip. Double-check that the sandpaper doesn't overlap anywhere in the spiral seam.
  8. After running one workpiece, re-tension the drum abrasive.

Abrasive Selection:

  • 36g: Aggressive stock removal, glue removal, rough sanding.
  • 80 grit: General purpose sanding and stock removal.
  • 120 grit: Minimum stock removal finishing, leaves a fine marked surface.
  • 180 grit: Fine finishing, leaves a smooth finish.
  • 220 grit: Very fine finish. Sanding should progress through all grits without skipping any.

Replacing the Infeed Belt:

This process requires removing the infeed/outfeed table and realigning the drum. Follow instructions in the manual or request assistance from the supervisor.

Delta 31-255x Specifications

General IconGeneral
BrandDelta
Model31-255x
CategorySander
LanguageEnglish

Related product manuals