DFU Thermaprep Plus Oven – F1902115.X /04/2010 updated 10-2011 3 / 24
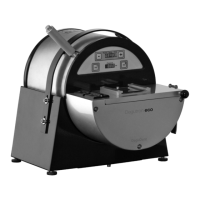
4. After disinfecting the obturator and setting the rubber stop, place the Obturator in one of the
obturator holders, lightly press on top to have it firmly seated. Regardless of what working length
you have determined, the rubber stop must be under the holder. Make sure the obturator is hanging
straight, not at an angle. The obturator must clear all sides of the heating chamber.
5. Push the button which corresponds to the selected obturator holder, to select the size of the
Obturator you wish to heat. Repeatedly push this button to select the correct size.
6. To start the heating process push the obturator holder down until you hear it click. It will raise a little
but keep in a steady down position. The indicator light around the button will show that the heater is
on (constantly on). The obturator is now being heated. Heating time varies – depending on obturator
size –from 20 to 49 seconds, and is regulated automatically.
The heating times for the selected obturator sizes are as follows:
30 - 60 44 seconds ± 7 seconds
7. After the first signal “beep,” the obturator is ready for use. Push the back of the obturator holder
(marked area) to let it raise slowly. The indicator light around the button will go off. Take the
obturator carefully out of the holder by pulling it towards you, making sure not to scrape the obturator
on any part of the holder.
8. You may leave the obturator in the Thermaprep
®
2 Obturator Oven for up to 90 seconds after the
first signal “beep.” It will keep the obturator at the appropriate temperature and ready for use. The
oven will “beep” every 15 seconds to remind you that the obturator is still in the oven. After 90
seconds, the heating element will switch off automatically.
9. If you want to heat more obturators, you may use one holder or both to continue your work
efficiently. Each holder is operated by its own button and indicators. If you hear a signal “beep” then
look at indicator lights around the buttons which indicate obturator heater is ready (flashing). When
both heaters have finished their cycle and no buttons are pushed, the oven will go into a power-
saving, stand-by mode after 5 minutes.
10. See below table for oven specifications:
The equipment is designed to be safe for indoor use under following environmental conditions:
Max. altitude 2 000 m
Storage temperature -20 to 65° C
-4 to +149° F
Storage humidity 20 to 80%
no condensation
Operating temperature +5 to +40°C
+41 to +104° F
Max. operating humidity 80% at +31° C to 50% at 40° C (lin.)
80% at +87° F to 50% at 122° F (lin.)
Mains voltage fluctuations Up to ±10% of the nominal voltage
Transient overvoltages Category II
Rated pollution degree 2
Mass of the equipment 0.56 kg
Overall size of the equipment (W x D x H) 155 x 178 x 81 mm
If there is any doubt about the compatibility of decontamination or cleaning agents, please contact the
cleaning agent’s manufacturer or DENTSPLY Tulsa Dental Specialties