2. Ensure that both system modules are mounted at
approximately the same height above grade level,
and that each module is roughly aligned to directly
face the other module’s lens surface.
3. Ensure that the four nuts on each module’s mounting
U-bolts are sufficiently tightened to properly support
the module, yet allow horizontal (left/right) adjust-
ment of the plate/module by hand without binding.
4. Ensure that the mounting bracket nuts are sufficient-
ly tightened to properly support the module’s
up/down angle without deflection, yet allow the mod-
ule to be vertically adjusted by hand without binding.
It is recommended to tighten the lower bracket nut
slightly more than the upper bracket nut.
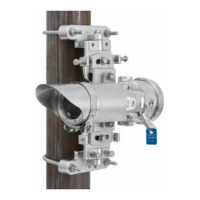
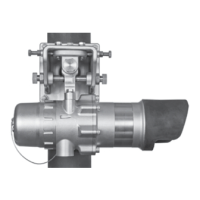
5. Attach the laser aimer holder to the front face of the
Transmitter by threading the holder’s two captive
screws into the respective threaded holes on the
Transmitter faceplate. Insert the battery-powered
laser into the holder. Do not turn on the laser yet.
6. Attach the alignment target holder to the front face of
the Receiver. Insert the alignment target into the
holder.
7. Turn on the laser aimer and slowly move the trans-
mitter module left or right as required until the laser
spot hits the the alignment target as close as possi-
ble to dead center. Tighten the U-bolt nuts so that
no left/right movement will occur.
8. Slowly move the transmitter module up or down as
required until the laser spot hits the alignment target
as close as possible to dead center. Tighten the
module mounting bracket nuts so that no up/down
movement will occur. As this point, the laser spot
should be aimed dead center on the alignment tar-
get. Turn the laser off.
9. Exchange the laser and aiming target locations by
removing the laser from the laser holder and insert-
ing it into the Receiver’s target holder. Relocate the
alignment target into the Transmitter’s holder.
10. Repeat steps 7 and 8 with the laser installed on the
Receiver module.
11. Remove the laser, laser holder, target, and target
holder from both modules.
12. Bypass all external gas alarm devices that are con-
nected to the receiver outputs, and apply 24 Vdc
power to the modules.
13. Upon completion of warm-up mode (approximately 2
minutes), the receiver should display a green LED,
indicating that the system is in normal operating
mode. If the green LED is not displayed, confirm
that the transmitter is generating a visible light flash,
that the receiver is powered up, that the modules are
within the specified mounting distance, and then
repeat steps 1 to 10 above.
NOTE
If monitoring the 4-20 mA signal output, do not be
alarmed if the signal is greater than 4.0 mA. This
is common and will be corrected by performing a
zero calibration.
14. Perform a zero calibration using the calibration mag-
net. Any faults or alarms that may be present as a
result of the alignment process will be cleared.
15. When the zero calibration is successfully completed,
Basic Alignment is completed.
NOTE
If Full Alignment will be performed, stop here and
go directly to Step 1 in the “Full Alignment
Procedure”.
16. Confirm proper operation by blocking the light beam
with a solid object such as cardboard until a beam
block fault is generated (default setting is 60 sec-
onds).
17. Confirm proper operation by installing the optical
test film into the light beam and checking for a low
gas alarm condition. The alarm condition should
clear when the film is removed from the beam.
15 95-85561.1