10. Assemble
guide
fence and spacer
boards,
thread thumb screw
into
bracket. lnsert bracket into the slot
provided
in
rear
of
cleats. Hold the
eyelet in
place
and turn the
thumb
screw
until it
"pops"
into
place.
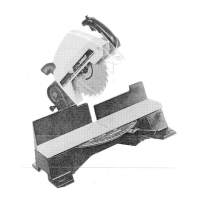
11. Place saw blade
(with
direction
ar'
row as shown)
between collars
(re-
cessed side against
blade).
Tighten
arbor
nut securely
with both
wrenches
(left-hand
threads).
"*l
l2.Assemble
anti-kickback,
locking
knob, dust
spout
and lower
guard
except
front
inner retainer
and
inner ring
per
the Parts
List dia'
gram.
.'$S
13.
place
guard
over blade
tilting
guard
slightly
to clear
the arbor
shaft.
Seat
g.uard
on.motor so
--'
[tri[ it-eEird rides in the ciririlar
slot
in
th6
motor and
the
motor stud
goes
through
the
hole.ln
iffi;;r!:Gi,lJiiit'-itie
*inenui.
Prace
the
inner
ring under
the moior and
hook it over
the
;;;i;;6;;;;J
itrE tioni
uoi!.
tnstait
the
front
insiide
retainer
with
the
thumbscrew
and
iiliit,i,iiecuiety.
lloti
inj[ltriiitep
must be
repeated
in reverse.orde.l,tog?!n.?9ces_s-
t9.!!9
blade
lor
removing
it. Place
the key
in
the
endcap.
but d.o
not
press
the
ON
button.
Your
machlne
t
l-.-#en
p-Jiiiittiioirsiteo
ino
itigneo
at
the f aitorv;
bef
ord
operating
the saw
perlorm
the ad-
iustmenti
and alignments
marked
with an asterisk
(
*
).
CAUTION
1.
ACCESSORIES
Recommended
Blades
and
Accessories
lor
your
Radial
Arm
Saw are
stocked by
your
B&D Dealer. These accessories
are
listed
and described
in the B&D DeWalt
Catalog
and on
pages
19
and
20.
CAUTION-The
use
ol
any
other accessory
might be
hazardous.
Securell' laslen
rhe
rable
irame
:o ihe Leg
Stand
or
a sturdy
work
bench using
the
holes
provided.
Use
sturdy
outrigger
supports
if
any
table
er:ensions are a::ached:o::e
sa\r'.
Shin uncier i:on:
legs
:o
keep sa* carriage
from creeping
forward.
Read. unCe:s:a;:d
anci al-* avs
practice
the
cautions
and
operating instructions contained
within
this manual.
ELECTRICAL
CONNECTIONS
AND GROUNDING
This tool should
be
grounded
s
hile in use
to
protect
the
operator
from electric
shock.
\\'e
recommend
that
you
\E\ ER
dissemble
the
tool or
try
to do anp.
re*iring
in
the
electrical
s!'stem.
Any such
repairs should
be
performed
onll
bf B&D Service
Centers
or other
qualified
serrice
organizations. Should
you
be
determined
to make a
repair
l
ounelf
.
remember
that the
green
colored
wire is the
"grounding"
*ire.
Never
connect
this
green
wire to a
"live"
terminal.
l. Cord-Connected
Tools: In
the
erent
of a
malfunction
or breakdown,
grounding
proi'ides
a
path
of
least
resistance for electric current
to reduce
the risk
of electric
shock.
This tool is equipped
*ith
an electric cord
having an
equipment-grounding
conduclor
and a
grounding
plug.
The
plug
must be
plug-eed
into a
matching outlet
that
is
properly
installed and
grounded
in
accordance
with all
local codes and ordinances.
Do not
modify
the
plug
pro-
vided
-
if it
will not
iii
ihe ou:let.
have the
proper
outlet
installed by a
qualified
eie;::i;ian.
Improper
connection
of
the equipment-grouniing
coilciuctortan
result in a
risk of
electric shock.
The con,ju;:or
*ith insulation
having an
outer surface thai is
*sreen
*iih
or
without
yellou
stripes
is
the equipment-grounding
conductor.
If
repair or
repiace-
ment
of the eieclric cord
or
plug
is
necessar)'. do
not con-
necl
Ihe equipmeni-,erounding
conductor
Io a
iive
ter-
1
1
minal.
Check
with
a
qualified
electrician
or serviceman
if
the
grounding
instructions
are
not completely
understo-od,
or
if in doubt
as to
whether
the
tool
is
properly
grounded.
Use
only 3-wire
extension
cords
that
have
3-prong
ground-
ing
plugs
and 3-pole
receptacles
that accept
the
tool's
plug.
Repair or
replace damaged
or
worn cord
immediately.
lA.
Grounded,
cord-connected
tools
intended
for use
on
a
supply
circuit
having
a
nominal
rating
less
than 150
volts.
This lool
is intended
for use
on a circuit
that
has an
outlet
that
looks like
the one
illustrated
in Sketch
A'
The tool
has
a
grounding
plug
that
looks
like
the
plug
illustrated
in
Skitch
A. A
temporary
adapter,
which
looks
like the
adapter
illustrated
in Sketches
B and
C,
may be used
to
connect
this
plug
to a 2-po1e
receptacle
as shown
in Sketch
B if a
properly
grounded
outlet
is
not
available.
The
temp-
orary adapter
should
be used
only
until
a
properly
ground-
ed outlet
can
be
installed
by a
qualified
electrician.
The
green-colored rigid ear,
lug, etc.
extending
from
.
the
adapter
must be connected
to a
permanent
ground
such as
a
properly
grounded
outlet
box.
Adapter
shown
in Sket-
cnes
Ii ani
6
is Not for
Use
in Canada.
1B. Grounded,
cord-connected
tools
intended
for use
on
a supply circuit
having a
nominal
rating
between
150-250
volts, inclusive:
This
tool
is
intended
for use
on a circuit
that
has an outlet
that
looks
like the one
illustrated
in
Sketch
D.
The
tool
has a
grounding
plug
that
looks
like the
plug
illustrated
in Sketch
D. Make
sure
the tool
is con-
(Con't
on
P.
4)