The provided document is an installation and operation manual for the Dometic Awnings Slide Topper. This device is designed for use on recreational vehicles (RVs) to cover and protect slide-out rooms.
Function Description:
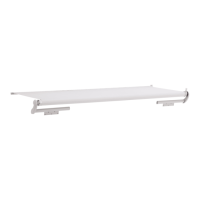
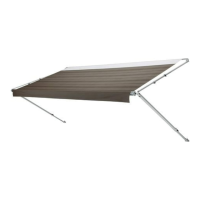
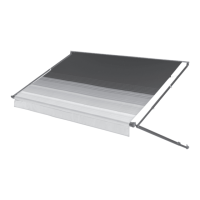
The Dometic Slide Topper is an awning system that automatically extends and retracts as the RV's slide-out room opens and closes. Its primary function is to provide protection for the slide-out room from various environmental elements such as leaves, sticks, debris, rain, and snow. By covering the slide-out room, it helps prevent water intrusion, reduces the accumulation of dirt and organic debris, and minimizes the risk of damage to the slide-out room's seals and surfaces. The system includes a fabric roller tube assembly (FRTA), mounting brackets, and extension arms that facilitate its automatic operation. The design aims to maintain a clean slide-out room, which in turn helps prevent mildew, discoloration, and stains that can occur from prolonged exposure to moisture and dirt.
Important Technical Specifications:
The manual details various hardware and component specifications, which are crucial for proper installation and function.
- Hardware:
- Left Hand Topper Arm with 15 in. (38 cm) or 18 in. (46 cm) Extension (Bar): Quantity 1
- Right Hand Topper Arm with 15 in. (38 cm) or 18 in. (46 cm) Extension (Bar): Quantity 1
- Cotter R-Pin: Quantity 2
- #10-12 x 1 in. Screw: Quantity 12
- #8-18 x 3/8 in. Screw: Quantity 6
- #6 - 20 x 7/16 in. Self-Drilling Screw: Quantity 2
- Included Anti-Billow Bracket Kit:
- Anti-Billow Stop: Quantity 1
- #10-16 x 3/4 in. Screw: Quantity 2
- Anti-Billow Bracket: Quantity 1
- Anti-Billow Spacer: Quantity 1
- #10-12 x 3/4 in. Screw: Quantity 3
- 3/16 in. X 3/8 in. Oscar Rivet: Quantity 2
- Required Topper Bracket Sets (not included, chosen based on application):
- Topper Short (Wall) Bracket with Hardware (98000(LL).401(#)): Quantity 2
- Topper Tall (Wall) Bracket with Hardware (98000(LL).402(#)): Quantity 2
- Optional Kits:
- Mounting Bracket Spacer Kit 0.75 in. (19 mm) thick (3107940.003): Quantity 1
- Mounting Bracket Spacer Kit 0.50 in. (13 mm) thick (3310066.000#): Quantity 1
- Anti-Billow Stop Kit (3109252.XXX#): Quantity 1
- Anti-Billow Bracket Kit (3107198.XXX#): Quantity 1
- Cradle Kit (3309526.XXX#): Quantity 1 (recommended for Slide Toppers 260 in. or wider, and required for 198 in. to 259 in. toppers along with a second anti-billow stop/bracket kit)
- Optional Components:
- Awning Rail (3106774.XXX-#): Quantity 1
- Awning Rail 20 ft. (6.1 m) (20 pack) (3106774.262-#): Quantity 1
- Oscar Rivet (10 pack) (113008P10): Quantity 1
- Oscar Rivet (100 pack) (113008P100): Quantity 1
- Clearances:
- Minimum clearance between fully opened Slide Topper and any permanent object: 16 in. (407 mm).
- Minimum clearance between Slide Topper rotating assembly, RV slide-out room obstructions, and stationary wall: 0.5 in. (1.3 cm).
- Minimum distance between awning rail and mounting bracket: 0.25 in. (0.6 cm).
- Maximum distance between awning rail and mounting bracket: 4 in. (10 cm).
- Slide-Out Room Extension: The full extension of the slide-out room must not exceed 42 in. (106.7 cm).
- Slide Topper Widths: Toppers from 198 in. (503.0 cm) to 259 in. (657.9 cm) require additional anti-billow stop/bracket kits and a cradle kit. Toppers 260 in. (660.4 cm) or wider are recommended to install a second cradle kit.
- Drill Bit Sizes: 3/16 in. (4.7 mm) for general drilling, 7/32 in. (5.6 mm) for steel, 7/16 in. (11 mm) for other applications.
Usage Features:
- Automatic Operation: The Slide Topper is designed to open and close automatically in sync with the RV's slide-out room, eliminating the need for manual deployment or retraction.
- Protection from Elements: It shields the slide-out room from debris, rain, and snow, which helps maintain the integrity of the slide-out seals and prevents damage to the room's surfaces.
- Reduced Maintenance for Slide-Out Room: By keeping the slide-out room clean, it reduces the frequency of cleaning required for the room itself and helps prevent issues like mildew and stains.
- Anti-Billow Stop: The system includes anti-billow stops and brackets to prevent the awning fabric from billowing or tearing due to wind, ensuring stability and longevity of the fabric.
- Adjustable Arm Extensions: If the awning fabric becomes misaligned, the arm extensions can be adjusted by loosening clamping screws, moving the extension, and then retightening the screws.
- Compatibility: The system is designed for recreational vehicles (RVs) and requires careful selection of mounting brackets and spacers based on the RV's slide-out room configuration and clearances.
- Safety Features: The manual emphasizes several safety warnings, including pinch hazards during operation and installation, and fire/electrical shock hazards during drilling. It also warns against operating the topper with people or objects in its path.
Maintenance Features:
- Regular Inspections: Users are advised to frequently examine the product for imbalance, sagging, loose parts, signs of wear or damage to wiring (if applicable), and other critical parts such as awning fabric, brackets, and arm assemblies. Any necessary adjustments or repairs should be addressed immediately.
- Cleaning Hardware: The Slide Topper hardware should be cleaned as needed with a mild surface cleaner.
- Lubrication: Silicone spray lubricant should be applied as needed to keep the Fabric Roller Tube Assembly (FRTA) moving parts operating smoothly.
- Fabric Cleaning:
- A specific cleaning solution (one-quarter cup dish soap, one-quarter cup bleach, five gallons fresh water) is recommended.
- The fabric should be drenched with the solution, allowed to soak for five minutes (with the awning closed), then opened and thoroughly rinsed with clean water to remove all cleaning solution.
- The fabric must be allowed to thoroughly dry before stowing to prevent mildew, discoloration, and stains.
- Fabric Repair: For pinholes or flaked-off coating spots on vinyl fabric, a small dab of VLP (vinyl liquid patch, Dometic part number 3314216.000) can be applied with a cotton swab to melt the coating and fill the pinhole.
- Preventative Measures:
- Avoid using insecticides or other sprays near the fabric as they can cause stains and affect water repellency.
- Do not expose the Slide Topper to adverse environmental conditions or corrosive agents.
- Never close the Slide Topper when it is wet for storage, as this can lead to mildew, discoloration, and stains. If rolled up wet, it should be unrolled and allowed to dry as soon as conditions permit.
- Do not use strong chemicals, abrasives, or hard bristle brushes on any parts.
- Do not use silicone sprays near labels as it can weaken adhesive bonds.
- Prevent dirt, leaves, or other debris from accumulating on the topper, as this can cause abrasions, stains, and mildew.
- Wrinkling: Vinyl fabric may wrinkle, especially when retracted or after prolonged storage. Leaving the Slide Topper open during warm weather can help minimize wrinkling over time.