18
.A.9<4 %<3A .?1 .:6;.A2@ %A229 9B:6;B: ?FD.99 2?.:60
!B:/2? )<<1 )<<1 #9.@A60 2A0
TR615 20 18-20 -----
TR618 20 18-20 -----
TR654 20 18-20 -----
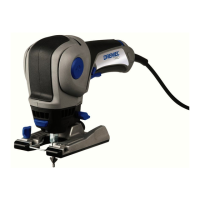
$<BA6;4
* Speed for light cuts; Caution - burning on deep grooves.
• Depending on cutting direction relative to grain.
!<A2.05;B:/2?@2AA6;4@96@A216;A52@=22105.?A@$# K@
%=221%2AA6;4@
2@A#?.0A602@&6=@
• For maximum control use a slow feed rate
of cut.
• For maximum control place a second hand
on the front of the tool or on the rear of the
foot.
• For straightest possible cut use straight
edge guide or fence.
• When using a fence, position it on the left
side of the foot.
• Securely fix your workpieces with clamps.
• When using a straight edge guide, position
it on the right side of tool.
• When cutting most materials steer the tool
in a clock-wise direction. Exception: when
tracing an outlet steer counter clock-wise.
• When plunge cutting into ceramic wall tile
start at a 45° angle.
• When using sanding drums and router bits
it is recommended to make less aggressive
more frequent passes through the material
to extend the tool and accessory life.
• Accessories rotate in a clockwise direction
which causes the tool to wander ot the left.
.A.9<4 %<3A .?1 .:6;.A2@ %A229 9B:6;B: ?FD.99 2?.:60
!B:/2? )<<1 )<<1 #9.@A60 2A0
TR407 20 20 10-15 10-12 12-17 --
TR408 20 20 10-15 10-12 12-17 --
TR432 20 20 10-15 10-12 12-17 --
TR445 20 20 10-15 10-12 12-17 --
%.;16;4
!<A2Start at highest speed then adjust speed down as requires.
.A.9<4 %<3A .?1 .:6;.A2@ %A229 9B:6;B: ?FD.99 2?.:60-
!B:/2? )<<1 )<<1 #9.@A60 2A0 #9.@A2?
TR561 15-20 15-20 10-20 15-20 15-20 --
TR562 -- - - -15-20 15-20
TR563 15-20 15-20 10-20 15-20 15-20 --
BAA6;4
DM 2610010088 02-10:DM 2610010088 02-10 2/26/10 1:02 PM Page 18