Technical data
Auxiliary supply:
DC 24V ± 25% (integral polarity reversal protection)
AC 24V ± 20%
Current input: Typically 25 mA (without alarm load)
Mains frequency (for load): 50/60 Hz
Current ranges: prescalation with DIP switch
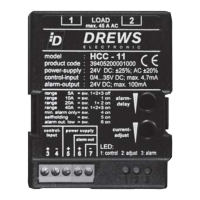
1.25A to 5A; 2.5A to 10A; 5A to 20A; 10A to 40A
isolated from auxiliary supply
Monitoring setpoint set by trimmer
Monitoring window
± 15% referred to set current value
Adjustment window
± 2% referred to set current value
Alarm response delay 2 to 40 secs (set by trimmer)
Function range: Current monitoring 4 to 100% duty cycle
Heating circuit monitoring 5 to 95% duty cycle
Cycle time:
≥ 1 sec
Bistable control input: isolated from auxiliary supply
integral polarity reversal protection
Power-up level: DC 4 to 35V max. 4.7 mA
Power-off level: ≤ DC 1V
Alarm output Auxiliary supply typically DC 20V
max. 100mA, sustained short circuit proof transistor output,
if alarm = HIGH (Sw6 = OFF) outputs can be connected
in parallel
Indicator element LED 1 - green:
lights in time with control signal
auxiliary supply must be present
Indicator element LED 2 - yellow:
for current setpoint check, comes on
within range of ± 2% referred to nominal current
Indicator element LED 3 - red:
comes on after delay when current deviates from nominal value
by more than ± 15%
comes on straight away in the event of heating circuit
interruption and SSR malfunctions.
Storage temperature: -20 to +80 °C
Operating temperature: 0 to 60 °C
Degree of protection: DIN 40050 - IP20
Application class:
DIN 40040 - KUF, ≤ 75% rel. humidity, no condensation
Noise immunitiy: CE-marked
Electrical terminals: Screw terminals 2.5mm² fine wire
Housing: Noryl black, fire resistance class UL 94 V-0
Dimensions: 67mm x 85mm x 35mm
Weight: 120g
Mounting: Threaded connection on solid state relay (SSR)
(DIN-rail EN 500222 mounting kit available)
HCC11 with DIN-rail mounting: (with assembly set art. no.: 39405200008000)
To put on the mounting-clips, carefully lever the PCB at the four notches out of the bottom of the
housing, using a small screwdriver. Then the mounting clips can be fixed by the screws through the
provided holes. After that, engage the PCB in the bottom again.
A wire of the load-circuit (Ø 6mm max.) is to be led through the borehole of the current-transformer.
Connect the control input of the SSR in parallel to the terminals 3 + 4.
Subject to modification Order-Nr: 1491.0142 DZ10/97
 Loading...