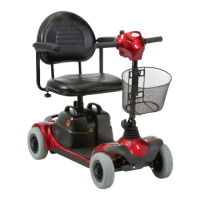
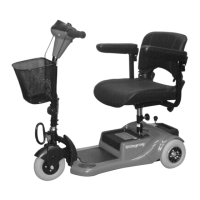
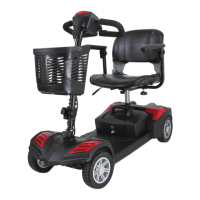
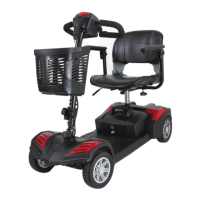
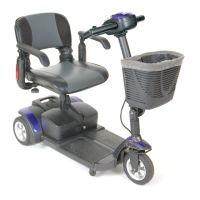
The Drive Medical ST3 Mobility Scooter is a personal transportation device designed for both indoor and outdoor use, offering users increased mobility and independence. It is engineered for single-person operation and prioritizes safety and comfort.
Function Description
The ST3 Mobility Scooter provides a means of transport for individuals, allowing them to navigate various environments with ease. Its primary function is to offer a reliable and comfortable ride, enhancing the user's ability to travel short to medium distances. The scooter is equipped with an automatic braking system that engages when the thumb lever is released, ensuring immediate stopping and enhanced safety. It also features a free-wheel mode, allowing the scooter to be pushed manually if needed, though an automatic speed reducer engages in this mode if pushed too quickly, as a safety measure.
Usage Features
The ST3 scooter is designed with several user-friendly features to ensure a comfortable and intuitive operating experience:
- Control Panel: The top control panel includes a Speed Dial Knob, a Self-Diagnostic Warning Light, and a Battery Gauge. The Speed Dial Knob allows the user to control the overall speed, with a "turtle" image indicating slow speed and a "rabbit" image indicating high speed. The Battery Gauge provides an approximation of battery strength, with green lights indicating a fully charged battery and no green lights signaling an immediate need for charging. The Self-Diagnostic Warning Light flashes to indicate a problem within the scooter, with specific flash codes corresponding to different issues detailed in the troubleshooting section.
- Thumb Lever: Located adjacent to the control panel, the thumb lever acts as both the accelerator and directional control. Pushing the right thumb lever forward moves the scooter forward, while pushing the left thumb lever forward moves it backward. The further the lever is depressed, the faster the scooter will go, subject to the setting of the speed dial knob. Releasing the thumb lever automatically engages the brakes. This configuration can be reversed by an authorized dealer if required.
- Tiller Angle Adjustment: A Hand Wheel Tiller Angle Adjustment at the base of the tiller allows users to adjust the tiller to their most comfortable angle, enhancing ergonomic comfort during operation.
- Seating Adjustments: The scooter features a Padded Foldable Swivel Seat with multiple adjustment options. The seat height can be adjusted using three holes on the seat post, ensuring the detent pin is fully inserted and the bolt tightened for security. A Seat Rotation Lever allows the seat to rotate, which is useful for getting on and off the scooter, though caution is advised when the seat is swiveled as stability may be compromised. Armrest Width Adjustment Thumbscrews enable users to loosen and adjust the armrest width for personalized comfort, then tighten them to lock in the desired position.
- Anti-Tip Wheels: For added safety, the ST3 is equipped with anti-tip wheels at the rear to prevent the scooter from tipping over, especially on inclines or uneven terrain.
- Free-Wheel Lever: This lever allows the user to disengage the drive and brake system, enabling the scooter to be pushed manually. Pushing the lever upward to the "N" position puts it in free-wheel mode, while pulling it backward to "D" engages the brake system.
- Disassembly for Transport and Storage: The scooter can be easily disassembled without tools into five main parts: front section, rear section, seat, basket, and battery pack. This feature makes it convenient for storage or transport in a vehicle. The process involves removing the seat, detaching the battery pack (which is heavy and requires proper lifting posture or assistance), separating the front and rear sections, and removing the front basket. Reassembly is the reverse of these steps.
- Operating Guidelines: Users are advised to practice driving in an open area, starting at the slowest speed (turtle setting) to familiarize themselves with turning, starting, and stopping. It is recommended to release the thumb levers and allow the scooter to stop completely before changing direction (forward to reverse or vice versa). When negotiating corners, turning slightly wider than necessary is advised, as the rear wheels take a sharper route. Slow speeds are crucial when ascending, descending, or traversing slopes, as well as on uneven terrain, ramps, and soft or loose surfaces like gravel or grass. The scooter should not be driven on slopes exceeding 8 degrees, and extreme care should be taken when turning on slopes. Full power should not be used when turning sharp corners. When backing up, riding downhill, or on uneven surfaces, or climbing curbs, low speed is essential. For descending roads or uneven terrain, if the speed becomes too fast, releasing the handle bar to stop the scooter and restarting at a safer speed is recommended. Kerb climbing should be approached slowly and at right angles, not exceeding 1.2 inches for the ST3. If the scooter stops or fails when attempting to climb a kerb or slope, the power should be turned off and then on again to reset the system, and the scooter should be reversed down the obstacle at minimum speed.
Maintenance Features
Proper maintenance ensures the longevity and optimal performance of the ST3 Mobility Scooter:
- Battery Charging: The scooter is equipped with two sealed, maintenance-free 12V 18Ah rechargeable batteries and a 24V/2A charger. Batteries must be charged before first use and recharged after each day's use. The power switch must be in the OFF position, and the free-wheeling lever must not be in free-wheel mode during charging. The charging process involves inserting the charger cord into the Charging Socket on the battery pack and plugging the other end into a standard electrical wall outlet. The charging indicator will typically be red or yellow and will turn green when fully charged. If the light flashes green for over 40 minutes, it indicates an abnormal charging condition, and the user should check the charger plug, ensure the scooter is off, or contact a dealer if the problem persists. Batteries cannot be overcharged, so charging for longer than necessary will not harm them. It is recommended to fully charge batteries at least once a month, or more frequently with regular use, especially after trips exceeding 3 kilometers / 1.86 miles. If storing the scooter for a month or more, ensure batteries are fully charged and recharged again before use. Batteries achieve maximum performance after being used and recharged up to 10 times.
- Cleaning: For the body cover, a damp or lightly soapy cloth should be used for cleaning. Running water should not be used to wash or rinse the scooter to protect electrical parts. An automotive liquid polish can be used for polishing. For the seat and armrests, a damp cloth is suitable for cleaning upholstery. Users should be aware that outdoor use can degrade upholstery material due to sun exposure, and normal wear and tear is not covered under warranty.
- Professional Servicing: An authorized dealer should handle all maintenance and repair related to electronics, batteries, motor, and tires. It is recommended to have the scooter inspected and serviced at least once a year.
- Storage: Between uses, the scooter is best stored in a dry area at room temperature. It should not be left exposed to rain or snow without additional protection, nor in a damp area for extended periods, as this can cause electrical and mechanical malfunctions and premature rusting.
- Troubleshooting: The Self-Diagnostic Warning Light provides codes (flashes) to help identify common issues such as low battery, high battery fault, current limit time-out, park brake fault, thumb lever out of neutral, speed VR fault, motor voltage fault, other internal errors, and push/rollaway fault. The manual provides a table detailing these flash codes and their meanings, guiding users on initial steps to address problems. For issues like the scooter not moving when the key is on, users should check the battery gauge, warning light, electrical connections, and shipping stickers on the battery pack, contacting an authorized dealer if the problem persists.