A
B
C
D
E
F
G
H
L
M
N
P
Motore
Engine
sezione / section
N 9.2
155Monster 400 - 620 Aggiornamento/Update - M.Y. 2006 - edizione/edition 00
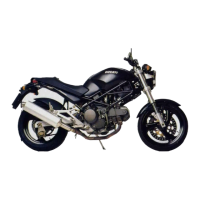
Installare due viti M8 (29), sul
semicarter lato frizione (34).
Serrare tutte le viti, partendo da
quelle di diametro maggiore, alla
coppia di serraggio prescritta.
Controllare che l'albero motore ruoti
con una certa interferenza sui
cuscinetti di banco (l'albero motore
deve avere un precarico di 0,15 ÷ 0,20
mm) e che tutti gli organi montati
ruotino o si spostino correttamente.
Installare il coperchietto di accesso al
filtro a rete con guarnizione come
descritto alla Sez. D 4.
Installare il tappo di scarico (24) con
guarnizione (23) e bloccarlo alla
coppia prescritta (Sez. C 3).
Installare il filtro a cartuccia come
descritti alla Sez. D 4.
Procedere al montaggio dell’anello di
tenuta (11) e del distanziale con
guarnizione O-Ring sull’albero
secondario cambio come descritto
alla Sez. G 8.
Operazioni Rif. Sez.
Rimontare il filtro a rete D 4
Rimontare il gruppo
frizione completo
N 6.1
Rimontare il coperchio
lato frizione
N 6.2
Rimontare il gruppo
avviamento motore
P 3
Rimontare il coperchio
lato alternatore e
l’alternatore completo
N 8
Rimontare il gruppo
cilindro/pistoni
completo
N 5
Rimontare il gruppo
teste completo e gli
organi distribuzione
N 4.2
Rimontare l'impianto di
lubrificazione
N 2.1
Installare il motore nel
telaio
N 1
Fit two M8 screws (29) to clutch-side
casing (34).
Tighten all screws to the specified
torque. Begin with the larger
diameter screws.
Check that crankshaft rotates with a
certain amount of interference in the
main bearings. Crankshaft must have
a pre-load of 0.15 - 0.20 mm. Check
also that all assembled parts can
rotate or move correctly.
Fit the mesh filter cover and its seal
as described under section D 4.
Fit the drain plug (24) with seal (23).
Tighten to the specified torque (Sect.
C 3).
Fit the cartridge filter as described
under section D 4.
Fit oil seal (11) and spacer with O-ring
on gearbox secondary shaft as
described under Sect. G 8.
Operations Ref. Sect.
Fit mesh filter D 4
Refit the complete
clutch unit
N 6.1
Refit the clutch-side
cover
N 6.2
Refit the engine
starting system
P 3
Refit the generator-side
cover and the complete
generator
N 8
Refit the complete
cylinder / piston
assembly
N 5
Refit the complete
head unit with timing
system
N 4.2
Refit the lubrication
system
N 2.1
Refit engine to frame N 1
29
34
 Loading...