Do you have a question about the Eagle 12 and is the answer not in the manual?
Explains reliance on satellite signals for position, speed, and direction.
Discusses line-of-sight requirements for GPS signals and potential obstructions.
Details government-induced errors affecting GPS accuracy for civilian users.
Describes how DGPS receivers improve position and altitude accuracy by applying corrections.
Details operation from AA batteries or DC voltage, including adapters and battery packs.
Describes the optional external antenna kit for mounting the antenna remotely.
Explains the quick-release design for removing and reinstalling the antenna.
Details IMS SmartMap, WorldMap, C-Map, and Navionics cartridges and their coverage.
Provides instructions for installing mapping cartridges, warning against doing so while powered on.
Explains how to remove a cartridge, suggesting a tool for assistance.
Describes the function of the twelve keys, including arrow keys, MENU, WPT, PAGES, Z-OUT/IN, ENT/EXIT, and PWR.
Explains how to turn the AccuMap 12 on and off using the PWR key.
Describes accessing and navigating through the unit's menus using the MENU key.
Explains the cold-start process for acquiring satellite data and position.
Details the process of waiting for satellite lock and the meaning of flashing numbers.
Guides on how to input position by selecting it on the map.
Guides on manually entering latitude and longitude coordinates for initialization.
Explains how to update the local time and date for faster satellite acquisition.
Warns against relying on flashing data, indicating invalid information or lost satellite lock.
Explains how to switch between navigation, mapping, and windows displays using the PAGES key.
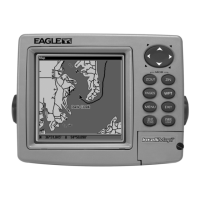
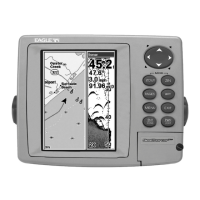
Shows examples of the three default displays: Navigation (Nav 1), Mapping (Map 3), and Windows (Group A).
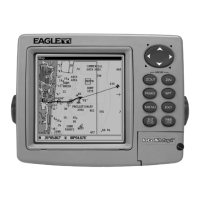
Describes Nav Screen #1, featuring a compass rose, track, and digital data boxes.
Explains how the screen changes when navigating to a waypoint, showing bearing and destination circle.
Describes Nav Screen #2, showing navigation details in large digital numbers.
Explains the CDI's role in showing deviation from the desired course to a waypoint.
Explains the CDI's range, arrows, and vertical bar for indicating course deviation.
Describes the built-in background map coverage and its initial display.
Explains how to switch between different mapping screens (Map 1, 2, 3) and their data.
Details how to activate the cursor, move it, and use zoom keys from its position.
Explains how autozoom automatically adjusts the map view while navigating to a waypoint.
Provides instructions on how to enable and use the autozoom feature.
Explains how to turn map text labels (city names, rivers) on or off.
Describes how to display cartridge boundaries to show coverage areas.
Explains how to turn the entire background earth map display off.
Describes how to hide or show placed icons on the map.
Explains how to select which type of installed cartridge (IMS, Navionics, C-MAP) provides detail.
Details options for C-Map cartridges, such as depth lines, restrictions, and navigation aids.
Explains how to enable/disable Navionics features like depth lines and names.
Describes the option to fill water or land areas with gray for better map contrast.
Explains North-Up, Track-Up, and Course-Up map orientation modes.
Introduces the plot trail feature that records the unit's path.
Explains how to make the plot trail flash for better visibility.
Describes how to turn the visibility of plot trails on or off.
Explains how to erase the current plot trail from the display.
Details how to save the current plot trail to memory, up to two trails.
Explains how to adjust plot trail point placement based on time or distance.
Guides on placing icons at the present position or cursor location.
Explains methods to delete icons, including all, by type, or from the map.
Introduces the windows feature for customizing displays and arranging them in groups.
Explains the dual mapping capability to display two independent maps side-by-side.
Details the Satellite Information screen, showing channel data, PRN, ELV, AZM, and SNR.
Describes accessing clock settings, alarms, and changing units of measure.
Explains how to switch the clock display between 12-hour and 24-hour formats.
Details how to set and activate an alarm clock function.
Guides on setting up countdown and count-up timers.
Explains how to start, stop, and reset the timers.
Details how to customize digital display boxes on MAP 3 and NAV 1 screens.
Explains the quick save method to store the current position as a waypoint.
Guides on saving the cursor's position as a waypoint.
Details saving the current position by selecting a specific waypoint number.
Explains saving the cursor's position by selecting a specific waypoint number.
Guides on editing or entering latitude/longitude for waypoints.
Explains how to assign a name (up to 12 characters) to a waypoint.
Describes how to change the icon assigned to a waypoint.
Explains the process for removing a waypoint from memory.
Guides on transferring waypoint information from one number to another.
Explains how to calculate and display the distance and bearing between two waypoints.
Details how to turn waypoint symbols, names, or numbers on/off.
Guides on creating a route by connecting multiple waypoints.
Explains selecting waypoints from a list to add them to a route.
Guides on selecting waypoints directly from the map to add them to a route.
Explains how to save a completed route.
Details how to recall a route and choose the starting direction and waypoint.
Explains how the unit guides you through waypoints in a route and switches automatically.
Explains how to erase a route from memory.
Guides on selecting a destination waypoint and initiating navigation.
Explains how to navigate to a location using the map cursor without saving it.
Describes using the map's "birds-eye" view to navigate to a waypoint.
Warns that the track line does not account for land features or obstructions.
Explains how to stop the current navigation sequence.
Guides on accessing the main System Setup menu.
Explains the Track Holding feature to reduce random numbers at low speeds.
Details how to disable the Track Holding feature.
Explains how to select different map datums for accurate positioning.
Guides on setting the PCF to adjust displayed position to match a chart.
Explains how to change units for distance, speed, bearing, altitude, and clock.
Details how to select position display formats like DMS, DDM, or UTM.
Explains how to enable NMEA 0183 data output for external devices.
Describes connecting DGPS receivers for improved accuracy.
Guides on configuring NMEA output version and sentence selection.
Explains how to configure DGPS receivers, including frequency and bit rate.
Guides on configuring serial port settings like baud rate, parity, and data bits.
Explains how to reset the unit to its original factory default settings.
Guides on resetting programmed boxes on navigation screens and Map-3 to defaults.
Guides on entering a name or ID for personalization, noting permanent storage.
Introduces the GPS Setup menu and its sub-menus affecting the GPS receiver.
Explains how to adjust the GPS update rate to conserve battery and affect responsiveness.
Guides on running a self-test to diagnose GPS receiver issues.
Explains how to initiate a cold start to reacquire satellite data.
Details how to set arrival, CDI, and anchor alarms with adjustable distances.
Provides important notes regarding anchor and arrival alarms, especially with DGPS.
Explains how position and DGPS messages appear and how to view the message log.
Guides on adjusting backlight delay time and brightness level.
Explains how to adjust the display contrast for best visibility.
Describes how to turn the unit's speaker off, which also silences alarms.
Guides on accessing and configuring the simulator's track, speed, and starting position.
Details how to change the simulator's speed.
Explains how to set a specific waypoint as the simulator's starting point.
Describes using arrow keys to control course and speed within the simulator.
Explains the low battery warning message and automatic shutdown.
Lists and describes various digital display boxes available for maps and navigation.
Continues the description of various digital display boxes.
Lists window groups A through T, showing examples of their displays.
Outlines the six easy steps for sending the unit for repair via UPS.
Provides contact information for ordering accessories like power cables and transducers.
Details the warranty coverage, exclusions, and customer remedies.
Outlines the legal terms for using the product's databases.
Specifies the warranty for the product's databases, including limitations.
Provides contact details for service inquiries from Canadian customers.
Advises international customers to contact their original dealer for service.
Provides US service contact number and details on warranty and repair policies.
| Product Name | Eagle 12 |
|---|---|
| Channels | 12 |
| Display | LCD |
| Waterproof Rating | IPX7 |
| Type | GPS Device |
| GPS Receiver | High-sensitivity |
| Dimensions | 120 x 60 x 30 mm |