52 Eaton 93PM Emergency Lighting UPS (50 kW, 480V Three and Four-Wire UL 924) Installation and Operation Manual P-164000569—Rev 03
44..77..55 IInnssttaalllliinngg MMiinniisslloott IInntteerrffaaccee CCoonnnneeccttiioonnss
NOTE 1 LAN drop for use with Minislot cards must be provided by the customer.
NOTE 2 When installing interface wiring connections, conduit must be installed between each
device and the UPS cabinet.
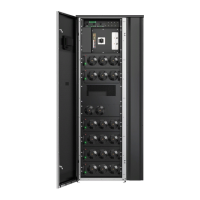
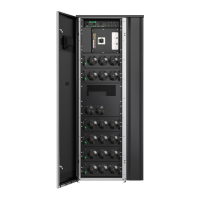
NOTE 3 Remove the cabinet stiffener bar (see Figure 21) before installing or removing Minislot
cards. Reinstall the bar after the procedure is completed.
For installation and setup of a Minislot card, contact an Eaton service representative (see paragraph
1.9 Getting Help).
To install wiring:
1. If not already installed, install the LAN drop.
2. If not already opened, open the front door by lifting the latch from the bottom and turning to the right
(counterclockwise) and swing the door open.
3. If wiring a Minislot card from the bottom of the UPS, proceed to Step 8; otherwise, proceed to Step 4.
4. Remove the top interface entry conduit landing plate to drill or punch holes (see Figure 15).
5. Reinstall the interface entry plate and install the conduit.
6. Route the Minislot card interface wiring through the top interface entry conduit landing plate to the
Minislot card terminals. See Figure 15 for wiring access information, and Figure 20 and Figure 21 for
Minislot card locations.
7. Proceed to Step 13.
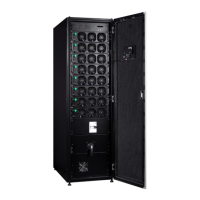
8. Remove the bottom interface entry conduit landing plate to drill or punch holes (see Figure 22).
9. Reinstall the interface entry plate and install the conduit.
10. Route the Minislot card interface wiring through the bottom interface entry conduit landing plate to the
bottom access interface wiring channel along the inside of the front door (see Figure 22).
11. Route the wiring along the interface wiring channel (see Figure 22) to the Minislot card terminals. See
Figure 20 and Figure 21 for Minislot card locations.
12. Secure the wiring to the wire tie anchors provided (see Figure 23) using Zip ties.
13. Install the LAN and other cables to the appropriate Minislot cards. Refer to the manual supplied with the
Minislot card for terminal assignments.
14. Refer to the manual supplied with the Minislot card for operator instructions.
15. Close the UPS outside door and secure the latch.
44..88 IInniittiiaall SSttaarrttuupp
Startup may be performed by the customer’s battery qualified electrical contractor for single (not parallel) UPS
installations without any accessory cabinets such as an External Battery Cabinet.
Startup and operational checks for parallel systems or installations with accessory cabinets must be performed
by an authorized Eaton Customer Service Engineer, or the warranty terms specified in Chapter 11 Warranty
become void. This service is offered as part of the sales contract for the UPS. Contact an Eaton service
representative in advance (usually a two-week notice is required) to reserve a preferred startup date.
UPS System Installation

 Loading...