For more information visit: www.eaton.com IB01602008E
Instructional Booklet
Page 20 Effective: March 2014
ATC-300 Breaker Based Transfer Switch
With the enclosed ATS equipment unpacked and ready for mount-
ing, proceed with the following steps.
Step 1: The ATS enclosure door is hinge mounted with removable
hinge pins. To simplify the mounting procedure and avoid
damaging the door-mounted logic panel, it is strongly
suggested that the door be carefully removed and put it in
a safe place until mounting is complete. To remove the
door, open the door and disconnect the connectors at the
back of the ATC-300 logic panel. Remove the wire ties
securing the harness to the inside of the door. Carefully
remove the hinge pins then the door from the enclosure.
Step 2: Install the required upper and lower mounting bolt
anchors and the two upper mounting bolts in the mount-
ing surface.
Step 3: Gently lift the enclosure and guide the teardrop holes in
the upper mounting flange over the upper mounting
bolts. Do not completely tighten the bolts at this time.
Step 4: While still supporting the enclosure, install the two lower
mounting bolts in the lower mounting flange. Again, do
not completely tighten the bolts at this time. Use shims,
if required, to prevent deformation of the enclosure if the
mounting surface is distorted.
Step 5: Tighten all four mounting bolts after any required shim-
ming is completed.
Figure 18.Typical Mounting of the ATS to a Mounting Surface.
Step 6: Double check to ensure that all packing and shipping
materials have been removed.
4.4 Load Lug Location
This section applies only to the 255-1200 A switches. The load
lugs for the 30-150 A switch are fixed.
ATS equipment is supplied from the factory with the load terminal
lugs at the top. If the load lugs are to be repositioned to the bot-
tom, do it at this time before wiring the unit or making power
cable connections.
IF THE LOAD LUG LOCATION IS BEING CHANGED ON ALREADY
INSTALLED TRANSFER SWITCH EQUIPMENT, MAKE SURE THAT THE
SOURCE 1, SOURCE 2, AND OTHER POWER SOURCES CONNECTED
TO THE EQUIPMENT ARE DE-ENERGIZED. HAZARDOUS VOLTAGES
ARE PRESENT INSIDE ATS EQUIPMENT THAT CAN CAUSE SEVERE
PERSONAL INJURY OR DEATH.
With the solid steel shield removed, proceed with the following
steps for bottom feed load termination. Refer to Figure 19 for
transfer switch component names and locations.
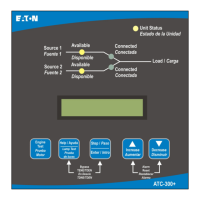
Source 1
Source 2
Available
Available
Connected
Connected
Load
Unit Status
Alarm
Reset
Engine
Test
Lamp
Test
Help
Step
Enter
Bypass
TDNE / TDEN
WARNING

 Loading...