GBGB
70
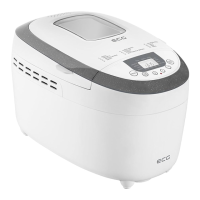
LOAF SIZE button
• Use this button to select the gross weight of the loaf (750 g, 1000 g, 1250 g). The LOAF SIZE selection can
only be used in some programs, see the “SETTING OPTIONS” table in the “BAKING BREAD INSTRUCTIONS”
chapter.
TIMER +/- buttons
• You can use timer to postpone baking to alater time. Press (+) and (-) to delay the process by up to 15
hours. The set time will appear on the display. The minimum possible delay time is dependent on the
selected program and the size and the degree of baking of the bread.
Notes:
• Set the timer only after selection of the program (MENU), weight (LOAF SIZE) and browning (COLOR).
• Do not use timer with recipes using eggs and milk products (milk, cream, cheese...).
• Press (+) (-) to select when the bread should be ready. Keep in mind that you have to add to the the
delay time the length of the program. After completing the program the appliance switches for 1 hour
to keep warm mode. Press (+) or (-) to prolong or shorten the delay interval. (one step 10 minutes).
Maximum timer delay is 15 hours. The countdown starts after pressing the START/STOP button. The
indicator on the display ashes.
OPERATING INSTRUCTIONS
STARTING
Before rst use
• Read all instructions and important information.
• Remove all packaging, including labels and stickers and wipe the surface with adamp dishwashing cloth.
Make sure that all the parts were supplied in good condition.
• Wash all accessories in warm soapy water using asponge or dish towel. Rinse o the detergent well and
dry everything thoroughly. Do not use abrasive cleaning products, scrubbers or metal utensils, the non-
stick surface could be damaged.
• Never immerse the appliance, cable or plug in water.
• Place the bread maker on aat, heat resistant surface.
• Switch the bread maker to baking mode and bake on empty for about 10 minutes. You can detect aslight
odor when you rst switch it on. This is normal and the odor will disappear in few seconds. Then let it
cool down and again clean all removable parts. After you dry them thoroughly and assemble them, the
appliance is ready to use.
Attention:
Danger of falling objects. The bread maker can rock or move during kneading. You have to place the
bread maker always in the middle of the kitchen counter, far from the edge.
On / O
• Before use, always check for damaged power cord or plug.
• Plug the power cable of the bread maker in the electrical outlet. Abeep sounds and the display shows
„03:15”. The colon between „3” and „15” does not ash. Default program is „1”. The arrows are directed to
„1250g” and „MEDIUM”, which are the default settings.
• Press MENU to select aprogram (see the list of the programs), press LOAF SIZE to select the size of the
loaf (weight) and press COLOR for degree of browning. Press TIMER +/- in case you want to set postponed
start.
• Press the button START/STOP to start the set program.
Note:
Long press the button START/STOP to stop the baking process and the bread maker returns to default
settings.
Power outage
In case of power outage of less than 10 minutes the program will automatically continue when power is restored
without pressing START/STOP. In case that the power outage lasts longer, the program will not resume and