3
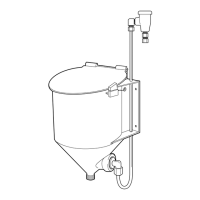
Figure 4-1
Figure 4-2
4.0 INSTALLATION PROCEDURES
NOTE: Refer to the appropriate VANGUARD EcoCenter,
Control Max, VANGUARD 2026, Senso-Matic 26 or
Centron Model 526 I/O Manual for installation instruc-
tions of the control unit, conductivity cell and the
solenoid valve hook-up.
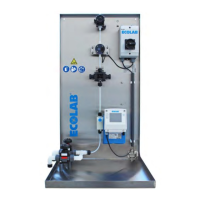
The installation of the VANGUARD Wash Max Reservoir is
essentially the same whether machine mounted or wall
mounted.
4.1 Machine Mounting the Reservoir
1. The reservoir must be mounted at a height below eye
level, but high enough to ensure a downhill slope of the
detergent discharge tube from the reservoir to the wash
tank inlet connector.
Refer to Figure 4-1.
2. Mount the reservoir unit to the dishmachine wash sec-
tion. To prevent crimping of the discharge tubing, the
bottom two (2) mounting holes should be located at
least eleven (11) inches (27.9 cm) above the wash tank
inlet connector. Use the mounting template to ensure
proper location of the holes. Use the four (4) bolts and
nuts supplied with the kit to secure the reservoir to the
dishmachine wall.
Refer to Figure 4-1.
NOTE: The shortest possible outlet tube run, be-
tween the bottom of the reservoir and the inlet
connector, is required. The outlet tube should not
have any dips in it.
4.2 Wall Mounting the Reservoir
1. Be sure to mount the dispenser at a height below eye
level and use the mounting template to mark four (4)
mounting hole positions. Secure the unit to the wall
using appropriate wall anchors and/or toggle bolts. It is
essential that the VANGUARD Wash Max Reservoir be
fastened firmly as the weight of the capsule being
placed into
the reservoir requires sufficient support.
Refer to
Figure 4-2.
4.3 Initial Electrical Connections
1. The VANGUARD Wash Max Reservoir is supplied with
a 25' (7.6 meters) 2 conductor wire. The RED and
BLACK wires will be used to wire to the designated
safety switch wiring in the dispenser controller. These
should be connected as illustrated in the controller
wiring diagram.
4.4 Install Wash Tank Connector and Tubing
1. To Install the wash tank connector and tubing, locate the
wash tank connector above normal water level in the
wash tank. Position the connector in a manner, such
that the effluent from the reservoir will not directly
contact the rack or utensils in the dishmachine,
refer to
Figure 4-1.
NOTE: Ensure a continuous downhill flow of deter-
gent from the reservoir Into the wash tank
SOLUTION SUPPLY MUST BE
ABOVE FLOOD STAGE
(OVERFLOW RIM)
OVERFLOW RIM
OVERFLOW RIM
SOLUTION SUPPLY
MUST BE ABOVE
FLOOD STAGE
(OVERFLOW RIM)
WASH TANK
CONNECTOR
WASH TANK
CONNECTOR
2. Cut a 7/8" hole in the wash tank wall and install the
connector with the locknut and gaskets supplied.
NOTE: While drilling, it is recommended to catch
the shavings with a rag.
3. Cut and install the 5/8" I.D. (15.9mm) Mayon tubing
between the reservoir product outlet and the wash tank
connector. Secure the tubing with clamps supplied in
the kit.
NOTE: Do not crimp the tubing.
 Loading...