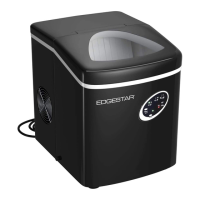
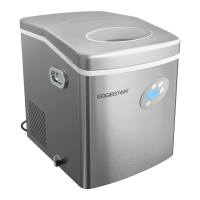
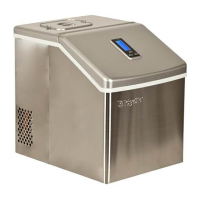
The EdgeStar Portable Ice Maker (models PIM100BL and PIM100SS) is designed for domestic indoor use, providing a convenient way to produce ice cubes. This appliance is not intended for industrial or commercial use. It is crucial to ensure proper grounding and adherence to all safety guidelines outlined in the manual to prevent damage or injury.
Function Description
The ice maker operates by first rotating an ice case into a horizontal water fill position under an evaporator. A water pump then fills the ice case with water, with any overflow draining away. After a few seconds, the compressor activates, pumping refrigerant, and the fan turns on once the condenser heats up. The unit then forms bullet-shaped ice around the evaporator. Once a batch of ice is fully formed, the freeze cycle stops, and the harvest cycle begins.
During the harvest cycle, a valve opens, diverting hot refrigerant gas into the evaporator. This heats the evaporator, causing the ice bullets to slide off. An ice shovel automatically pushes the newly formed ice into the ice basket and repositions the ice case for the next batch. The ice maker continues to produce ice until the "ice full" sensor detects a full basket or until the water reservoir is empty. The ice bin compartment is insulated but not refrigerated, so ice will slowly melt. The melted water is automatically reused to produce more ice.
The unit features a control panel with several indicators and buttons. The "Add Water" light illuminates when the water reservoir is low or empty, signaling the need to refill the reservoir and wait three minutes before restarting. The "Ice Full" light indicates when the ice basket is full, prompting the user to remove ice to continue production. An "Ice Size Indicator" displays the currently selected ice cube size (small, medium, or large). The "Select Button" allows the user to switch between these three ice sizes. A "Power Light" illuminates solid green when the unit is on and flashes when the unit is off but still plugged in. The "Power Button" is used to turn the unit on or off.
Usage Features
Before initial use, it is essential to allow the unit to stand upright for at least 24 hours to allow the compressor's oils to settle after transit. The ice maker should be installed in a well-ventilated area with ambient temperatures between 50°F and 90°F. It must be placed on a flat, level surface capable of supporting its total weight when full of water and ice. A minimum of 4 inches of clearance around the back and sides is required for proper air circulation.
To operate, potable water (between 51°F and 90°F) should be poured into the water reservoir, ensuring the level remains below the "MAX" mark. The ice basket is then inserted, and the lid is closed. After plugging the unit into a grounded outlet, the "On/Off" button is pressed, and the desired ice cube size (small, medium, or large) is selected using the "Select" button. For room temperatures below 60°F, selecting the small size setting is recommended to prevent ice cubes from sticking together. The first three batches of ice produced should be discarded.
If the water pump cannot detect or pump water, the unit will automatically stop, and the "Add Water" indicator will illuminate. Adding water will cause the unit to restart automatically. It is crucial not to power on the unit without water. Direct sunlight can interfere with the "ice full" infrared sensor, potentially causing the unit to continue producing ice even when the basket is full. In such cases, moving the unit away from direct sunlight may be necessary.
The ice maker may produce various normal sounds during operation, including whirling from the ice case motor, rattling from refrigerant flow, pulsating or high-pitched sounds from the compressor, trickling or splashing water sounds, gurgling from refrigerant flow, fan noise, and the sound of ice cubes falling into the basket during the harvest cycle. A screeching noise from the water pump indicates the unit is running without water, which should be avoided.
Maintenance Features
Regular cleaning and proper maintenance are vital for the efficiency, performance, and longevity of the ice maker. Before cleaning, the unit should be unplugged. The ice basket should be removed and cleaned. The interior can be cleaned with a mild solution, such as a 10:1 mixture of warm water and either baking soda or vinegar, using a soft cloth. Solvent-based cleaning agents, abrasive solutions, or flammable fluids should not be used as they can damage the unit or impart taste to the ice. The exterior can be cleaned with a mild detergent and warm water, then dried with a soft cloth.
For routine maintenance, after cleaning the ice basket, a mild cleaning solution (10:1 water to white vinegar or lemon juice) should be added to the water reservoir. The ice maker should then be run to produce at least two batches of ice, which should be discarded. The cleaning solution is then drained from the reservoir. The water line above the evaporator should be removed, cleaned, and rinsed. Fresh water is then added to the reservoir up to the mark, and the unit is run for at least two more batches of ice, which are also discarded. Finally, the water is drained, and fresh water is added for ice production, or the interior and exterior are dried with a clean soft cloth for storage. The ice scoop should be washed regularly like any other utensil.
If the ice develops an unappealing taste or a musty odor, running several cycles with a mild white vinegar or lemon juice solution, followed by plain water cycles, can help eliminate the taste. If the bad taste persists, a solution of 2 tablespoons of baking soda in a full water reservoir, left overnight, can absorb remaining odors. This solution should then be drained, the reservoir rinsed, and the interior dried. It is crucial not to turn the ice maker upside down during cleaning or drying, as this can cause the oil in the compression unit to shift, potentially rendering the unit inoperable.
For extended periods of non-use, the unit should be unplugged, the water drained from the reservoir, and the interior dried with a clean soft cloth. An extra drain plug is included with the unit for convenience.