Chapter 2: Installation and configuration
LaserSense Nano Aspirating Smoke Detector Installers Handbook 17
Table 3: Procedural guidelines
Do Don’t
• Ensure that the ClassiFire alarm factor
is appropriately set.
• Ensure that the power and signal cables
are correctly connected before powering
up by use of cable identifiers or electrical
continuity checks. Incorrect connection
could damage the detector.
• Ensure that cable of an appropriate
approved type is used for interconnection.
• Place sampling points so that the
detector will be able to detect smoke at the
earliest opportunity.
• Ensure that the detector exhaust is in an
area with the same atmospheric
pressure as the sample pipes, either by
placing the detector physically in the
protected area or by leading a pipe from the
detector exhaust to the protected area.
• Ensure that the environment of the
protected area is within the environmental
operating parameters of the detector.
• Ensure the detector is properly
grounded.
• Remove or connect boards when the
detector is powered up.
• Attempt to adjust or alter detector
settings other than via the user-
programmable functions. Any attempts
to adjust the laser potentiometer are
detectable and will void the warranty on the
product.
• Drop the detector or use excessive force
when fitting sampling pipes as this may
damage the detector.
• Connect internal 0 volt terminals to local
earth.
• Use sampling pipe of less than 1 inch
(27 mm) outside diameter without a
suitable 1-inch (27- mm) pipe adapter. It
is important that there are no leaks where
the pipe connects to the detector.
• Place the detector so close to other
equipment that there is insufficient room
to access and change the dust separator
(filter) or access the RS-232 connector (if
installed).
• Install the detector near high power RF
sources or in damp or exposed areas.
• Attempt to re-use dust separator (filter)
cartridges once removed.
Removing the front cover
To remove the front cover, unfasten the cover securing screw located on the
bottom of the unit. The cover may then be removed.
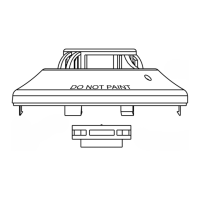
Mechanical installation
Refer to “Inside the detector” on page 5 for conduit, pipe interface information,
and mounting hole locations.
The detector is connected to the installed sampling pipework and fixed to the
mounting surface using three screws of a type appropriate to the mounting
surface. Ensure that the sampling and exhaust pipes are securely seated in the
pipe ports before securing. If using a piped exhaust connection, be sure that the
sampling and exhaust pipe are fitted into the relevant port as shown in Figure 8
on page 18.