Do you have a question about the EINHELL TC-MS 3017 T and is the answer not in the manual?
Read operating instructions to reduce injury risk and follow all warnings.
Use ear-muffs, breathing mask, and safety goggles.
Avoid blade contact; set stop rail correctly for miter cuts.
Follow all safety regulations and instructions for safe operation.
Use for wood/plastic cutting only; misuse voids warranty.
Identifies risks like blade contact, noise, and dust.
Ensure stable setup, proper covers, and smooth operation.
Procedure for safely replacing the saw blade.
Instructions for using the On/Off switch.
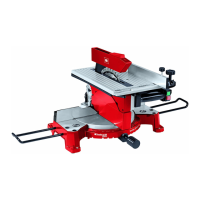
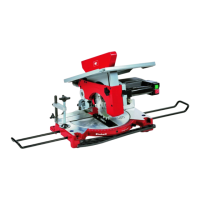
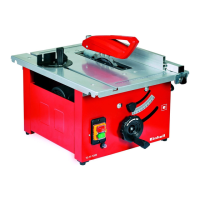
This document describes a combination saw, specifically a crosscut and miter saw with a table, designed for various wood and plastic cutting tasks. It can be used for cross-cutting, longitudinal cutting, and lateral cutting (with a cross stop). The saw is not intended for cutting firewood.
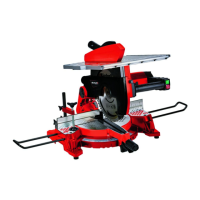
The device operates as a versatile cutting tool, capable of functioning in two primary modes: a bench circular saw and a crosscut/miter saw. This dual functionality allows for a wide range of cutting operations.
In bench circular saw mode, the saw table is used to support the workpiece, which is then guided through the saw blade for longitudinal cuts. The cutting depth can be adjusted by lowering the saw table. A parallel stop helps guide the workpiece for precise cuts, and a push stick or push block is recommended for narrower workpieces to ensure safety and control. The top saw blade guard automatically opens as the workpiece moves forward and closes after the cut is completed.
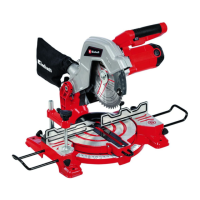
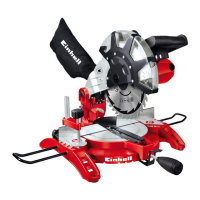
In crosscut and miter saw mode, the machine head is lowered onto the workpiece for cross-cutting and miter cuts. The turntable allows for angle adjustments from -45° to +45°, enabling miter cuts at various angles. The machine head itself can also be tilted to the left by up to 45° for compound miter cuts. A clamp is used to secure the workpiece firmly on the machine surface during sawing. The saw blade is activated by a trigger switch, which must be held down during operation. An electric brake system is integrated to stop the saw blade quickly after the switch is released, enhancing safety.
The saw is equipped with an extractor socket and an extractor port, allowing connection to standard sawdust extractors for dust collection. This helps maintain a cleaner working environment and reduces exposure to wood dust.
The saw requires a stable setup, ideally bolted to a workbench or a universal stand. Workpiece support clips can be inserted into designated mounts to provide additional support for longer workpieces. An additional foot can be pulled out to prevent the saw from toppling backward.
To switch from bench circular saw mode to crosscut mode, several steps are involved: tightening specific locking screws, lifting the saw table to its highest position, pressing the saw table down at the front while drawing out a safety pin, and removing the bottom saw blade cover. The safety pin deactivates the bench mode switch and activates the crosscut mode switch. Converting back to bench mode involves positioning the bottom saw blade cover, pressing a release button to lower the machine head until the saw blade is covered, pressing the saw table down while pressing in the safety pin (which activates the bench mode switch), and adjusting the saw table to the desired cutting height.
The turntable can be adjusted by loosening a locking screw, allowing angles from -45° to +45°. Locking points are available for common angles (0°, 15°, 22.5°, 30°, 45°), which must be secured by tightening the locking screw. For precise 90° crosscuts, the machine head is lowered and fastened with a safety pin, and an angular stop is used to adjust the angle between the blade and the turntable to 90°. For 45° miter cuts, the machine head is tilted to the left, and an angular stop is used to set the blade angle to 45° relative to the turntable.
The cutting depth is adjusted by loosening locking screws and lowering the saw table. The parallel stop can be set to the required dimension using a scale on the saw bench and secured with a locking screw. For longitudinal cuts, the workpiece is slowly and precisely guided along the parallel stop to the saw blade. For crosscuts in bench mode, a cross parallel stop is fitted into the side groove of the saw bench, and the stop rail is adjusted to avoid touching the saw blade guard.
The device incorporates several safety measures. It is crucial to read the operating instructions thoroughly to reduce the risk of injury. Users are advised to wear ear-muffs to protect against noise, a breathing mask to prevent inhalation of dust (especially when working with wood), and safety goggles to protect against sparks, splinters, and dust. Users must never reach into the running saw blade. The adjustable stop rail must be fixed at an outer position for miter cuts and an inner position for 90° crosscuts to prevent collision with the saw head or blade. The electric brake system ensures the saw blade stops quickly after use.
It is important to keep all safety devices, air vents, and the motor housing free of dirt and dust. The equipment should be wiped with a clean cloth or blown with compressed air at low pressure. Regular cleaning with a moist cloth and soft soap is recommended after each use, ensuring no water seeps into the device. Cleaning agents or solvents should be avoided as they can damage plastic parts.
Before changing the saw blade, the device must be unplugged from the mains power. Gloves should always be worn when handling the saw blade. The saw should be set to crosscut mode. Specific screws and the saw blade screw need to be undone using a Hexagon key and face spanner. The motor shaft and flange must be thoroughly cleaned before fitting a new saw blade. The cutting angle of the teeth and the direction arrow on the saw blade must match the arrow on the housing. The lever on the housing must be retightened, and the saw blade guard's automatic closing function should be checked.
The splitter is pre-set at the factory. If adjustments are made, a gap of 3-5 mm must be maintained between the teeth of the saw blade and the splitter, and the splitter must be securely tightened.
In cases of excessive sparking, the carbon brushes should be checked by a qualified electrician. Carbon brushes should only be replaced by a qualified electrician.
All moving parts of the equipment should be lubricated at regular intervals.
When ordering spare parts, specific information such as the type of unit, article number, ID number, and the required spare part number should be provided. Information on the latest prices and availability can be found on the manufacturer's website.
The equipment and accessories should be stored in a dark, dry place at above freezing temperature, ideally between 5°C and 30°C, in its original packaging.
| Blade Diameter | 305 mm |
|---|---|
| Bevel Angle | 0° - 45° |
| Saw blade bore | 30 mm |
| Mitre cut | 0° - 45° |
| Cutting Height | 90 mm |
| Cutting Width | 30 cm |
| Cutting width 90° x 90° | 30 cm |
| Cutting width 45° x 90° | 21 cm |
| Cutting depth (90°) | 90 mm |
| Max. cutting depth at 90° | 90 mm |