SAFETY INSTRUCTIONS
1 General information
Please read and follow these safety instructions.
Keep them safe for future reference.
Observe all warnings on the speaker and in the manual. Please check the speaker for damage
before use. The speaker must be in perfect working condition.
Damaged parts may lead to personal injury.
2 Use only as directed
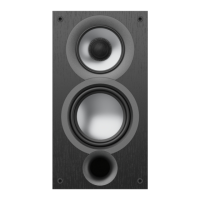
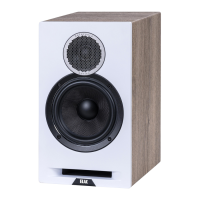
Connect the speaker(s) according to the instructions in the manual.
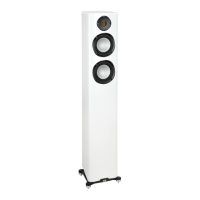
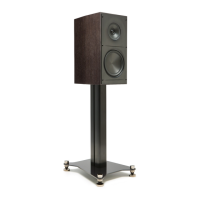
Many ELAC speakers are equipped with spikes and/or anti-slip feet. They are explicitly provided for
levelling the speaker. For levelling on an uneven fl oor, unscrew. the spikes or anti-slip feet by 2-3
turns of thread. The speaker should always be in perfect vertical alignment: the stability of the spea-
ker must not be compromised by using spikes or anti-slip feet as the speaker may tip-over.
3. Location
Install the speakers on a level surface only
When choosing the location of these speakers do not place them in locations that are:
In direct sunlight
Very humid
Prone to vibrations
Exceptionally hot or cold
Near CRT Televisions (the speakers are not magnetically shielded and may cause color issues with
a CRT based TV)
Close to magnetic cards (Since the speakers are not magnetically shielded placing magnetic cards
such as credit cards or commuter cards may cause
WARNING! Please ensure the product is perfectly stable to avoid injury from tip-over. Please note,
that stability can be increased by using spikes on carpeted surfaces. However, the mounting of
spikes must be carried out carefully due to their very sharp ends which may cause injuries. The sta-
bility on slippery fl oors can be increased by using Velcro fastening tape or double-sided adhesive
tape. Do not install the speaker near any heat sources such as radiators, heating valves, stoves,
or other apparatus (including amplifi ers) that produce heat, or in areas where there is a risk of ex-
plosion.
Do not block any ventilation openings. Install in accordance with the manufacturer’s instructions.
Do not install the speaker in a closed rack or in a closed cupboard.
Do not put burning candles on or near the speaker.
Do not install the speaker near transformers because electromagnetic stray fi elds can cause hum
noise on woofers.
In combination with certain materials / lacquers / material surfaces, anti-slip feet or spike washers
may cause colored imprints on the surfaces.
levelling the speaker. For levelling on an uneven fl oor, unscrew. the spikes or anti-slip feet by 2-3
turns of thread. The speaker should always be in perfect vertical alignment: the stability of the spea-
levelling the speaker. For levelling on an uneven fl oor, unscrew. the spikes or anti-slip feet by 2-3
turns of thread. The speaker should always be in perfect vertical alignment: the stability of the spea-
turns of thread. The speaker should always be in perfect vertical alignment: the stability of the spea-
ker must not be compromised by using spikes or anti-slip feet as the speaker may tip-over.
ker must not be compromised by using spikes or anti-slip feet as the speaker may tip-over.
Install the speakers on a level surface only
Install the speakers on a level surface only
When choosing the location of these speakers do not place them in locations that are:
Install the speakers on a level surface only
When choosing the location of these speakers do not place them in locations that are:
levelling the speaker. For levelling on an uneven fl oor, unscrew. the spikes or anti-slip feet by 2-3
turns of thread. The speaker should always be in perfect vertical alignment: the stability of the spea-
levelling the speaker. For levelling on an uneven fl oor, unscrew. the spikes or anti-slip feet by 2-3
turns of thread. The speaker should always be in perfect vertical alignment: the stability of the spea-
turns of thread. The speaker should always be in perfect vertical alignment: the stability of the spea-
ker must not be compromised by using spikes or anti-slip feet as the speaker may tip-over.
turns of thread. The speaker should always be in perfect vertical alignment: the stability of the spea-
ker must not be compromised by using spikes or anti-slip feet as the speaker may tip-over.
Install the speakers on a level surface only
Install the speakers on a level surface only
levelling the speaker. For levelling on an uneven fl oor, unscrew. the spikes or anti-slip feet by 2-3
turns of thread. The speaker should always be in perfect vertical alignment: the stability of the spea-
turns of thread. The speaker should always be in perfect vertical alignment: the stability of the spea-
turns of thread. The speaker should always be in perfect vertical alignment: the stability of the spea-
turns of thread. The speaker should always be in perfect vertical alignment: the stability of the spea-
ker must not be compromised by using spikes or anti-slip feet as the speaker may tip-over.
turns of thread. The speaker should always be in perfect vertical alignment: the stability of the spea-
ker must not be compromised by using spikes or anti-slip feet as the speaker may tip-over.
levelling the speaker. For levelling on an uneven fl oor, unscrew. the spikes or anti-slip feet by 2-3
turns of thread. The speaker should always be in perfect vertical alignment: the stability of the spea-
turns of thread. The speaker should always be in perfect vertical alignment: the stability of the spea-
turns of thread. The speaker should always be in perfect vertical alignment: the stability of the spea-
turns of thread. The speaker should always be in perfect vertical alignment: the stability of the spea-
ker must not be compromised by using spikes or anti-slip feet as the speaker may tip-over.
ker must not be compromised by using spikes or anti-slip feet as the speaker may tip-over.
turns of thread. The speaker should always be in perfect vertical alignment: the stability of the spea-
turns of thread. The speaker should always be in perfect vertical alignment: the stability of the spea-
levelling the speaker. For levelling on an uneven fl oor, unscrew. the spikes or anti-slip feet by 2-3
ker must not be compromised by using spikes or anti-slip feet as the speaker may tip-over.
turns of thread. The speaker should always be in perfect vertical alignment: the stability of the spea-
ker must not be compromised by using spikes or anti-slip feet as the speaker may tip-over.
ker must not be compromised by using spikes or anti-slip feet as the speaker may tip-over.
ker must not be compromised by using spikes or anti-slip feet as the speaker may tip-over.
levelling the speaker. For levelling on an uneven fl oor, unscrew. the spikes or anti-slip feet by 2-3
turns of thread. The speaker should always be in perfect vertical alignment: the stability of the spea-
ker must not be compromised by using spikes or anti-slip feet as the speaker may tip-over.
levelling the speaker. For levelling on an uneven fl oor, unscrew. the spikes or anti-slip feet by 2-3
levelling the speaker. For levelling on an uneven fl oor, unscrew. the spikes or anti-slip feet by 2-3
turns of thread. The speaker should always be in perfect vertical alignment: the stability of the spea-
turns of thread. The speaker should always be in perfect vertical alignment: the stability of the spea-
turns of thread. The speaker should always be in perfect vertical alignment: the stability of the spea-
levelling the speaker. For levelling on an uneven fl oor, unscrew. the spikes or anti-slip feet by 2-3
turns of thread. The speaker should always be in perfect vertical alignment: the stability of the spea-
ker must not be compromised by using spikes or anti-slip feet as the speaker may tip-over.
levelling the speaker. For levelling on an uneven fl oor, unscrew. the spikes or anti-slip feet by 2-3
levelling the speaker. For levelling on an uneven fl oor, unscrew. the spikes or anti-slip feet by 2-3
levelling the speaker. For levelling on an uneven fl oor, unscrew. the spikes or anti-slip feet by 2-3
turns of thread. The speaker should always be in perfect vertical alignment: the stability of the spea-
levelling the speaker. For levelling on an uneven fl oor, unscrew. the spikes or anti-slip feet by 2-3
turns of thread. The speaker should always be in perfect vertical alignment: the stability of the spea-
turns of thread. The speaker should always be in perfect vertical alignment: the stability of the spea-
ker must not be compromised by using spikes or anti-slip feet as the speaker may tip-over.
levelling the speaker. For levelling on an uneven fl oor, unscrew. the spikes or anti-slip feet by 2-3
levelling the speaker. For levelling on an uneven fl oor, unscrew. the spikes or anti-slip feet by 2-3
levelling the speaker. For levelling on an uneven fl oor, unscrew. the spikes or anti-slip feet by 2-3
levelling the speaker. For levelling on an uneven fl oor, unscrew. the spikes or anti-slip feet by 2-3
levelling the speaker. For levelling on an uneven fl oor, unscrew. the spikes or anti-slip feet by 2-3
turns of thread. The speaker should always be in perfect vertical alignment: the stability of the spea-
ker must not be compromised by using spikes or anti-slip feet as the speaker may tip-over.
levelling the speaker. For levelling on an uneven fl oor, unscrew. the spikes or anti-slip feet by 2-3
Many ELAC speakers are equipped with spikes and/or anti-slip feet. They are explicitly provided for
Many ELAC speakers are equipped with spikes and/or anti-slip feet. They are explicitly provided for
Many ELAC speakers are equipped with spikes and/or anti-slip feet. They are explicitly provided for
levelling the speaker. For levelling on an uneven fl oor, unscrew. the spikes or anti-slip feet by 2-3
levelling the speaker. For levelling on an uneven fl oor, unscrew. the spikes or anti-slip feet by 2-3
turns of thread. The speaker should always be in perfect vertical alignment: the stability of the spea-
turns of thread. The speaker should always be in perfect vertical alignment: the stability of the spea-
ker must not be compromised by using spikes or anti-slip feet as the speaker may tip-over.
Many ELAC speakers are equipped with spikes and/or anti-slip feet. They are explicitly provided for
levelling the speaker. For levelling on an uneven fl oor, unscrew. the spikes or anti-slip feet by 2-3
Connect the speaker(s) according to the instructions in the manual.
Connect the speaker(s) according to the instructions in the manual.
Many ELAC speakers are equipped with spikes and/or anti-slip feet. They are explicitly provided for
Connect the speaker(s) according to the instructions in the manual.
Many ELAC speakers are equipped with spikes and/or anti-slip feet. They are explicitly provided for
levelling the speaker. For levelling on an uneven fl oor, unscrew. the spikes or anti-slip feet by 2-3
turns of thread. The speaker should always be in perfect vertical alignment: the stability of the spea-
turns of thread. The speaker should always be in perfect vertical alignment: the stability of the spea-
ker must not be compromised by using spikes or anti-slip feet as the speaker may tip-over.
Connect the speaker(s) according to the instructions in the manual.
Many ELAC speakers are equipped with spikes and/or anti-slip feet. They are explicitly provided for
Connect the speaker(s) according to the instructions in the manual.
Many ELAC speakers are equipped with spikes and/or anti-slip feet. They are explicitly provided for
levelling the speaker. For levelling on an uneven fl oor, unscrew. the spikes or anti-slip feet by 2-3
turns of thread. The speaker should always be in perfect vertical alignment: the stability of the spea-
turns of thread. The speaker should always be in perfect vertical alignment: the stability of the spea-
ker must not be compromised by using spikes or anti-slip feet as the speaker may tip-over.
Damaged parts may lead to personal injury.
Connect the speaker(s) according to the instructions in the manual.
before use. The speaker must be in perfect working condition.
Damaged parts may lead to personal injury.
Damaged parts may lead to personal injury.
Connect the speaker(s) according to the instructions in the manual.
Many ELAC speakers are equipped with spikes and/or anti-slip feet. They are explicitly provided for
levelling the speaker. For levelling on an uneven fl oor, unscrew. the spikes or anti-slip feet by 2-3
turns of thread. The speaker should always be in perfect vertical alignment: the stability of the spea-
turns of thread. The speaker should always be in perfect vertical alignment: the stability of the spea-
ker must not be compromised by using spikes or anti-slip feet as the speaker may tip-over.
before use. The speaker must be in perfect working condition.
Damaged parts may lead to personal injury.
Observe all warnings on the speaker and in the manual. Please check the speaker for damage
before use. The speaker must be in perfect working condition.
Damaged parts may lead to personal injury.
Connect the speaker(s) according to the instructions in the manual.
Many ELAC speakers are equipped with spikes and/or anti-slip feet. They are explicitly provided for
levelling the speaker. For levelling on an uneven fl oor, unscrew. the spikes or anti-slip feet by 2-3
turns of thread. The speaker should always be in perfect vertical alignment: the stability of the spea-
turns of thread. The speaker should always be in perfect vertical alignment: the stability of the spea-
ker must not be compromised by using spikes or anti-slip feet as the speaker may tip-over.
Keep them safe for future reference.
Observe all warnings on the speaker and in the manual. Please check the speaker for damage
before use. The speaker must be in perfect working condition.
Connect the speaker(s) according to the instructions in the manual.
Many ELAC speakers are equipped with spikes and/or anti-slip feet. They are explicitly provided for
levelling the speaker. For levelling on an uneven fl oor, unscrew. the spikes or anti-slip feet by 2-3
turns of thread. The speaker should always be in perfect vertical alignment: the stability of the spea-
ker must not be compromised by using spikes or anti-slip feet as the speaker may tip-over.
Please read and follow these safety instructions.
Keep them safe for future reference.
Observe all warnings on the speaker and in the manual. Please check the speaker for damage
before use. The speaker must be in perfect working condition.
Connect the speaker(s) according to the instructions in the manual.
Many ELAC speakers are equipped with spikes and/or anti-slip feet. They are explicitly provided for
levelling the speaker. For levelling on an uneven fl oor, unscrew. the spikes or anti-slip feet by 2-3
turns of thread. The speaker should always be in perfect vertical alignment: the stability of the spea-
ker must not be compromised by using spikes or anti-slip feet as the speaker may tip-over.
ker must not be compromised by using spikes or anti-slip feet as the speaker may tip-over.
Please read and follow these safety instructions.
Observe all warnings on the speaker and in the manual. Please check the speaker for damage
before use. The speaker must be in perfect working condition.
Connect the speaker(s) according to the instructions in the manual.
Many ELAC speakers are equipped with spikes and/or anti-slip feet. They are explicitly provided for
levelling the speaker. For levelling on an uneven fl oor, unscrew. the spikes or anti-slip feet by 2-3
turns of thread. The speaker should always be in perfect vertical alignment: the stability of the spea-
ker must not be compromised by using spikes or anti-slip feet as the speaker may tip-over.
Please ensure the product is perfectly stable to avoid injury from tip-over. Please note,
that stability can be increased by using spikes on carpeted surfaces. However, the mounting of
spikes must be carried out carefully due to their very sharp ends which may cause injuries. The sta-
bility on slippery fl oors can be increased by using Velcro fastening tape or double-sided adhesive
tape. Do not install the speaker near any heat sources such as radiators, heating valves, stoves,
Please ensure the product is perfectly stable to avoid injury from tip-over. Please note,
that stability can be increased by using spikes on carpeted surfaces. However, the mounting of
spikes must be carried out carefully due to their very sharp ends which may cause injuries. The sta-
Please ensure the product is perfectly stable to avoid injury from tip-over. Please note,
such as credit cards or commuter cards may cause
Close to magnetic cards (Since the speakers are not magnetically shielded placing magnetic cards
such as credit cards or commuter cards may cause
Exceptionally hot or cold
Near CRT Televisions (the speakers are not magnetically shielded and may cause color issues with
Close to magnetic cards (Since the speakers are not magnetically shielded placing magnetic cards
Near CRT Televisions (the speakers are not magnetically shielded and may cause color issues with
Close to magnetic cards (Since the speakers are not magnetically shielded placing magnetic cards
Near CRT Televisions (the speakers are not magnetically shielded and may cause color issues with
Near CRT Televisions (the speakers are not magnetically shielded and may cause color issues with
Near CRT Televisions (the speakers are not magnetically shielded and may cause color issues with
Install the speakers on a level surface only
When choosing the location of these speakers do not place them in locations that are:
Near CRT Televisions (the speakers are not magnetically shielded and may cause color issues with
Install the speakers on a level surface only
When choosing the location of these speakers do not place them in locations that are:
turns of thread. The speaker should always be in perfect vertical alignment: the stability of the spea-
ker must not be compromised by using spikes or anti-slip feet as the speaker may tip-over.
When choosing the location of these speakers do not place them in locations that are:
When choosing the location of these speakers do not place them in locations that are:
levelling the speaker. For levelling on an uneven fl oor, unscrew. the spikes or anti-slip feet by 2-3
levelling the speaker. For levelling on an uneven fl oor, unscrew. the spikes or anti-slip feet by 2-3
turns of thread. The speaker should always be in perfect vertical alignment: the stability of the spea-
ker must not be compromised by using spikes or anti-slip feet as the speaker may tip-over.
ker must not be compromised by using spikes or anti-slip feet as the speaker may tip-over.
When choosing the location of these speakers do not place them in locations that are:
When choosing the location of these speakers do not place them in locations that are:
Connect the speaker(s) according to the instructions in the manual.
Connect the speaker(s) according to the instructions in the manual.
Many ELAC speakers are equipped with spikes and/or anti-slip feet. They are explicitly provided for
levelling the speaker. For levelling on an uneven fl oor, unscrew. the spikes or anti-slip feet by 2-3
turns of thread. The speaker should always be in perfect vertical alignment: the stability of the spea-
Many ELAC speakers are equipped with spikes and/or anti-slip feet. They are explicitly provided for
turns of thread. The speaker should always be in perfect vertical alignment: the stability of the spea-
ker must not be compromised by using spikes or anti-slip feet as the speaker may tip-over.
When choosing the location of these speakers do not place them in locations that are:
When choosing the location of these speakers do not place them in locations that are:
Connect the speaker(s) according to the instructions in the manual.
Connect the speaker(s) according to the instructions in the manual.
Many ELAC speakers are equipped with spikes and/or anti-slip feet. They are explicitly provided for
levelling the speaker. For levelling on an uneven fl oor, unscrew. the spikes or anti-slip feet by 2-3
turns of thread. The speaker should always be in perfect vertical alignment: the stability of the spea-
ker must not be compromised by using spikes or anti-slip feet as the speaker may tip-over.
before use. The speaker must be in perfect working condition.
Damaged parts may lead to personal injury.
Connect the speaker(s) according to the instructions in the manual.
Many ELAC speakers are equipped with spikes and/or anti-slip feet. They are explicitly provided for
levelling the speaker. For levelling on an uneven fl oor, unscrew. the spikes or anti-slip feet by 2-3
turns of thread. The speaker should always be in perfect vertical alignment: the stability of the spea-
ker must not be compromised by using spikes or anti-slip feet as the speaker may tip-over.
Exceptionally hot or cold
Near CRT Televisions (the speakers are not magnetically shielded and may cause color issues with
Exceptionally hot or cold
When choosing the location of these speakers do not place them in locations that are:
Install the speakers on a level surface only
When choosing the location of these speakers do not place them in locations that are:
Install the speakers on a level surface only
When choosing the location of these speakers do not place them in locations that are:
When choosing the location of these speakers do not place them in locations that are:
ker must not be compromised by using spikes or anti-slip feet as the speaker may tip-over.
turns of thread. The speaker should always be in perfect vertical alignment: the stability of the spea-
ker must not be compromised by using spikes or anti-slip feet as the speaker may tip-over.
levelling the speaker. For levelling on an uneven fl oor, unscrew. the spikes or anti-slip feet by 2-3
turns of thread. The speaker should always be in perfect vertical alignment: the stability of the spea-
ker must not be compromised by using spikes or anti-slip feet as the speaker may tip-over.
Connect the speaker(s) according to the instructions in the manual.
Many ELAC speakers are equipped with spikes and/or anti-slip feet. They are explicitly provided for
levelling the speaker. For levelling on an uneven fl oor, unscrew. the spikes or anti-slip feet by 2-3
turns of thread. The speaker should always be in perfect vertical alignment: the stability of the spea-
ker must not be compromised by using spikes or anti-slip feet as the speaker may tip-over.
 Loading...