7 ASSESSING THE RESULTS - DESTRUCTIVE TESTING (cont.)
c) Adhesive Failure: If no coating is present on
the dolly this must be recorded as a failure of
the adhesive (or glue). This is normally due to
incorrect or insufficient mixing of the
component parts of the adhesive,
incompatibility of the adhesive and the coating
or the dolly and / or test surface has not been
properly prepared before test - see Section 4
‘Securing the Dolly’ on page en-4.
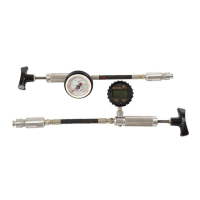
8.1 AFTER TEST
Analogue pressure gauge:
2 Pull up the coupling sleeve to release the dolly.
Digital pressure gauge:
1 Fully unwind the handle (anti-clockwise) to decrease the pressure
to zero.
1 Fully unwind the handle (anti-clockwise) to decrease the pressure
to zero.
2 Pull up the coupling sleeve to release the dolly.
3 Press to release the ‘Max Hold’.
Note: Failure to release the ‘Max Hold’ and zero the gauge before each adhesion test
will result in an invalid adhesion measurement.
8.2 CLEANING THE DOLLY
Cleaning the dolly produces unpleasant fumes - ensure that the
work area is extremely well ventilated. DO NOT inhale the
fumes.
4 Press again to zero the gauge and reset ‘Max Hold’.
HOT! Exposed very hot surfaces. Use great care when handling
or placing the tongs. Allow to cool before storing.
MAX
MAX
8 AFTER TEST
www.elcometer.com
en-7
R
c)