33. The used filter might be heavily coated with dust and particulate matter so before opening the front panel, please ensure a disposable bag or packaging is at hand to place
the used filter in.
34. Remove the front panel and the mesh pre-filter and put them aside. Next remove the filter layer which is at end of life and place it in the disposable bag at hand.
35. Next, please remove the plastic packaging from the replacement filter and insert the filter in the appropriate place. Please ensure the VOC carbon filter goes in first inside the
unit, followed by the ultrafine particle filter. Reinsert the mesh pre-filter and close the front panel. The filter change icon on the product UI will no longer be lit and the
Wellbeing App will indicate the same, with a new filter lifetime reading.
NOTE: In case the change is only reflected on the product UI and not the Wellbeing App, please restart the App and the unit, before further troubleshooting.
36. Discard the used filter as well as any plastic packaging according to local recycling guidelines. The RFID tags contain circuitry and hence are to be disposed separately from
the rest of the filter.
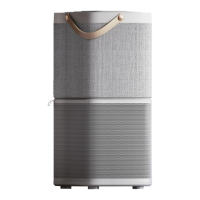
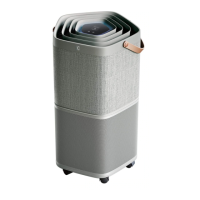
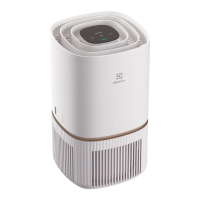
CUSTOMIZING picture pages 6-7
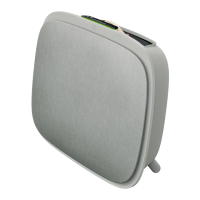
The WELL A7 / A5 series Air Purifier was designed with a unique form and aesthetic sense to ensure it fits in with your home and its furnishings, unlike other appliances. In
addition, the series comes with many customization kits for the unit that add to the aesthetics but also functionality of the unit.
TOP HANDLE CUSTOMIZATION The polyurethane leather (PU) handle at the top of the unit is attached to the unit by way of two screws. Follow the steps below to attach or
replace an existing top handle.
37. If you are replacing an existing top PU handle:
a. Remove the two screws, twisting counterclockwise, and set aside along with existing handle.
b. Remove any protective plastic packaging from the new handle and fit it onto the unit by tightening the screws, twisting clockwise, till you meet some resistance. Ensure a
snug fit with no gap in between the unit and the screw.
c. Test out the handle by lifting the unit 5-6 cm above the ground with it and giving it a gentle shake.
38. If you are adding a top handle for the first time: a. At the top of the unit, in between the product UI & the air outlet grill you will find two circular cavities secured with a rubber
plug. Uncover the cavity by removing these rubber plugs from the unit by gently pulling on the sides of the plug. b. Follow the steps 37b. and 37c (above).
FRONT PANEL CUSTOMIZATION
The look of the front panel can be customized with a fabric cover to help accentuate it but also to ensure the unit blends well with the decor of the room. The fabric cover has
an elastic seam that helps secure it to the front panel, hence no screws or staples are necessary for its installation.
39. Please detach the front panel from the unit and if it already has a removable fabric cover please gently take it off the panel ensuring not to bend the panel.
NOTE: Some models in the WELL A7 series come with a fabric permanently attached to the front panel, this fabric is not removable from the panel, but you can still
customize the panel with another fabric cover on top of the existing fabric.
40. Remove any plastic packaging from the new fabric cover to be used.
41. Starting at the top left corner of the front panel, tuck the elastic band behind the panel and while holding that corner in place work your way with the other hand to the top right
corner while continuously tucking the elastic band of the fabric cover behind the edge of the panel. Now pull the fabric cover towards the bottom edge of the panel and
securely tug the rest of the fabric edge behind the bottom part of the panel.
42. Smooth out any wrinkles on the fabric cover by pushing against the wrinkles.
43. Attach the front panel with the newly fit fabric cover back to the unit and check the edges to ensure there is no blockage of the air inlet area.
NOTE: Customizable fabric covers are machine washable, as per the care instructions provided with the kit. It is important that the elastic band along the edges of the fabric
cover is unbroken and tight as it helps ensure an optimum flow of air into the unit, with minimal decrease in performance. If you notice that the elastic band is broken or very
loose, it is time to replace the fabric cover.
FEET CUSTOMIZATION
The thermoplastic elastomer (TPE) feet are attached to the unit by way of inbuilt screws. The feet like the top handle are detachable. Follow the steps below to attach or
replace an existing set of feet.
44. Place the unit flat on its back, so the front panel faces the ceiling. Unscrew the existing feet, if any, by twisting counterclockwise.
45. Remove any protective plastic covering the new set of feet.
46. Gently nudge the inbuilt screw of the new feet into the cavity at the bottom of the unit and secure them by twisting clockwise till you meet some resistance.
47. Test out the stability of the feet by placing the unit back upright and lifting it about 5-6 cm above the ground and giving it a gentle shake.
ERRORS & TROUBLESHOOTING
The table below is only a limited list. For the latest and complete section on troubleshooting, FAQ, and error guide please refer to the corresponding section on our website or the
Wellbeing App.
# ISSUE TROUBLESHOOTING NOTES
1 The air purifier’s alert icon is lit
If you have just bought the unit OR inserted new filter(s), please ensure that the filter(s) are
positioned in the correct way for the RFID tags to be read by the sensor (refer to point 6 within
ONBOARDING & SETUP section above).
Generally, the unit comes with a variety of sophisticated sensors, electronics and other
electrical components and if one of these is malfunctioning, you will see the alert icon on the
product UI light up. For more details on steps to resolve, please head over to the Wellbeing App
and check for details whenever you see this icon lit.
Please have at and the unit’s PNC
and SERIAL number when calling
for support.
2
The air purifier is running at
max fan speed all the time for
extended periods
If in MANUAL mode, please check the fan speed slider on the product UI or within Wellbeing
App and adjust it to desired level.
If in SMART mode, please check air quality indicator on the product UI or within Wellbeing App
– if all PM values are constantly showing 999-1000 without any reduction then most likely the
sensor is clogged. Please use a vacuum cleaner to clean the sensor via the sensor window –
detailed instructions in CLEANING, CARING & STORAGE section above.
The PM sensor in the unit is highly
accurate and sensitive and it is
normal for the purifier to react
to poor air quality by ramping up the
fan speed – to get your indoor
air quality back to safe levels.
 Loading...