12
1 2 3 4
Italiano English KOR
ASSEMBLAGGIO ASSEMBLY 조립
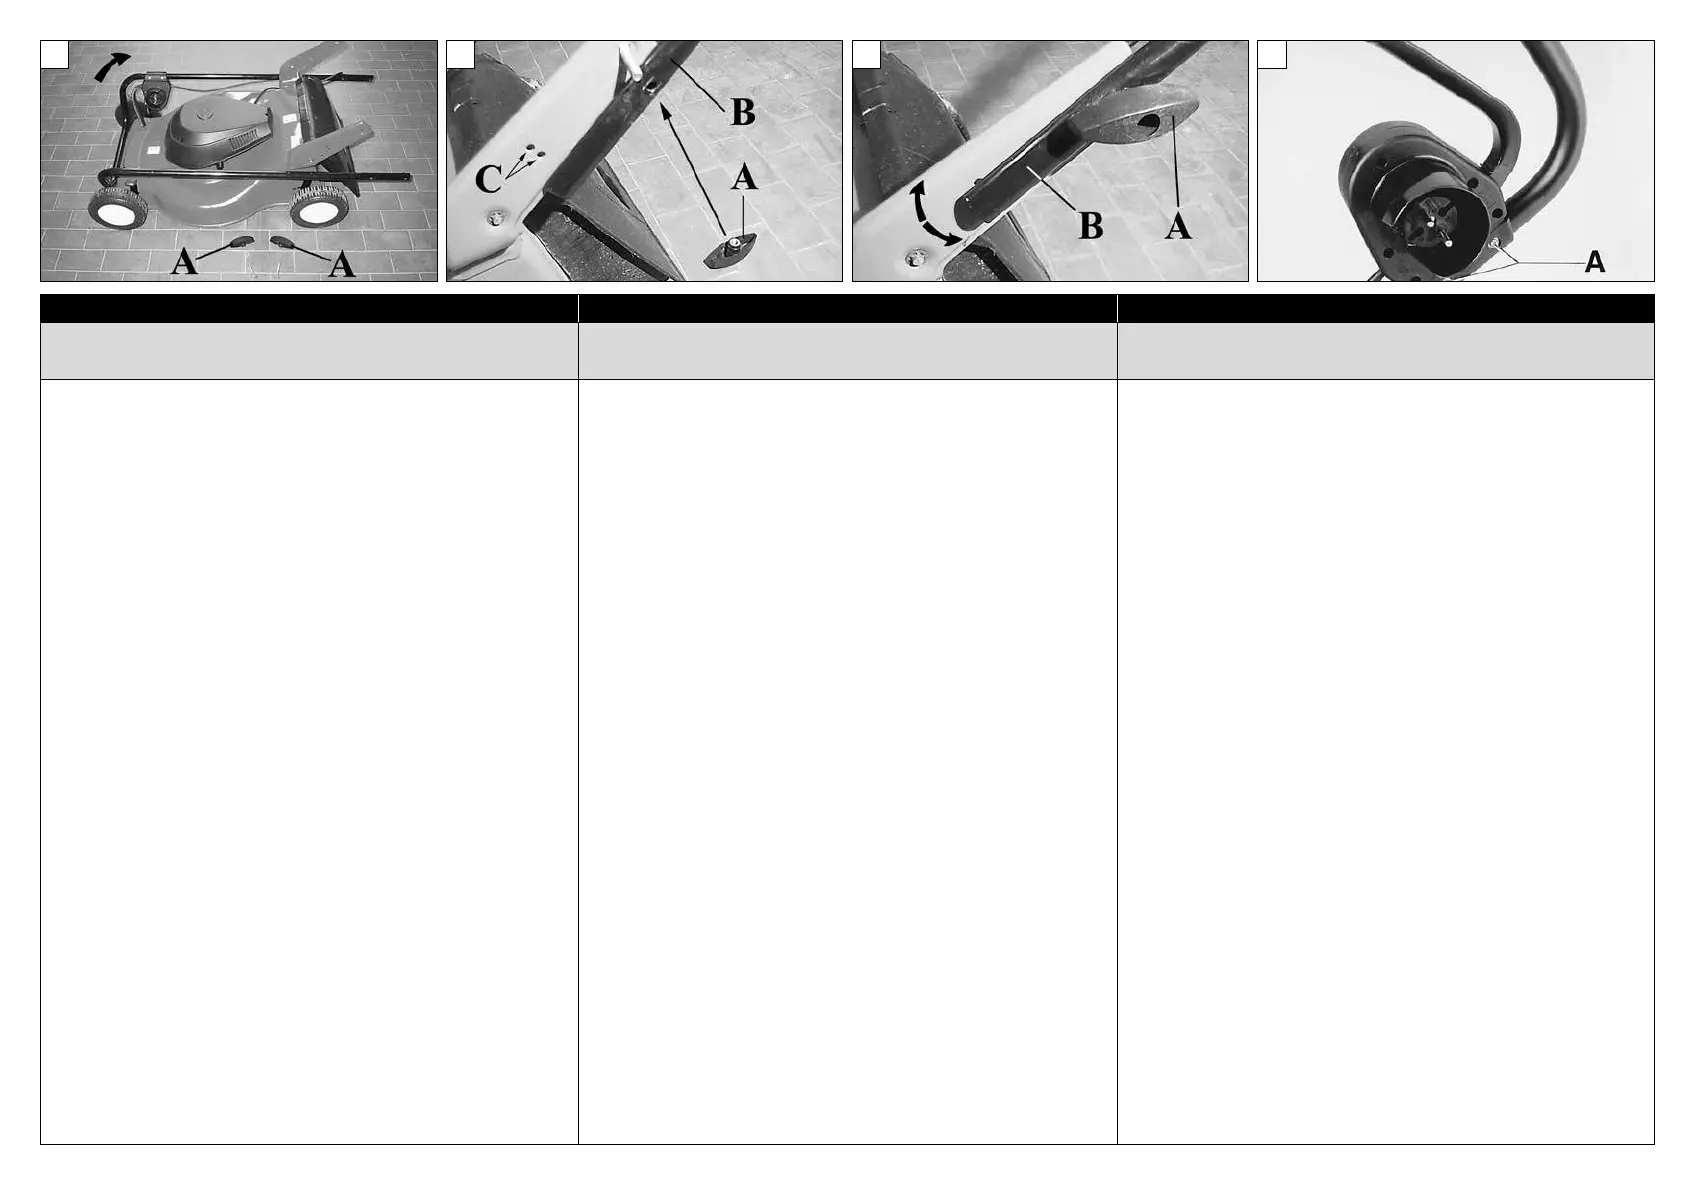
MONTAGGIO MANUBRIO (Fig. 1-2-3)
- Sollevare il manubrio come mostra la Fig. 1. Serrare i
pomelli (A, Fig. 3) dopo avere posizionato il manubrio
(B) e deciso l’altezza dello stesso, scegliendo una
delle due posizioni (C, Fig. 2).
- Fissare l’interruttore sul manubrio con le viti (A)
(Fig. 4) tenendo la spina rivolta verso l’operatore.
ALTEZZA DEL MANUBRIO (Fig. 3)
Svitare i pomelli (A) ed alzare o abbasare il manubrio
(B).
CESTO RIGIDO:
- Assemblare il cesto per mezzo degli appositi agganci
e viti (Fig. 7).
- Alzare il deettore (A) e posizionare il cesto nella
parte superiore della carcassa (Fig. 8).
OPZIONALE
SACCO RACCOGLIERBA (Fig. 5)
Inlare il telaio (A) nel sacco (B). Fissare i bordi del sacco
aiutandosi con una punta o un cacciavite
.
POSIZIONAMENTO DEL SACCO (Fig. 6)
Alzare il deettore (A) e posizionare il sacco nella parte
superiore della carcassa.
FIXING HANDLE (Fig. 1-2-3)
- Lift the handle as in Fig. 1. Tighten the knobs
(A, Fig. 3) after positioning the handle (B) at the
correct height. Choose one of the two positions
(C, Fig. 2).
- Attach the switch onto the handlebar using screws
(A) (Fig. 4), keeping the plug turned toward the
operator.
HANDLE HEIGHT ADJUSTMENT (Fig. 3)
Unscrew knobs (A) and lift or lower the handle (B).
RIGID BOX:
- Assemble the box using in hooks and screws (Fig. 7).
- Raise the deector (A) and position the basket in the
upper part of the body (Fig. 8).
OPTIONAL
GRASS CATCHER (Fig. 5)
Side the frame (A) into the bag (B). Secure the edges of
the bag with the aid of a screwd
river or other pointed
tool.
POSITIONING OF GRASS CATCHER (Fig. 6)
Raise the deector (A) and position the bag in the
upper part of the body.
핸들 조립 (그림1-2-3)
- 그림1과 같이 핸들을 들어 주십시오.
핸들(B)의 위치를 양쪽이 같게 하고 플라스틱
너트(A 그림3)를 조여 주십시오. 사용자에 맞게
위치(2개의 구멍)를 맞추어 주십시오.(C그림2)
- 스크류(A, 그림4)를 이용 스위치의 플러그를
사용자 방향으로 장착 하십시오.
핸들 높이 조절(그림3)
플라스틱 너트(A)를 풀러 위쪽 또는 아래 쪽으로
핸들(B) 높이를 조정 하십시오.
풀통 조립:
- 스크류를 이용 풀통을 조립 하십시오.(그림7)
- 플통덮개(A)를 들어 화살표의 부분을 맞추어
풀통을 장착 하십시오.(그림8)
 Loading...