12. Trigger Adjustments
The Empire AXE trigger can be adjusted by the four set screws in the trigger. Three of
the set screws can be adjusted without removing the trigger frame assembly.
When a trigger pull is recognized, the LED will quickly flash a dim red for each trigger
pull. If no trigger pull is recognized, the LED flashes normally based on the status of
the eyes and battery power level. If the trigger is held in, the dim red LED will stay
illuminated.
Before making any trigger adjustments, de-gas the Empire AXE, make sure the gauge
reads 0 psi, and then switch on the Empire AXE with eyes turned off to easily moni-
tor the current activation point by watching the LED, while listening to the solenoid
clicking.
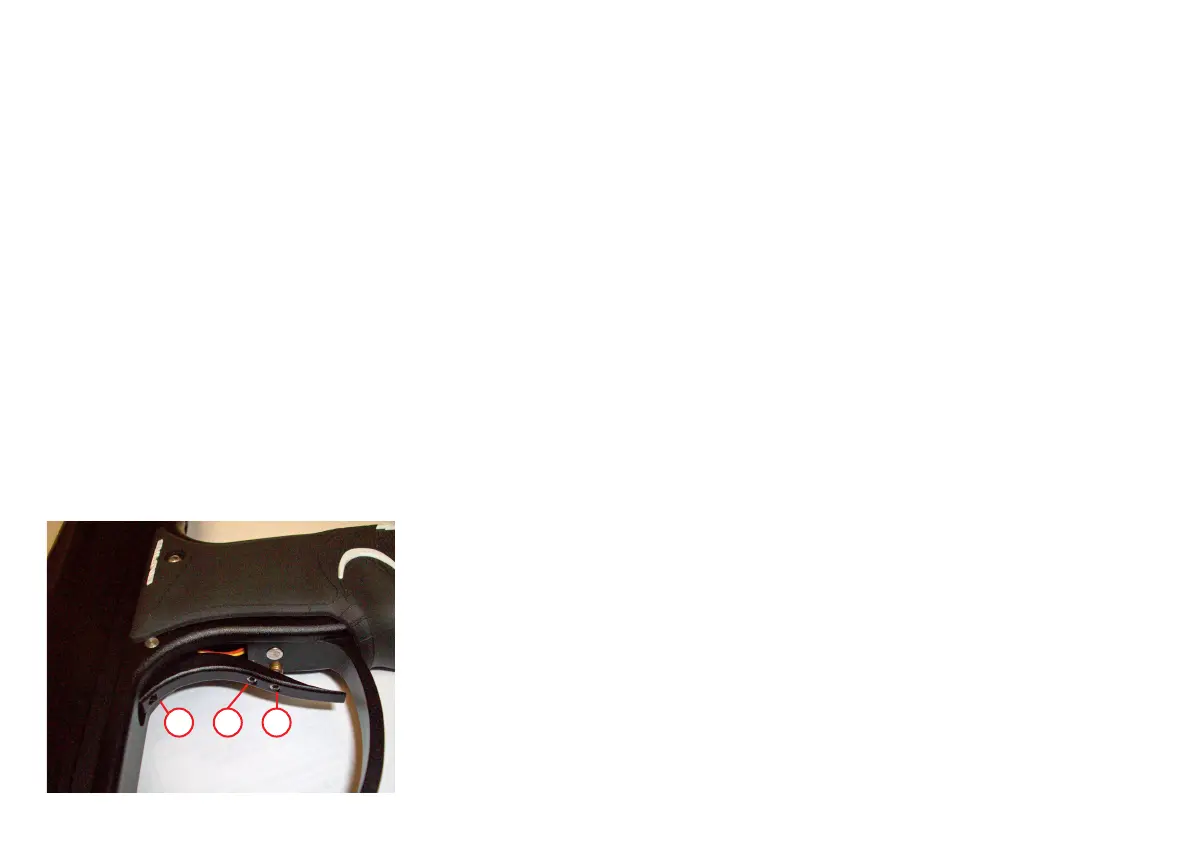
You will notice three set screws in your trigger (Fig. 12.1). These can be adjusted with
a 1/16” Allen wrench. Make small adjustments and check that the trigger is activating
the solenoid.
• The (1) rst set screw located in the top of the trigger adjusts forward movement,
and forward stop point.
• The (2) second set screw adjusts the rear movement range, and rear stop point.
• The (3) third set screw located at the bottom of the trigger adjusts the trigger
magnetic return. Turn it clockwise to increase the return strength and counter
clockwise to decrease the return strength.
• The rst screw adjusts the trigger activation point. This screw can only be adjusted
once the frame or trigger has been removed. It is recommended that you do not
adjust the factory setting of this set screw as setting this set screw to high may
cause damage to the trigger switch.
Notes:
• Normal activity may cause set screws to back out of adjustment. If necessary use
blue loctite to help keep them set correctly. However do not use an excessive
amount and allow the blue loctite to dry overnight before using your Empire AXE.
• If any of the set screws are over adjusted in any direction the Empire AXE may not
fire.
• If the trigger travel is adjusted too short, the Empire AXE may re on its own,
repeatedly and/or uncontrollably.
13. General Maintenance
CAUTION: Before attempting to perform any maintenance operations, make sure
that all paintballs and air sources have been removed from the marker and that the
regulator gauge reads 0 psi. Install a barrel-blocking device, and push the power
button and hold for over 2 seconds until the LED light changes from red to green. Keep
the Empire AXE power off.
Keep your Empire AXE clean and lubricated to eliminate the friction that would prevent
reliable operation. It is recommended that you clean and lube the marker before each
use.
Do not use oil or petroleum-based lubricants in the lubrication of this marker. Under
any circumstances DO NOT use a solvent based lubricant. Teflon or silicon (non-
spray only) lubricants designed for use on O-rings may be used for lubrication for the
bolt, bolt guide and poppet area only. Dow 33 or the include factory grease is recom-
mended.
(Fig.12.1)
321