14 Check for parts online at www.GetEskimo.com or call 800-345-6007
Operator’s Manual
44100
|
Eskape™ 2000 Flip-Style Sled Shelter
ENGLISHENGLISH
ASSEMBLY TIPS FOR SKIN ATTACHMENT:
• To keep the skin evenly aligned, it is recommended to
secure the entire rear of the skin before working the
edge trim around the corners of the sled.
• The edge trim attachment process can be re-done until
satisfactory results are achieved. This is recommended,
as it will improve the performance of the shelter.
• Once the edge trim is satisfactory, remove all spreader
poles and ensure the skin is self-supporting correctly,
before permanently xing the edge trim with screws.
• We recommend the use of a cordless drill during STEP 5.4.
The rubberized edge trim has a metal core to provide
additional structure, but is also sometimes dicult to
screw through. It is important to place screws higher on
the width of the edge trim to make sure full contact is
made with the sled.
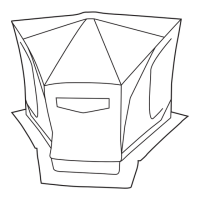
SECTION 5 Attaching the Shelter Skin
5.1
With all spreader poles in place, begin working the
#42826 skin assembly over the aluminum frame work.
There are hook-and-loop connections sewn on the
inside of the skin to attach/locate each aluminum
frame assembly.
Secure each connection as snug as possible.
This will determine how tight the skin will be
once attached to the sled.
5.2
Shorten the front #27729 spreader poles by 1 inch,
still leaving them attached. Also shorten the rear
#27730 spreader pole by 1 inch. This will ensure
there is appropriate tension on the skin while in
use, without the need for spreader poles.
The skin and frame should be self-supporting
without the need for spreader poles once the
edge trim is attached in the next step.