14
ENGLISH ENGLISH
Drawing A
INSTALLATION DIMENSIONS
Fig. A
Fig. B
Table A: Recommended dimensions
Opening a b c (*) d (**)
angle "
αα
αα
α" (mm) (mm) (mm) (mm)
90° 145 145 290 100
110° 125 125 290 80
(*) working excursion of piston rod
(**) maximum dimensions
CALCULATING INSTALLATION DIMENSIONS:
GENERAL RULES
If modifications to the dimensions specified in Table A
are necessary, proceed as follows:
- For 90° leaf opening: a + b = c
- For leaf opening over 90°: a + b < c
- The lower the dimensions of a and b the higher the gate
speed. Always respect current standards.
- Limit the difference between a and b to within 4 cm: larger
differences alter speed considerably during opening and
closing.
- For reasons of operator clearance, the minimum value for
Z is 45 mm (fig. A)
If the dimensions of the gate post or position of the hinge do
not allow for the specified distance of “a”, make a recess
in the gate post as shown in fig. B.
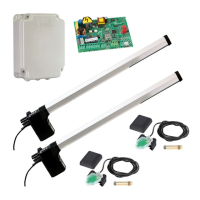
3. INSTALLATION OF THE AUTOMATION SYSTEM
3.1. PRELIMINARY CHECKS
To ensure trouble-free operation, make sure that the gate
(whether existing or yet to be installed) has the following
specifications:
• max. length of each gate leaf: 1.8 metres
• strong and rigid leaf frame
• smooth gate movement, with no stiff points
• hinges in good condition
• mechanical travel limit stops
If any welding or brazing has to be done on the gate, do this
before installing the automation system. The good order of the
structure directly influences the reliability and safety of the
automation system.
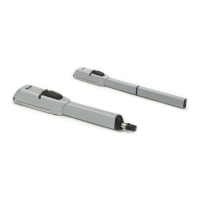
3.2. INSTALLATION OF THE OPERATORS
1) Fix the rear bracket to the gate post according to the
instructions in Table A. Adjust the length of the bracket if
necessary.
Warning:
Observe the specified dimensions to ensure
correct operator functioning.
In the case of iron gate posts, weld the bracket directly
onto the gate post.
In the case of brick/concrete gate posts, flush-mount a
wall plate (fig. 4), and weld the bracket to the plate.
2) Fix the operator to the rear bracket by means of the screws
supplied (fig. 4).
Caution: the operators supplied in the kit are left and right
hand versions.
For correct installation the operator must be positioned as
shown in fig. 4.
3) Release the operator (see paragraph 6).
Fig. 4
4) Extend the rod to the end of its stroke (fig. 5).
5) Lock the operator (see paragraph 6).
6) Rotate the operator rod two full turns clockwise (fig. 5).
7) Fit the front bracket onto the rod as shown in fig. 6.
Fig. 5
b
a
z
d
80
892
300 mm
150 mm
100 mm