The Fanvil X303W is a quick start guide for a Fanvil IP phone, likely a model within the X303W series, designed to provide users with essential information for setting up and utilizing the device. This guide covers the physical assembly of the phone, cable connections, basic Wi-Fi setup, voicemail configuration, and common call features.
Function Description
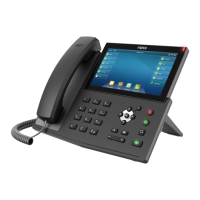
The Fanvil X303W is an IP phone intended for business communication, offering standard telephony functions along with advanced features enabled by its IP connectivity. It supports both wired Ethernet and wireless Wi-Fi connections, providing flexibility in network deployment. The phone is designed to integrate with an existing IP telephony system, allowing users to make and receive calls over the internet. Its primary function is to facilitate voice communication, with additional capabilities such as voicemail, call forwarding, and call management features. The device is designed for ease of use, with a clear display and intuitive button layout.
Usage Features
The Fanvil X303W offers a comprehensive set of usage features for efficient call handling and communication management.
Physical Assembly and Connection:
- Stand Assembly: The phone includes a plinth that slots into the back of the device. Multiple insert positions allow for various viewing angles, enabling users to adjust the phone's tilt for optimal visibility and comfort.
- Handset and Headset Connection: The phone supports a wired handset, which connects via a handset cable. It also accommodates optional headsets using an RJ-9 cable, providing hands-free communication. Users are directed to their headset documentation for specific connection instructions.
- Cable Connections: The guide details various ports for connectivity:
- DC-5V Port: For connecting the power adapter, supplying power to the device.
- Network Port: Connects to a LAN/Internet via Ethernet. This port is Power over Ethernet (PoE) capable, meaning it can receive power and data through a single Ethernet cable if the network infrastructure supports it.
- PC Port: Allows for a pass-through network connection to a PC/MAC, enabling a computer to share the phone's network connection without requiring an additional Ethernet drop.
- Headset Port (RJ-9): For connecting any RJ-9 capable headset.
- Handset Port: Specifically for connecting the X303W handset.
- Automatic Configuration: Once the phone is plugged into power and establishes a network connection, it automatically downloads its configuration files, making it ready for use. The voicemail box becomes functional with a default greeting.
Wi-Fi Connection:
- Menu Navigation: Users can establish a Wi-Fi connection by accessing the "Menu" soft key, navigating to the "Basic" menu option, and then selecting "WLAN."
- Enabling WLAN: The "WLAN" option can be toggled to "Enabled" using the right navigation key.
- Network Scan: Users can scroll to "Available Networks" and press "OK" to initiate a scan for available 2.4GHz/5GHz networks using the "Scan" soft key.
- Network Selection and Password Entry: The desired Wi-Fi network can be selected using navigation and "OK" keys, followed by prompts to enter any required password.
Voicemail Box Setup:
- Recording Personal Greeting:
- Press the "Messages" button.
- Enter the Administrator-provided PIN followed by the # key.
- Select option 3 for personal options, then option 1 to record the voicemail greeting.
- Follow voice prompts to record and review the greeting.
- Changing PIN:
- Press the "Messages" button.
- Enter the Administrator-provided PIN followed by the # key.
- Select option 3 for personal options, then option 2 to change the PIN.
- Enter the new PIN when prompted and press # when done.
Commonly Used Features:
- Placing Outgoing Calls:
- Without Headset: Pick up the handset or press the "Speakerphone" button. A dial tone will be heard, allowing the user to dial.
- With Headset: Press the "Headset" button to activate headset mode, then dial an extension or telephone number.
- During an Active Call (New Call): Press "Hold," then "More," then "New Call." Dial the extension or number. The original call can be resumed by pressing "Resume."
- Answering Incoming Calls:
- On Handset: Pick up the handset.
- On Headset: Press the "Headset" button when connected.
- On Speakerphone: Press the "Speaker" button.
- Rejecting Incoming Calls: Press the "Reject" soft key to send the caller directly to voicemail.
- Ending a Call:
- On Handset: Hang up the handset or press the "EndCall" soft key.
- On Headset: Press the "Headset" button or "End Call" soft key.
- On Speakerphone: Press the "Speakerphone" button or "End Call" soft key.
- Hold:
- Placing on Hold: Press the "Hold" soft key during an active call.
- Retrieving from Hold: Press the "Resume" soft key.
- Mute:
- Muting: Press the "Mute" button during a call to mute the microphone.
- Unmuting: Press the "Mute" button again to unmute.
- Transferring Calls:
- Cold Transfer: During an active call, press "Xfer," enter the transfer number, and press "Xfer" again.
- Warm Transfer: During an active call, press "Xfer," enter the transfer number, press "Dial," and then press "Xfer" when the second party answers.
- Call Waiting:
- Answering Second Call: When a new call rings in during an active call, press "Answer." The first call is placed on hold. Resume the original call with "Resume" after the second call ends.
- Rejecting Second Call: Press the "Reject" soft key to send the caller to voicemail.
- Volume Adjustment:
- In-Call Volume: Use the "+" and "-" buttons during a call to adjust the earpiece/speaker volume.
- Ringer Volume: Use the "+" and "-" buttons when the phone is idle to adjust the ringer volume.
- Speakerphone:
- Activating (Idle): Press the "Speakerphone" button to activate and get a dial tone for outbound calls.
- Switching from Handset/Headset: Press the "Speakerphone" button during a call on the handset or headset to continue the call on speakerphone.
- Ending Call (Speakerphone): Press the "Speakerphone" button to hang up an active speakerphone call.
- Forwarding Calls:
- Access the "Menu" soft key, navigate to "Features," then "Call Forward."
- Select the desired forwarding option (e.g., "Unconditional") and use arrow keys to toggle options.
- Save changes by selecting "OK."
- Redial:
- Press the redial button when idle to dial the last dialed number.
- Press the "CallLog" soft key to view recent calls and select a different previous call.
Maintenance Features
The quick start guide primarily focuses on initial setup and usage, with minimal explicit mention of ongoing maintenance features. However, implicit maintenance aspects include:
- Firmware Updates: While not explicitly detailed in this quick start guide, IP phones typically receive firmware updates to improve performance, add features, and address security vulnerabilities. The automatic configuration upon network connection suggests a system that can push updates.
- Troubleshooting: The guide implies that if the phone is not functioning as expected (e.g., not connecting to the network or not downloading configuration), basic troubleshooting would involve checking cable connections and network status.
- Support: The guide provides a link to online support ("https://support.serverdata.net/app/main"), indicating that users can seek assistance for any issues or questions that arise, which is a key aspect of device maintenance and longevity.
- Voicemail Management: The ability to record and change voicemail greetings and PINs can be considered a user-level maintenance feature, allowing personalization and security of the voicemail service.
Overall, the Fanvil X303W is presented as a user-friendly IP phone with robust communication features, designed for straightforward setup and daily operation in a business environment.