Do you have a question about the Festo MS4-LFR B Series and is the answer not in the manual?
General safety rules for product use, installation, and maintenance.
Describes the purpose of the LFR filter regulator for compressed air.
Specifies that only qualified personnel should work on the product.
Specifies required clearance around the product during mounting.
Lists different mounting types for the product.
Steps before mounting, including flow direction and exhaust.
Procedures for placing and securing the product at the installation site.
Steps for connecting pneumatic fittings and tubing.
Steps for initial setup and bringing the product into operation.
How to adjust and set the output pressure using the rotary knob.
Manual and automatic methods for draining condensate from the filter.
Step-by-step guide for replacing the filter cartridge.
How to clean the product exterior with suitable agents.
Table listing common faults, their causes, and remedies.
Steps for safely dismantling the complete system and product.
Mechanical specifications including mounting, threads, and temperature ranges.
Pneumatic specifications like pressure, flow rate, and air quality.
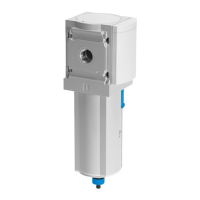
The MS4-LFR-...-B filter regulator is designed to precisely regulate and condition compressed air within pneumatic systems. Its primary function is to maintain a consistent outlet pressure in the downstream line, smoothing out pressure fluctuations that could otherwise impact system performance. Beyond pressure regulation, the device also acts as a filter, removing dirt particles and condensate from the compressed air supply, thereby protecting downstream components and ensuring the longevity and efficiency of the pneumatic system.
The filter regulator is intended for use in its original, unmodified state and must be in perfect technical condition for safe and optimal operation. Users should always observe the labeling on the product, which provides crucial information for proper handling and installation. Before any mounting, installation, or maintenance work, it is imperative to switch off the compressed air supply and secure it to prevent accidental reactivation, ensuring the safety of personnel.
Installation requires careful attention to several details. The product must be placed at the installation site, observing the flow direction indicated by the numbers (1 to 2) on the housing. Adequate mounting clearances, as specified in the manual, must be maintained around the product to allow for proper ventilation and access. For wall mounting, a mounting bracket is used, which is tightened with a nut and then secured to the mounting surface. When using sheet metal mounting, the product must be mounted vertically, and the maximum permissible wall thickness should not be exceeded.
Pneumatic installation involves screwing fittings into the pneumatic ports. It is crucial to note the maximum screw-in depth of the connector thread, as screwing in deeper can reduce the flow rate. Suitable tubing should be pushed into the fittings up to the stop, ensuring it is positioned axially to the pneumatic ports and not bent beyond its minimum bending radius.
Commissioning the device involves setting the desired output pressure. This is achieved by first unlocking the rotary knob by pulling it. The knob is then turned completely in the "-" direction. The system is slowly pressurized, and the rotary knob is turned in the "+" direction until the desired pressure is reached. It is important to maintain the permissible pressure regulation range, and the input pressure should always be higher than the set output pressure. Once the desired pressure is set, the rotary knob is locked by pressing it.
Regular maintenance, particularly draining condensate, is essential for the filter regulator's optimal performance. Condensate can be drained manually when its level reaches approximately 10 mm below the filter element. This is done by turning the drain screw anticlockwise from below, allowing the condensate to flow out, and then turning it clockwise to close. The filter regulator also features an automatic condensate drain function, which handles this process without manual intervention.
Changing the filter cartridge is another key maintenance task, especially if the flow rate is reduced despite an unchanged pressure setting. The process begins by exhausting the product. The release button on the filter bowl is pulled down, and the filter bowl is turned anticlockwise manually until a stop is felt. The filter bowl is then pulled from the housing. The latch on the support module is unlocked by pressing its upper edge, and the support module is pulled upwards. The spin disc is unscrewed, and the old filter support is removed. A new filter cartridge is installed by gripping it and pushing it onto the filter support, then screwing in the spin disc and tightening it lightly to the specified torque. The spin disc is then pressed into the filter bowl until the lock audibly engages. Finally, the filter bowl is mounted by aligning its lock release with the cutout on the housing and inserting it, then turning it clockwise until it audibly locks at the end stop.
Cleaning the outside of the product is recommended using a soft cloth and permissible cleaning agents such as soap suds (max. +60 °C) or petroleum ether (free of aromatic compounds). This ensures the device remains in good condition and continues to operate effectively.
| Type | Filter regulator |
|---|---|
| Max. pressure hysteresis | 0.2 bar |
| Material housing | Die-cast aluminum |
| Voltage | Not applicable |
| Housing material | Die-cast aluminum |
| Seal material | NBR |
| Operating pressure | 1.5 to 16 bar |
| Operating medium | Compressed air |
| Medium temperature | -10 ... 60 °C |
| Ambient temperature | -10 ... 60 °C |
| Bowl guard material | Polycarbonate |
| Port size | G1/4 |
| Power consumption | 0 W |