[2.4]
Clamping lever for stop ruler
[2.5]
Bevel holder
[2.6]
Release lever for special cutting posi
tion*
[2.7]
Lever for special cutting position*
[2.8]
Cable winder with integral carry han
dle
[2.9]
Clamping lever for mitre angle (verti
cal)
[2.10]
Selector switch for mitre angle range
(vertical)
The components marked with an * on the fig
ures are only included in the scope of delivery
of the KS 120 REB.
The illustrations specified are located at the be
ginning and end of the operating instructions.
6 Operation
WARNING
Unauthorised voltage or frequency.
Risk of accidents
► The mains voltage and the frequency of the
power source must correspond to the
specifications on the machine's name
plate.
► In North America, only Festool machines
with the voltage specifications 120 V/60 Hz
must be used.
Before initial operation
– Remove the transport safety device [4.4] on
the guide rod.
Switching on/off
– Press the on/off switch until you feel re
sistance in order to unlock the saw unit and
the pendulum guard.
– Press the safety lock [1.3].
– Press the on/off switch [1.2] all the way in
to switch on the machine.
– Release the on/off switch again to switch
off the machine.
6.1 Setting up the machine
WARNING
Risk of injury, electric shock
► Always disconnect the mains plug from the
socket before performing any work on the
machine.
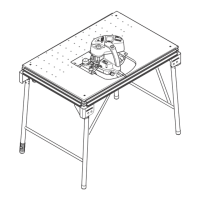
Install the machine on a level and stable work
surface before using it (e.g. the UG-KAPEX un
derframe, the MFT multifunction table or a
workbench).
You have the following installation options
Screws: Use four screws to secure the machine
to the work surface. Use the holes [6.1] at the
four support points on the saw table to do this.
Fastening clamps: Use four fastening clamps
to secure the machine to the work surface. The
flat surfaces [6.2] at the four support points on
the saw table can be used as clamping surfa
ces.
Clamping set (for MFT): Secure the machine
onto the Festool MFT multifunction table using
the clamping set [6.4, 494693]. Use the two
screw holes [6.3] to do this.
UG-KAPEX underframe: Attach the machine to
the underframe as described in the assembly
instructions which accompany the underframe.
6.2 Transportation
Securing the machine (transport position)
► Press the on/off switch [4.1].
► Swivel the saw unit down all the way to the
stop.
► Press the lock [4.2]. The saw unit will now
remain in the lower position.
► Tighten the rotary knob [4.3] to secure the
saw unit in the rear position.
► Wrap the power cable onto the cable wind
er [5.5] for transport.
► Put the hex key [5.4] and the bevel [5.3] (KS
120 REB only) away in the holders intended
for this purpose.
WARNING
Risk of injury
► Never lift or carry the machine by the mov
able pendulum guard [5.1].
► To carry the machine, hold it by the side of
the saw table [5.2] and by the carry han
dle [5.5] in the cable winder.
Unlocking the machine (working position)
► Push the saw unit down slightly and pull the
transport safety device [4.2].
► Swivel the saw unit upwards.
► Unscrew the rotary knob [4.3].
English
24
 Loading...