13
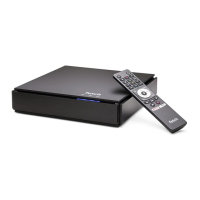
Start up
This is the home stretch where you activate your Fetch service and get it all
happening. It will take a few minutes for your Fetch Mighty to move through
three loading screens and the screen may go black between each one. Don’t
worry, this is normal. Once finished simply follow the instructions on the
Welcome Screen.
Visit www.fetchtv.com.au to download the Fetch Mighty User Guide and get the most from your service.
Your Fetch Mighty will check your connection to the Internet and prompt you if you need to connect. If you are
already connected there is no need to set up Wi-Fi. If you are connecting using Wi-Fi:
1. Choose ‘Wi-Fi Connection’ and follow the prompts.
2. Select your home network from the list of in range networks. If needed, confirm the security settings.
3. Your Fetch Mighty will let you know once you’re connected then continue to start up.
• Use your remote to enter the Activation Code you got from www.fetchtv.com.au/activate if this is your first
box, or www.fetchtv.com.au/account if you are adding additional boxes to your account. Your code (which is
case-sensitive) will then be checked and confirmed.
• If the feature is available to you, you can choose another Name for your Fetch Mighty.
• The box will next try set up the remote to control your TV. Do this now or later at Menu > Manage > Settings >
Remote Control.
• Choose 5.1 Surround Sound for Fetch, if your sound system supports this Audio Setting.
• Next you can set up your Parental PIN. Do this now or later at Menu > Manage > Settings > User > PIN Change.
The default PIN is 0000. If you’ve already set your PIN then you’ll just need to confirm it.
• The box will then do a Channel Scan which may take up to 5 minutes. The box will check Diagnostics then show
the location of the Fetch TV Privacy Policy. Select Finish to restart and load the Fetch main menu.
Do not turn off or reboot your Fetch Mighty at any time during set up. Software updates can take up to 5 minutes.
Connect to your home Wi-Fi network
Welcome Screen