Do you have a question about the Fetco CBS-71A and is the answer not in the manual?
This document serves as a User's Guide and Operator Instructions for FETCO's CBS-71A, CBS-71AC, CBS-72A, and CBS-72AC High Volume Drip Coffee & Tea Brewers, which are commercial beverage equipment. It covers models manufactured after 2014, with references to older digital and analog CBS-7000 series brewers in separate guides.
The FETCO CBS-71 and CBS-72 series brewers are designed for high-volume drip coffee and tea production. The "A" suffix denotes stationary counter or stand-mounted units, while "AC" indicates units with a stand for use with mobile dispensers. The core functionality of both "A" and "AC" versions is identical, with the primary difference being their intended placement and compatibility with different dispenser types.
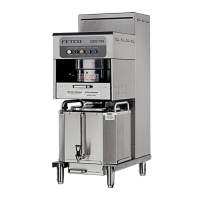
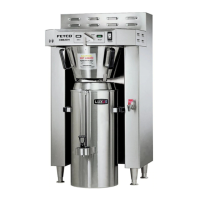
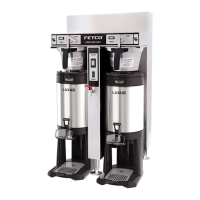
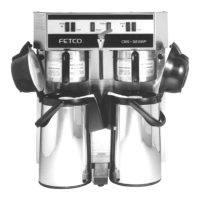
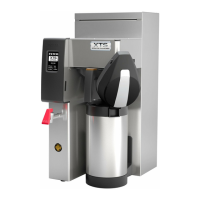
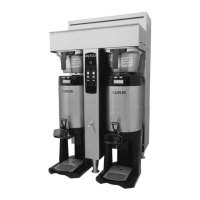
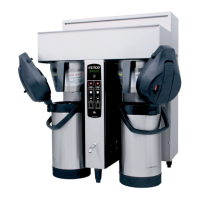
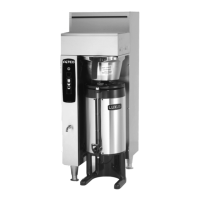
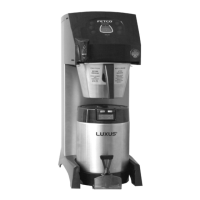
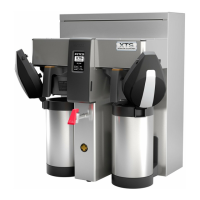
The CBS-71A is a single brewer, stationary unit, while the CBS-71AC is a single brewer designed for use with mobile dispensers. The CBS-72A is a twin brewer, stationary unit, and the CBS-72AC is a twin brewer for mobile dispensers. Each CBS-72 unit is essentially two separate brewers housed within one body, each with its own water tank and three heaters.
These brewers are fully automatic and feature electronic temperature control to ensure precise brewing. A key safety and quality feature is that the brewer will not initiate a brew cycle unless the brewing water temperature is correct. For added safety, thermal breakers and a high-pressure cutoff switch are incorporated.
The brewers require large volume insulated dispensers for operation. For CBS-71A and CBS-72A models, LBD-6 six-gallon counter-top dispensers are used (two required for CBS-72A). For CBS-71AC and CBS-72AC models, LBD-6C mobile six-gallon dispenser carts are used (two required for CBS-72AC). Additionally, LBD-18 mobile 18-gallon dispenser carts and LBD-24 mobile 24-gallon dispenser carts are available for CBS-72AC models only.
An optional Power Management System is available for CBS-72 (dual) models. This system reduces high amperage power requirements by operating only one side's tank heaters at a time. When a brew cycle starts, power to the heaters on the brewing side is temporarily turned off and redirected to the non-brewing side if needed. If a brew is initiated while the tank is still heating, the ready light will flash until the setpoint temperature is reached.
Operating the FETCO CBS-71 and CBS-72 series brewers involves a straightforward process designed for efficiency and consistency.
To begin, the POWER switch must be pushed to the ON position, which will illuminate the button, indicating the brewer is powered and operational.
Preparing the brew basket(s) is the next step. Users carefully pull open the drawer holding the brew basket, grasp it by both handles, and lift it out. After emptying and rinsing if necessary, a paper filter is placed in each basket to be used. The appropriate amount of pre-measured, ground coffee is then poured into the filter and spread evenly. The brew basket is then placed back into the drawer, aligning one of the handles with a front corner, and the drawer is closed completely until it is flush with the brewer's front surface.
Proper placement of the dispenser(s) under the brew baskets is crucial. Users must ensure the brew-through cover is in place, the dispenser is empty enough to accommodate the brew volume, and the faucets are closed. Dispensers should be pushed all the way in, with brew funnels aligned to the bottom of the brew baskets. When using mobile carts, both parking brakes must be set by pressing the paddle above the wheels; a green button will extend to confirm the brakes are engaged. To release, the green button is pressed again.
Once the READY light is on, the BREW button is pressed to start the brew cycle. The BREW button will illuminate, and the cycle will begin immediately. The brew cycle cannot be started if the READY light is off. An optional BREW WAIT setting can be enabled; if active and the READY light is off when BREW is pressed, both BREW and READY lights will flash. Brewing will commence only after the water reaches the correct temperature, at which point the READY light will turn solid.
A drip delay cycle follows the brew cycle, during which the BREW button flashes, indicating that coffee may still be dripping. Users are cautioned not to remove the brew basket or move dispensers until dripping has completely stopped, which may take several minutes. When removing the brew basket, it's important to inspect for any trapped hot coffee. For carts, parking brakes should always be set when not in transport.
Programming features allow for customization of brewing parameters. By holding the SET button for three seconds, users can access the programming menu. Parameters such as brew orifice size, bypass percent, drip delay, auto transfer pump time (for transfer units only), and water temperature can be adjusted using the UP and DOWN buttons. An optional "Brew Wait" setting can be toggled ON or OFF; when ON, the brewer will wait for the set temperature before brewing if the BREW button is pressed while the unit is still heating. To save changes and exit programming mode, the SET button must be held for three seconds until "STo" is displayed. The unit will automatically return to normal operating mode after 30 seconds of inactivity, but unsaved changes will be lost. Error codes, such as those for temperature probe issues or stuck switches, are displayed on the control board and can be reset by cycling the power switch.
Maintaining the FETCO CBS-71 and CBS-72 series brewers is essential for optimal performance and longevity, with a focus on daily cleaning and periodic inspection of key components.
Daily Cleaning: At the end of each day, it is crucial to remove the brew basket and wipe the bottom of the spray pan with a cloth. This action helps to remove any accumulated coffee oils, preventing buildup that could affect flavor and hygiene. Before initiating any brew cycle, operators should always verify the cleanliness of both the brew baskets and the dispensers.
Brew & Bypass Orifices Maintenance: The flow of water through the brew and bypass orifices can gradually become restricted due to the accumulation of mineral deposits. Therefore, these orifices should be inspected periodically and cleaned as necessary.
To access and clean the orifices:
Installation and Electrical Considerations: For successful installation, it is imperative that the brewer is installed by qualified personnel to prevent damage and ensure proper operation, as damage from improper installation is not covered by the warranty.
Electrical Installation:
Plumbing Installation:
Brewer Set-up:
Drip Tray Drain Connection (stationary systems only):
By following these guidelines, users can ensure the safe, efficient, and long-lasting operation of their FETCO CBS-71 and CBS-72 series brewers.
| Manufacturer | Fetco |
|---|---|
| Model | CBS-71A |
| Category | Coffee Maker |
| Material | Stainless Steel |
| Type | Commercial Coffee Brewer |
| Capacity | 1.9 liters |
| Water Source | Direct water line |
| Voltage | 120V |
| Features | Programmable |