PAGE 19Help: 888-426-5001 QualityWaterForLess.com
9 ›InItIal start-uP
1) With one nearby softened faucet running in the COLD position, slowly open your bypass valve or 3-valve bypass
to about ¼ open to allow the air trapped in the softener to escape via your running faucet.
NOTE: Opening the
bypass too quickly or too open may damage your softener or plumbing
2) Allow the softener tank to slowly fill with water. After a few minutes, you will see a trickle of water coming from
the cold water faucet. Allow the water to run slowly in this manner for an additional 5 minutes. Next, with the
cold water faucet still running, gradually move your bypass valve to the fully open position.
NOTE: You may see
some initial discoloration from the softened water – this is normal and should dissipate within the first
40-50 gallons of water used.
Turn off the running cold water faucet when the water runs clear
3) Repeat steps 1 and 2 for the other tank (it will switch to the other tank automatically after a regeneration)
› conGr at u l atIon s
Your new softener with Fleck 9000 Meter Valve is now properly installed and programmed! Please
maintain your system by keeping the softener plugged-in and always keep your brine tank filled
with salt to at least above the water level. We appreciate your business and hope that you enjoy
years of trouble-free softened water!
4)
i
To test the integrity of your new system and all connections
,
it is strongly encouraged that you
perform a short form regeneration to check for leaks before service.
Begin this process by adding approxi-
mately 5 gallons of water/the amount of water needed to cover the brine grid into the brine tank
5)
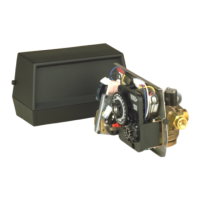
If you have the mechanical version of the Fleck 9000,
begin a regeneration by turning the timer wheel
clockwise, let the regeneration run its full course to completion, and check the entire system for leaks. If you
notice a leak originating from the drain line/connection,
return to page 14
to review preparing the drain con-
nection. If you notice a leak originating from the brine line/connections,
return to pages 12 and 13
to review
preparing the brine tank connection
6)
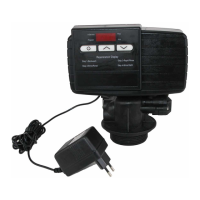
If you have the electronic Fleck 9000 SXT version,
begin the regeneration sequence by HOLDING the
REGEN button for 5 seconds. Once the screen stops flashing BW, let BW - Backwash run for about 1 minute
to observe the water leave out the drain line and check for leaks. If you notice any leaks,
return to page 14
to
review preparing the drain connection. Click the REGEN button ONCE to move on to BD - Brine Draw
7) Once the screen stops flashing BD, let BD - Brine Draw run for about 1 minute to observe the water level in
the brine tank being drawn lower. Also check the brine line and the float valve in the brine well for leaks. If the
water level doesn’t lower or there is a leak,
return to pages 12 and 13
to review preparing the brine tank
connection. Click the REGEN button ONCE to move on to RR - Rapid Rinse
8) Once the screen stops flashing RR, advance from RR - Rapid Rinse to BF - Brine Fill by clicking the REGEN
button ONCE more. Once the screen stops flashing BF, let BF - Brine Fill run for about 1 minute to observe the
water level in the brine tank rise. Also check the brine line and float valve in the brine well for leaks. If the water
level doesn’t rise or there is a leak,
return to pages 12 and 13
to review preparing the brine tank connection.
Click the REGEN button ONCE to finish
9) Now you may add 120-160 pounds of pellet, solar, or block salt to your brine tank.
Always keep your brine tank
filled with salt to at least above the water level.
You do not need to perform a full regeneration immediately
after installation as the new resin arrives at full softening capacity. Simply let your softener meter automatically
trigger regenerations by tracking the water consumption
 Loading...