40
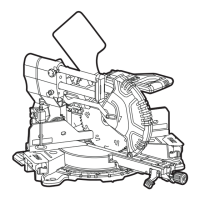
SMS 305 18-EC
Inserting/replacing the battery
Press the charged battery into the power
tool until it clicks into place (see figure B).
To remove, press the release button and
pull out the battery (see figure C).
CAUTION!
When the device is not in use, protect the
battery contacts. Loose metal parts may short
circuit the contacts; explosion and fire hazard!
Mounting on a level and stable
surface (see figure D)
WARNING!
To ensure safe handling, the miter saw
must be mounted on a level and stable
surface (e. g., workbench) prior to using.
Fasten the miter saw to the working
surface by using suitable fasteners. The
bolt holes (10) serve for this purpose.
The nail hole (9) can be used for nails or
longer drywall screws. Be careful not to
overdrive nails or over torque the bolts.
This could crack/damage the base of the
saw.
Place two or more “C” clamps on the
clamping areas and secure for temporary
mounting.
Mounting to a FLEX saw stand
This miter saw can be mounted on FLEX WB
110-260 saw stand, referring to the instruction
of saw stand for its installation.
WARNING!
Read all safety warnings and instructions
included with the saw stand. Failure of
observing safety warnings and instructions
can cause serious injuries.
WARNING!
Assemble the stand properly before mounting
the power tool. Perfect assembly is important
in order to prevent the risk of collapsing.
Dust extraction
(see figure E1
-
E2)
This miter saw comes with a dust bag (36),
dust tube (39) and a vacuum adapter (37)
to help you keep the work area clean. The
vacuum adapter (37) accepts vacuum hoses
with diameter (32mm or 38 mm). It also
allows to be connected with dust bag (36) for
smaller jobs.
To install the dust tube (39), push it onto the
dust port (30).
To install vacuum adapter (37) or dust bag
(36), after the dust tube (39) is installed,
connect the vacuum adapter (37) or dust bag
(36) with the dust tube (39).
NOTE
Clean the bag at the end of the cutting
session and before transporting or storing the
saw.
WARNING!
Be extremely careful with disposed dust.
Materials in fine particle form may be
explosive. Do not throw sawdust on an
open fire. Spontaneous combustion may, in
time, result from mixture of oil or water with
dust particles.
Work cla
mp (see figure
F)
WARNING!
To ensure optimum working safety, the
workpiece must always be firmly clamped.
Do not saw workpieces that are too small to
clamp.
The work clamp (35) can be mounted on the
left or right side of the saw depending on the
cutting task at hand.
Insert the work clamp (35) into the desired
mounting hole (25) behind the fence. Secure
the clamp into place by tightening the work
clamp locking knob (26).
Lift up the clamping lever (F-1) to adjust
the clamp so that the hold-down clamp (F-
2) is positioned over workpiece as needed.
Press down the clamping lever (F-1).
Double-ended Allen wrench
storage (see figure G)
There is a storage location on the saw to store
the double-ended Allen wrench (38).
When not in use, store the Allen wrench to
prevent it from being lost.
Removing and installing the
blade (see figure H1-H3)
WARNING!
Use only the recommended saw blades. If
they are for cutting wood or similar materials
they have to be according to EN 847-1:2017.