45
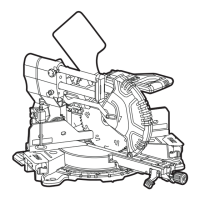
SMS 305 18-EC
WARNING!
Always support long pieces. Never use
another person as a substitute for a table
extension (7), as additional support for a
workpiece that is longer or wider than the
basic miter saw table or to help feed, support
or pull the workpiece.
Table extensions (7) have been provided for
the left and the right side of the saw.
To adjust table extensions:
Turn the table extension lock lever (8)
outward to unlock the table extension (7).
Move the table extension (7) inward or
outward depending on your application.
Tighten the lock lever (8) by pushing it
inward to secure the table extension (7)
place.
If the table extension lock lever (8) cannot
be locked, lift the lever up and rotate it
outward to adjust the tension. Then try
again and repeat this step if necessary.
WARNING!
Always adjust the table extension to
support workpiece. Unsupported workpiece
can move out of position during cut and cause
injury and/ or tool damage.
Adjusting kerf insert
(see gure S)
WARNING!
The kerf insert (17) must sit below the
miter table. If the kerf insert is not adjusted
properly, the workpiece can catch on the
uneven edges, resulting in binding, which
could result in serious personal injury.
WARNING!
Never operate the saw without a kerf insert
(17) installed.
Remove the battery.
Lock the saw head down.
Loosen the six kerf screws (S-1) securing
the kerf insert (17) with the supplied Allen
wrench (38).
Adjust the kerf insert (17) as close to the
blade (teeth) as possible without touching
the blade.
Tighten the screws (S-1).
NOTE
At extreme bevel angles, the saw blade may
slightly cut into kerf insert.
Saw operations
Main switch (see gure T)
The main switch (3) has a lock-off lever (2)
that must be moved to the left to be able to
depress the main switch (3). Grasp the main
switch (3) with your fingers and move the
lock-off lever (2) to the left. Then pull the main
switch (3) to activate the saw.
Release the main switch (3) to stop the saw.
LED shadow light (see figure U)
WARNING!
Do not stare into the light beam (not even
from a distance). Staring into the light beam
may result in serious injury or vision loss.
The LED shadow light (U-1) is controlled
by the shadow light switch (31) and is
independent from the miter saw main switch
(3).
If the shadow light (U-1) is turned on only by
pressing the shadow light switch (31) without
activating the main switch (3), light will be on
for 1 minute, then turn off automatically.
The shadow light (U-1) will turn off
automatically approximately 10 seconds after
the main switch (3) is released.
Speed control (see figure V)
There are three speed levels that can be
changed by using the speed control button
(33). Press speed control button (33) to
choose the speed. The LED lights below the
numbers indicate the current speed level.
Indicator
light on
control panel
Speed
level
/min
(OPM)
Application
1 1900 Aluminum
2 2580 Plastic
3 4000 wood