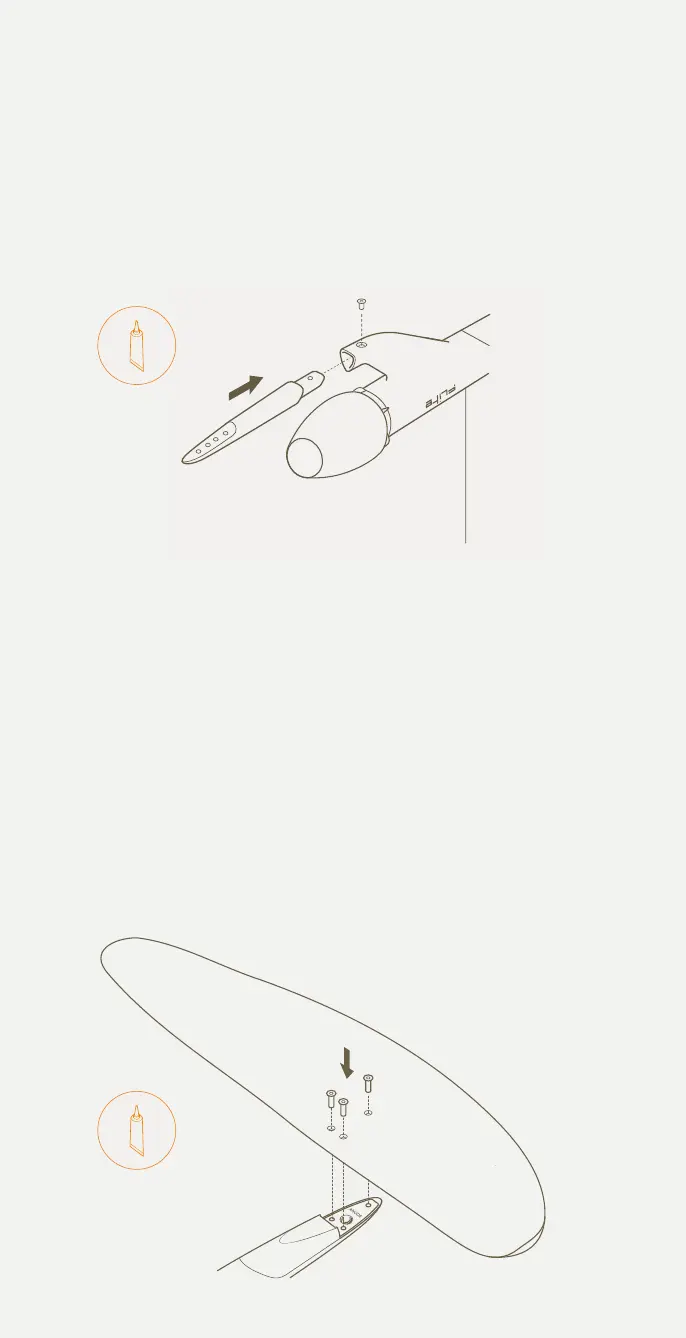
Connect the fuselage tail
1 Place the board upside down with the eFoil connected. Take the
fuselage tail from the travel bag, add a light cover of Tef-Gel to the
tail connection and install the tail into the fuselage.
2 Add a thin layer of Tef-Gel from the tube supplied to the thread
of the supplied 16mm fastener bolt and carefully tighten using
the hex key using torque of 6 Nm. You may need to push on
the tail (compresses the o-ring) for the screw to find the thread.
Misalignment may cause damage to the thread.
Connect the wing
1 Remove your Cruiser 1800 wing from the travel bag and from its
wing cover.
2 Place the wing in position as shown. Ensure you have the correct
fuselage 1 cover that was provided with your wing (refer to page 12).
3 Insert the 3 fasteners taking care to ensure the correct set is
being used for the particular wing model you are fitting. ALWAYS
add Tef-Gel to the fasteners first. The fasteners should extend
by approximately 6-8mm through the wing when placed in the
countersunk holes.
4 Tighten the fasteners with the supplied hex key, ensuring the
fasteners are tight enough that the wing cannot move or
wobble significantly during use. Use a torque of 6 Nm to tighten
the fasteners.
TEF-GEL
Connect the fuselage tail
Turning on Flitescooter
Place the inated Flitescooter
on a clear surface. Locate the
handlebar cap and remove
by gently pulling up
Turn the handlebar lock
counterclockwise so that the
opening lines
up with the handlebar cavity.
Insert the handlebars into the
handlebar cavity. Turn the
handlebar
lock clockwise until it stops.
This will keep the handlebars
locked into
place.
Flitescootering for the rst time
Arming the motor
Connect the front wing
Connect the stabliser
TEF-GEL
24
Connect the fuselage tail
Turning on Flitescooter
Place the inated Flitescooter
on a clear surface. Locate the
handlebar cap and remove
by gently pulling up
Turn the handlebar lock
counterclockwise so that the
opening lines
up with the handlebar cavity.
Insert the handlebars into the
handlebar cavity. Turn the
handlebar
lock clockwise until it stops.
This will keep the handlebars
locked into
place.
Flitescootering for the rst time
Arming the motor
Connect the front wing
Connect the stabliser
 Loading...