INSTALLATION, OPERATION, &
MAINTENANCE MANUAL
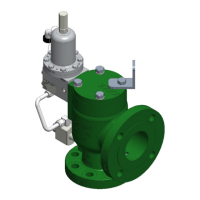
TITLE: F7000 / 8000 Series Rev. T
Pilot-Operated Safety Relief Valve Page 10 of 43
2.7 STARTUP
Foreign particles or dirt can damage the valve and make it inoperative. Prior to installation, clean out the
piping thoroughly. If the valve is not installed immediately, inlet and outlet connections should be protected
and covered.
Pressure can be applied to the valve as system pressure increases, or by opening the block valve (if there
is one) after the system has attained operating pressure. Pressure should flow through the pilot valve into
the dome cavity of the main valve and seat the piston. The valve may briefly vent to the exhaust before the
dome is fully pressurized. A dome spring installed in newer valves is intended to help keep the piston
seated with less-than-full dome pressure. Verify that the valve seat is leak-tight, in accordance with
Section 6.1.
The valve is now ready for service. Inspection and maintenance should be performed on a regular basis,
typically once a year, depending on the service conditions.
3.0 MAIN VALVE MAINTENANCE
WARNING: Improper assembly of the main valve or pilot may
result in leakage and/or failure of the valve assembly.
3.1
DISASSEMBLY OF THE F7000 / 8000 SERIES MAIN VALVE
(See Pages 11 and 12)
WARNING: It is extremely dangerous to attempt to disassemble any valve while it remains in
service with incoming line pressure. Due to the possibility of pressure being trapped
in the main valve dome region (above main piston) with valve out of service, pilot
mounting bolts and cap bolts should be loosened very slowly at first when performing
steps (2) and (3) below.
1) Remove the valve from service, or safely block the incoming pressure before disassembling the
valve and performing maintenance.
2) If necessary, remove the pilot valve and interconnecting tubing. See Section 4.0 for pilot valve
maintenance. The field test connection (FTC) may be removed by unscrewing the NPT connection
to the main valve. Older FTC bodies have a straight thread, lock nut, and Teflon seal. See main
valve assembly figure on Page 11.
3) Remove the bolts, lockwashers, and any lifting brackets that hold the valve cap in place.
4) With the cap removed, remove the dome spring if present, and top liner seal.
NOTE: A dome spring has been furnished in many newer valves, except at very low pressures, to
provide additional closing force on the main valve piston. At startup, this feature helps
minimize venting of the piston during initial pressurization.
5) Carefully reach into the valve and remove the piston assembly. Newer pistons may have an
interior threaded hole in which a cap bolt can be inserted to use for lifting. Note that the liner may
come out with the piston assembly. Care must be taken during this removal because any damage
might result in a sealing problem after the valve is reassembled.
6) The liner may then be removed; again, care must be taken not to damage the liner. Do not attempt
to pry or force the liner out as you may score the surface and cause a sealing problem.
7) Remove the retainer bolt, annular flow plug [if F8000 Series], and seat retainer. Larger F8000 flow
plugs may be fitted with a spring pin that locks its position on the piston and retainer. The spring
pin should remain in the piston due to an interference fit.
8) If the valve is IM construction, remove the pressure isolation spool at the top rear of the body using
a 1/4-20UNC bolt.
 Loading...