2-1.
INTRODUCTION
2-2.
This section
of
the
manual contains information
necessary
for you to effectively operate
your Model
893
AC/DC Differential
Voltmeter. It is recommended
that
you thoroughly
read and understand this
section of the
manual
before attempting to operate
your instrument.
POWER
RANGE
NULLS SENS
MODE
Readout dials
ON/LINE OPR
1000
TVM
+
000
.^
2-3.
Should
any
difficulties
be encountered during
the operation
of your
instrument,
please feel
free
to
contact your nearest John
Flulce Sales Representative
or write directly to the
John Fluke Mfg. Co.
,
Inc.
,
P.O.
Box
43210,
Mountlake Terrace, Wn.
98043,
with
a
statement
of your problem.
A
complete
list of Sales
Representatives
is contained
at the
rear of tMs manual.
2-4.
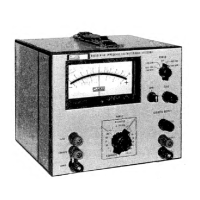
OPERATING FEATURES
2-5.
All of the controls,
terminals, and indicators
for
the
Model 893A and the
Model 893AR are illustrated
and described in Figure
2-1
and
Figure 2-2,
2-6.
OPERATION FROM 115/230
VOLT
AC POWER
LINES
2-7.
The Model
893 may be operated from either
a
115 or 230
volt ac power line. The input
power trans-
former
primary is composed
of
two
windings which,
when connected
in parallel, allows the instrument
to be
operated from
a
115 volt
ac power line or, when the
windings are connected
in series,
allows
the
instru-
ment to
be
operated
from
a 230
volt
ac power line.
2-8.
A rear panel
115/230 slide
switch
(S5) provides
the necessary
power transformer
primary winding con-
nections
when placed to the
desired 115 or 230 volt
position.
2-9.
PRELIMINARY
OPERATING
PROCEDURES
2-10.
Connect the Model
893
power cord to available
line power. If your instrument
does
not contain the
-01
option,
perform only
step
a. If your instrument
contains
the -01
option,
perform steps a
through c.
WARNING!
The
instrument case
is
connected
to
the
round
pin of
the three-prong
connector
located
on
the
power cord. Whenever the
instrument is operated
from
ac
line power,
ensure that
this round pin is connected to
a high quality earth
ground.
a.
Place the instrument controls
as
follows
and allow
at
least one minute of circuit stabilization
before
attempting any measurements.
2/10/75
The
Readout
dial labeled OO in the
preceding
step, represents the extreme
right-hand
vernier
dial.
b.
Place
the -01 option
equipped instrument POWER
switch to BAT CHK, observing that the meter needle
deflects to the left
of
the
-,
2 volt increment.
If
the
batteries
are
adequately charged,
the
instru-
ment
can
be operated on
battery
power
by placing
the POWER switch to either BAT OPR or BAT
OPR/LINE ISOL. To completely isolate your in-
strument
from
the
line power ground,
disconnect
the power cord
from line power.
c. If
the BAT CHK test results in
a deflection of less
than
.
2 volts on the meter, place the
POWER switch
to
BAT
CHG
and operate the
instrument from line
power until
the
batteries are adequately charged.
All measuremaits can be performed during recharg-
ing of the batteries. Should the
batteries
fail the
BAT CHK test after 16 hours
of recharging,
replace-
ment
of
the
batteries may be necessary. Refer to
Section
IV,
paragraph
4-19
and
4-20
for battery re-
placement instructions.
Battery manufacturers recommend
that nickel-
cadmium batteries should
not
be stored for
extended periods of
time without
recharging
at
least
every
90
days. Storage
temperatures
below
25‘^C are recommended.
2-11.
OPERATIONAL
TEST
2-12. The
following information
is
provided
for
the
operator to initially
verify instrument operation. These
tests
will only check relative instrument operation
and
are not intended
as
instrument
performance checks.
Should you wish to
check
the
accuracy of the instru-
ment against the
specifications contained in
Section
I,
refer to the
Performance Checks contained in
Section
rv of this manual.
2-13.
To
determine relative instrument operation,
perform the operations
described in the Preliminary
Operating
Procedures (paragraphs
2-9
and 2-10) and
proceed as follows:
a.
Place the
RANGE control to
1.
2-1
A