HYDRO TECH PERFORMANCE MONITOR
ADVANCED FILTRATION SYSTEM
www.fluval-g.com
EN.9
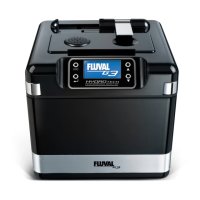
Rinse the inside and
outside of the cartridge
with fresh water to
remove any impurities.
Note that debris is col-
lected on the interior of
the cartridge.
•Re-placethecartridgecupandattachthe
mechanical cartridge to the priming chamber
using a clockwise motion.
•Putthemechanicalcartridgeassemblyaside
(preferably into a bucket.).
Maintenance Note: The mechanical cartridges
should be rinsed every 14 days— sooner if the
“Alert low flow” warning appears. The filter
cartridge included is a general usage cartridge.
To remove smaller debris in salt water or in
low-sediment aquariums, a fine cartridge can
be purchased. To find an online retailer visit
www.fluval-g.com.
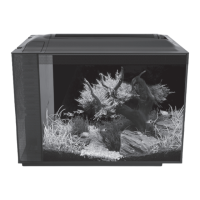
B. Preparation of Chemical Filter Cartridge
•Removethechemicalltercartridge,locatedon
the right (when facing the filter), by turning the
knob counter-clockwise from the “ ” position
to the “ ” position. Pull out the cartridge.
•Releasethechemicalcartridgecupfromthe
assembly head by pushing against one of the
two marked black clips located in the middle of
the cartridge. While pressing the clip, pull the
cup downwards.
If using the carbon
cartridge provided
remove it from the
cartridge cup and then
remove the plastic bag.
After rinsing it thorough-
ly with tap water, place
the cartridge back into
the bottom cup making
sure it’s properly aligned
If using another loose or
granulated chemical
media i.e. Fluval Lab
Series Nitrate or
Phosphate Remover, fill
the cup to 1 cm below
the top rim.
•Readmoreaboutltermediachoicesat
www.fluval-g.com.
•Beforereplacingthecartridgecap,checkforany
particles or debris on the outer lip or underneath
the cap. Debris in either area can prevent a
proper seal from taking place.
•Replacecartridgecapandre-insertcartridge
into cartridge cup. It can only be re-assembled
following the correct left to right orientation.
Re-attach cartridge cup to chemical cartridge
cap by aligning the arrows.
•Putthechemicalcartridgeassemblyaside.