Do you have a question about the FlySky FS-iA6B and is the answer not in the manual?
Guidelines for protecting the transmitter and proper power-on/off procedure.
Step-by-step guide to bind the FlySky transmitter to the receiver.
Diagram and explanation of connecting cables to the FS-iA6B receiver.
How to manage models and navigate the transmitter's menu using buttons.
Requirements for receiver battery, weight, and connection for RC yachts.
Adjusting maximum travel for rudder and sail winch servos.
Adjusting rudder sensitivity using Rate and Expo for different sailing conditions.
This document provides a comprehensive guide for setting up and using the FlySky FS-i6/FS-i6X Transmitter (Tx) and FS-iA6B Receiver (Rx) specifically for RC racing yachts, such as the DF65 and DF95. It also includes general tips and background information relevant to RC yachting.
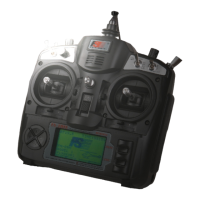
The FlySky FS-i6 system operates on a Digital Proportional Protocol, utilizing an Automatic Frequency Hopping Digital System. This means it transmits digital pulses on unique carrier frequencies, minimizing the risk of interference from other transmitters. The FS-i6 is a 6-channel controller, while the FS-i6X offers 10 channels. For DF yachts, only two channels are typically required: one for rudder control and one for sail winch control.
A key feature of this system is its built-in telemetry capability. The Tx monitor displays the condition of both the Tx and Rx batteries, and visual and audible alarms can be set for the Rx battery, providing crucial real-time feedback on power levels. The system also supports exponential (Expo) and proportional control for rudder and winch movements, allowing for fine-tuned adjustments to suit different sailing conditions and personal preferences. Furthermore, a single Tx can be bound to and used with multiple Rx units, enabling control of several different boats or rigs with one transmitter.
The Rx units come in different versions; the FS-iA6B, supplied with the kit, features a protected hard plastic case, making it suitable for marine environments. It has 7 ports for connecting components like the battery switch, rudder servo, and sail winch servo.
Binding: Each Tx has a unique ID, and the Rx must be programmed to receive signals only from its paired Tx. While a new Tx/Rx combination is usually pre-bound, additional Rx units need to be bound if you wish to operate multiple boats with one Tx. The binding procedure involves placing the Rx adjacent to the Tx, inserting the binding key tool into the Rx's B/VCC port, connecting the Rx battery, holding down the BIND KEY on the Tx, and then powering on the Tx. A steady red LED on the Rx indicates successful binding. The system supports up to 20 different models, each with its own unique settings, which can be selected via the System Menu/Model select option.
Switching Sequence: To ensure proper operation and prevent potential damage, a specific switching sequence is recommended: Tx ON, then Rx ON. When powering off, the sequence is Rx OFF, then Tx OFF. Additionally, if sails are rigged, the winch stick should be returned to a mid-range position before switching on the Rx to prevent overload of sheets or servos.
Navigation and Settings: The Tx features four buttons (OK, CANCEL, UP, DOWN) on either side of the screen for navigating through its hierarchical menu structure. A long press of OK activates the MENU, offering "System Menu" and "Functions Menu" options. Short presses of OK activate displayed screens for setting changes, while short presses of CANCEL exit screens without saving changes. A long press of CANCEL saves current settings. UP and DOWN buttons are used to change displayed parameters.
Model Selection and Naming: Users can select a model number and assign a custom name (e.g., "DF65 A+") to each boat or rig setup through the System Menu/Model select option. This allows for personalized settings for different configurations.
Rudder Control: The system allows for precise rudder control. Rudder end points can be set to prevent stalling, with a recommended throw of no more than 35 degrees from the center. This is adjusted via Function setup/Endpoints/Ch1. The rudder control can also be reversed if preferred, operating like a tiller, using the Sticks mode in the System menu.
Rudder Mid-Point Trim: The rudder's mid-point can be adjusted during racing using the trim tab below the stick, or more precisely via Functions setup/Subtrim/Ch 1.
Rudder Movement Rate and Expo: The Tx offers two methods to control the relationship between stick movement and rudder movement: Rate and Expo (exponential).
Sport Mode: Switch A (SWA) can be used to invoke a "Sport mode," which provides a second set of Rate/Expo settings for alternative rudder control, useful in specific conditions.
Winch Control: The sail winch line travel should be approximately 115mm. The main sheet attachment point can be adjusted by changing the number of turns on the drum or by rotating the drum itself. Bowsies should be slightly eased to prevent winch servo overload. The close-hauled and fully eased positions for both booms can be set using Function setup/Endpoints/Ch3/Up-Down. In very windy conditions, reducing sail load by easing sheets can prevent nosediving.
Throttle Curve for Winch: A "Throttle curve" can be set up using Switch B (SWB) to desensitize the winch, allowing for fractional easing of sheets in gusts.
Failsafe: The System setup/Rx Setup/Failsafe feature allows users to set a fail-safe position for the rudder and sheets in case of signal loss or Rx battery failure. This helps prevent the boat from sailing away uncontrollably.
LCD Screen Brightness: The LCD brightness can be adjusted via System Menu/LCD brightness, which is useful for visibility in bright sunlight.
Screen Saver: If the Tx is idle for a short period, the screen brightness will fade, and an audible alarm will sound. Pressing any button restores brightness, and the alarm can be switched off by upgrading the software.
Back Up and Model Copy: The system allows for backing up settings by creating a "dummy model" and copying settings to it using the Model Copy function (System setup/Model copy). This is a safer alternative to resetting model or factory settings, which can be done via System setup/Model reset or System setup/Factory reset.
Reverse Movement: If a control (e.g., rudder) moves in the opposite direction to what is desired, it can be reversed using the Functions Set Up – Reverse menu.
Advanced Settings: There is a "secret" Factory Setting Menu for experienced users, accessed by holding both sticks down at 45 degrees to the left before turning the Tx on.
Waterproofing: The Tx should not be used in the rain without a waterproof muff. The Rx should be mounted on the tray with all wires clear of rudder linkages. Liberal use of CorrosionX or similar waterproofing is strongly recommended for the Rx to protect its exposed circuit board in a marine environment.
Physical Rudder Reference: To ensure accurate rudder alignment, it is essential to establish a physical mid-rudder reference point on the underside of the hull. This involves removing the rudder, turning the hull upside down, aligning a straight edge between the keel and rudder post opening, and marking the rudder's trailing edge position with a fine permanent marker. Using a protractor, mark the positions for hard-over rudder throws (e.g., 35 degrees) on both tacks. If there is rudder slop, a short length of rigging line can be inserted into the rudder post hole and trimmed. Ensure the rudder moves freely after reassembly.
| Compatibility | FlySky transmitters |
|---|---|
| Frequency | 2.4GHz |
| Transmitting Power | < 20dBm |
| RF Receiver Sensitivity | -105dBm |
| 2.4G Mode | AFHDS 2A |
| Modulation | GFSK |
| Antenna Length | 26mm |
| i-BUS Port | Yes |
| Data Acquisition Port | Yes |
| Certification | CE, FCC |
| Type | 6-Channel Receiver |
| Range | 1.5km (in open area) |
| Input Voltage | 4.0-6.5V |
| Operating Voltage | 4.0-6.5V |
| Signal Output | PPM |
| Frequency Range | 2.4055-2.475GHz |