Service
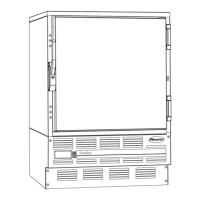
Latch adjustment
To adjust for proper latch engagement
1. Loosen striker plate mounting screws (Fig. 8.1).
2. Move striker plate up or down as required and tighten screws.
3. Test operation of latch.
To adjust for proper gasket seal
1. Loosen striker depth adjustment screw (Fig. 9.2).
2. Adjust stop in or out and tighten screws.
3. Test operation of latch.
Door gasket replacement
1. Remove existing gasket from mounting track.
2. Verify mounting track is free of any remaining gasket material.
3. Align new gasket with mounting track and press firmly in place.
4. Open and close door, checking for proper gasket seal without
pinching against refrigerator.
5. Adjust latch and or striker as necessary for proper door closure.
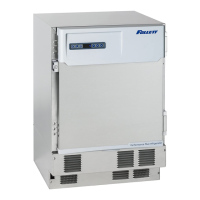
Slide-out compressor tray
Follett’s slide-out compressor tray allows technicians to partially
slide the condensing unit from the refrigerator back without cutting
refrigerant lines.
1. Remove rear panel (Fig. 10.1).
2. Remove two bolts securing condensing unit to refrigerator base
(Fig. 10.2).
3. Gently slide condensing unit out (Fig. 10.3).
Note: Do not put undue strain on the refrigerant lines.
Removing drawers
1. Pull drawer forward to stop.
2. Lift drawer front to free front rollers from sides.
3. Still lifted, pull drawer forward to free back rollers from sides.
Removing slides
1. Push slides all the way back.
2. Lift bottom of slide up and away from rollers.
8
1
2
Fig. 9
2
0
8
2
6
4
P
r
o
d
u
c
t
M
o
d
u
l
e
N
o
.
S
e
r
v
i
c
e
N
o
.
Easton Pennsylv
ania
MOTOR COMPRESSOR T
HER
MALLY PRO
TECTED
DESIGN PRESSURE HIGH SIDE
M
IN.
BRANCH CIRC
UIT AMP
ACITY
MAX. BR
ANCH CIRCUIT
FUS
E SIZ
E
S
INGLE
PHASE
LOW SIDE
L
THE
U
SA
MADE IN
O
Z
P
S
I
G
R
C
N
S
F
U
L
PART NO
HZ
CHARGE
A
M
P
S
R
A
M
P
S
U
VOLTS
CORPORATION
SERIAL NO
MODEL
FULL LOAD A
MPS
REFRIGE
RANT
1
2
3
Fig. 10