EasyManua.ls Logo

FratelliOnofri FREV905D User Manual

FratelliOnofri FREV905D
44 pages
To Next Page IconTo Next Page
Page #1 background imageLoading...
Page #1 background image
Conform to "ANSI Z21.1 - 2005 Household Cooking
Appl. "and" UL STD 858
3107527
IMPORTANT:
Read and save these instructions.
IMPORTANT:
Installer: Leave Installation Instructions
with the homeowner.
Homeowner: Keep Installation
Instructions for future reference.
Save Installations Instructions for local
electrical inspector's use.
Freestanding
Dual Fuel Ranges
Owners Manual and Installation Instructions
Safety
Instructions............ 3-8, 23-27
Operating Instructions
Surface Burners ....................... 9, 10
Electric Oven ................................ 11-18
Care and Cleaning
Control Panel and Knobs ........... 19
Metal Parts ..................................19
Painted Surfaces .........................19
Grates ......................................... 20
Burners ....................................... 20
Shelves ........................................20
Broiler Pan and Grid ....................20
Lift-Off Oven Door ...................... 21
Oven Interior ................................21
Installation Instructions ...... 22-42
LP Conversion ........................28-31
Troubleshooting Tips ...........43
35 /  (900 mm) wide
Write the model and serial
numbers here:
Model # ____________________
Serial # ____________________
You can find them on a label
affixed to the inner side of the plate
warming door.

Table of Contents

Question and Answer IconNeed help?

Do you have a question about the FratelliOnofri FREV905D and is the answer not in the manual?
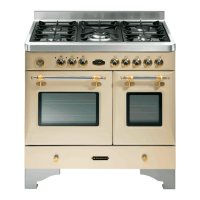
FratelliOnofri FREV905D Specifications

General IconGeneral
Fuel TypeElectric
Width90 cm
Number of Ovens1
Energy RatingA
Height85 cm
Depth60 cm
ColorStainless Steel
Control TypeKnobs
Number of Cooking Zones5
Appliance typeFreestanding
PowerElectric

Summary

Before You Start: Safety First

Important Safety Information and Notices

Range Hazard Warnings

General Safety Precautions

Oven and Heating Element Safety

Surface Cooking Unit Safety

Installation and Floor Safety

Using the Surface Burners

Lighting Surface Burners

Step-by-step guide for igniting surface burners, including manual lighting.

Post-Lighting Burner Checks

Checks and precautions after a burner has been lit.

Top of Range Cookware

Selecting Flame Size for Cookware

Advice on matching burner flame size to cookware for efficiency.

Using the Electric Oven

Static Electric Oven Operation

Details on the operation of the static electric oven.

Turnspit Operation (if equipped)

Instructions for using the turnspit accessory.

Multifunction Oven Modes and Controls

Oven Thermostat and Function Knobs

Description of oven control knobs and their settings.

Oven Function Knob Selections

Details on selecting specific oven functions via the control knob.

Timed Cooking and Programmer Use

Electronic Cooker Programmer Functions

Features and operation of the electronic cooker programmer.

Oven Features and Baking Preparation

Oven Shelves and Positions

Details on oven shelf placement for optimal cooking.

Oven Vents Explained

Information on oven vent locations and precautions.

Using the Oven for Baking

Setting Oven for Baking

Step-by-step instructions for setting oven temperature for baking.

Oven Shelves for Baking

Recommended shelf positions for various baked goods.

Baking Pan Placement Techniques

Tips for optimal pan placement for even baking results.

Baking Tips and Accessories

Baking Cookies

Specific advice for baking cookies for best results.

Baking Pies

Recommendations for baking pies, including pan types.

Baking Cakes

Guidance on baking cakes, including pan size impact.

Aluminum Foil Use in Baking

Proper use of aluminum foil during baking.

Baking 'Don't Peek' Advice

Advice against opening the oven door frequently during baking.

Using the Oven for Roasting

Roasting Setup and Procedure

Step-by-step guide for setting up and performing roasting.

Using the Oven for Broiling

Broiling Setup and Guide

Steps for broiling, including heat source distance and timing.

Care and Cleaning of the Range

Removing Range for Cleaning and Servicing

Steps to safely move the range for cleaning or maintenance.

Cleaning Control Panel and Knobs

Instructions for cleaning the control panel and knobs.

Cleaning Metal Parts

Guidance on cleaning metal components of the range.

Cleaning Painted Surfaces

How to clean painted surfaces on the appliance.

Cleaning Specific Range Components

Cleaning Burner Grates

Procedure for washing and drying burner grates.

Cleaning Burners

How to clean surface burner openings for proper ignition.

Cleaning Oven Shelves

Methods for cleaning oven shelves.

Cleaning Broiler Pan and Grid

Instructions for cleaning the broiler pan and grid after use.

Oven Door and Interior Cleaning

Lift-Off Oven Door Cleaning

Procedure for removing and cleaning the oven door.

Porcelain Oven Interior Cleaning

Tips for cleaning the oven's porcelain interior.

Oven Cleaner Cautions

Warnings on using spray-on oven cleaners to prevent damage.

Installation of the Range: Overview

Pre-Installation Requirements and Safety

Essential steps and safety precautions before starting installation.

Installation Tools, Materials, and Safety

Tools Needed for Installation

List of tools required for the installation process.

Additional Materials for Installation

List of necessary materials like gas connectors and sealants.

General Installation Safety Instructions

Crucial safety warnings related to installation procedures.

Installation Safety Instructions (Continued)

Range Dimensions and Clearances

Range Location and Supply Setup

Step 1: Range Location

Selecting the proper location for the range installation.

Recommended Gas and Electric Supply Location

Guidelines for the placement of gas and electrical connections.

Anti-Tip Bracket Installation

Step 2: Anti-Tip Bracket Installation

Detailed steps for securing the anti-tip bracket to the wall and range.

Gas Conversion Procedures

Step 3: Gas Conversions Overview

Steps for converting the range between natural gas and LP gas.

Converting Gas Pressure Regulator

Procedure for adjusting the gas pressure regulator.

LP Gas Conversion Steps

Specific instructions for converting the range to LP gas.

Converting Standard Surface Burners

Natural Gas Conversion Process

Connecting the Range to Gas

Step 4: Connect the Range to Gas

Final steps for gas connection, including safety checks.

Gas Type and Conversion Details

Type of Gas Information

Details on natural gas and LP gas compatibility.

LP Gas Conversion Procedure

Procedure for converting the appliance to LP gas.

Gas Supply Line and Pressure Testing

Gas Supply Line Requirements

Specifications for rigid and flexible gas supply lines.

Gas Pressure Regulator Specifications

Details on the gas pressure regulator and its settings.

Gas Supply Pressure Testing

Procedure for testing gas supply pressure.

Making the Gas Connection

Flexible Pipe Gas Connections

How to connect using flexible metal appliance connectors.

Rigid Pipe Gas Connections

How to connect using rigid pipe fittings.

Completing the Gas Connection

Final steps to ensure a secure and leak-free gas connection.

Electrical Connection (USA)

Step 5: Make Electrical Connection

Detailed steps for connecting the range to the electrical supply.

US Electrical Requirements and Grounding

Electrical codes, wire sizes, and grounding requirements for USA.

3-Wire Electrical System Connection

Power Supply Cord Installation

Electrical Connection Options Summary

4-Wire Connection Procedure

Detailed steps for a 4-wire electrical connection.

3-Wire Connection Procedure

Detailed steps for a 3-wire electrical connection.

Leveling the Range

Unpacking and Initial Setup

Steps for unpacking the range and preparing for leveling.

Adjusting Leveling Legs

How to adjust the range's leveling legs for stability.

Lift-Up Cooktop and Floor Protection

Protecting Your Floor During Installation

Advice on protecting flooring when moving or installing the range.

Troubleshooting: Before Calling for Service