999075 – Rev F Page 17 of 40
3 . 2 . 1 Handset Storage
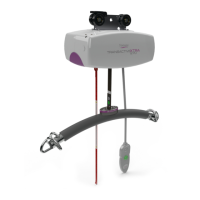
The Handset is designed to be stored on the carry bar. The Handset has a hook attached to
the rear face which will slot nicely onto the carry bar (See figure 3-2-1-1). It is recommended
that the Handset be always stored on the carry bar when not in use for safe keeping and easy
access.
4 Ceiling Hoist Operation
4 . 1 Turning the Ceiling Hoist ON and OFF
This toggle switch has three states, On, Off and E-Lower. These features should
only be operated in an emergency, but if the red pull cord has been pulled by
accident, to turn the ceiling hoist back on, the toggle switch, as shown in Fig. 4-
1-1 must be pressed vertically into the slot. Once this is done, press any button
on the handset to “wake up” the ceiling hoist, the display screen will turn on and
the LED will display a steady green.
To conserve battery, the ceiling hoist will automatically shut off after
approximately two minutes of non-use.
4 . 2 Raising and Lowering the Carry Bar
To raise and lower the carry bar, operate the grey and green buttons found on the handset. The grey button
raises, and the green button lowers the carry bar. This aligns with the arrows found on the lift tape. This applies
across all varying handsets.
It is recommended that the operator hold the carry bar with one hand while raising/lowering is being done. This
will stop the bar accidentally swaying and/or encountering an individual or close object. For the same reasons,
raise the carry bar above head height when not in use and when traversing the unloaded ceiling hoist.
In addition, the lifting tape must be kept vertically in line with the hoist when raising or lowering the
carry bar. Any deviation from this can cause the tape to fray, leading to potential failure of the hoist.
Please note that if the hoist fails due to improper handling, it will not be covered by warranty, and you
will be liable for the cost of the replacement tape.