5
Important!
- It is only possible to lower the current without interrupting the
welding sequence if "Main current" is activated
- If you accidentally push forward the torch trigger in in open
circuit, no ignition will take place
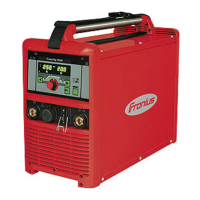
Special-4-step mode - Variant I (Fig.5)
- Makes it possible to activate the 4-step mode from TIG
torches that do not have the double-pushbutton function
- Intermediate lowering down to the reduced current I
3
(to set
this, see the section headed "Working with the program-
levels")
- Facility for lowering the welding current from the main
current to the reduced current I
3
and back, without inter-
rupting the welding sequence
- In the "PRESETTINGS LEVEL ---" program level (see "Wor-
king with the program-levels"), Parameter I3, the reduced
current I
3
can be set as a percentage of the main current I
H
- In the "PRESETTINGS LEVEL ---" program-level (see "Wor-
king with the program-levels"), parameter TIG, the setting
for SFS must be set to "1"
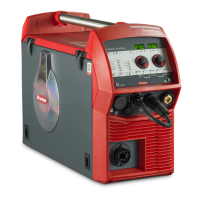
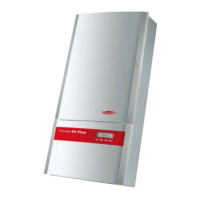
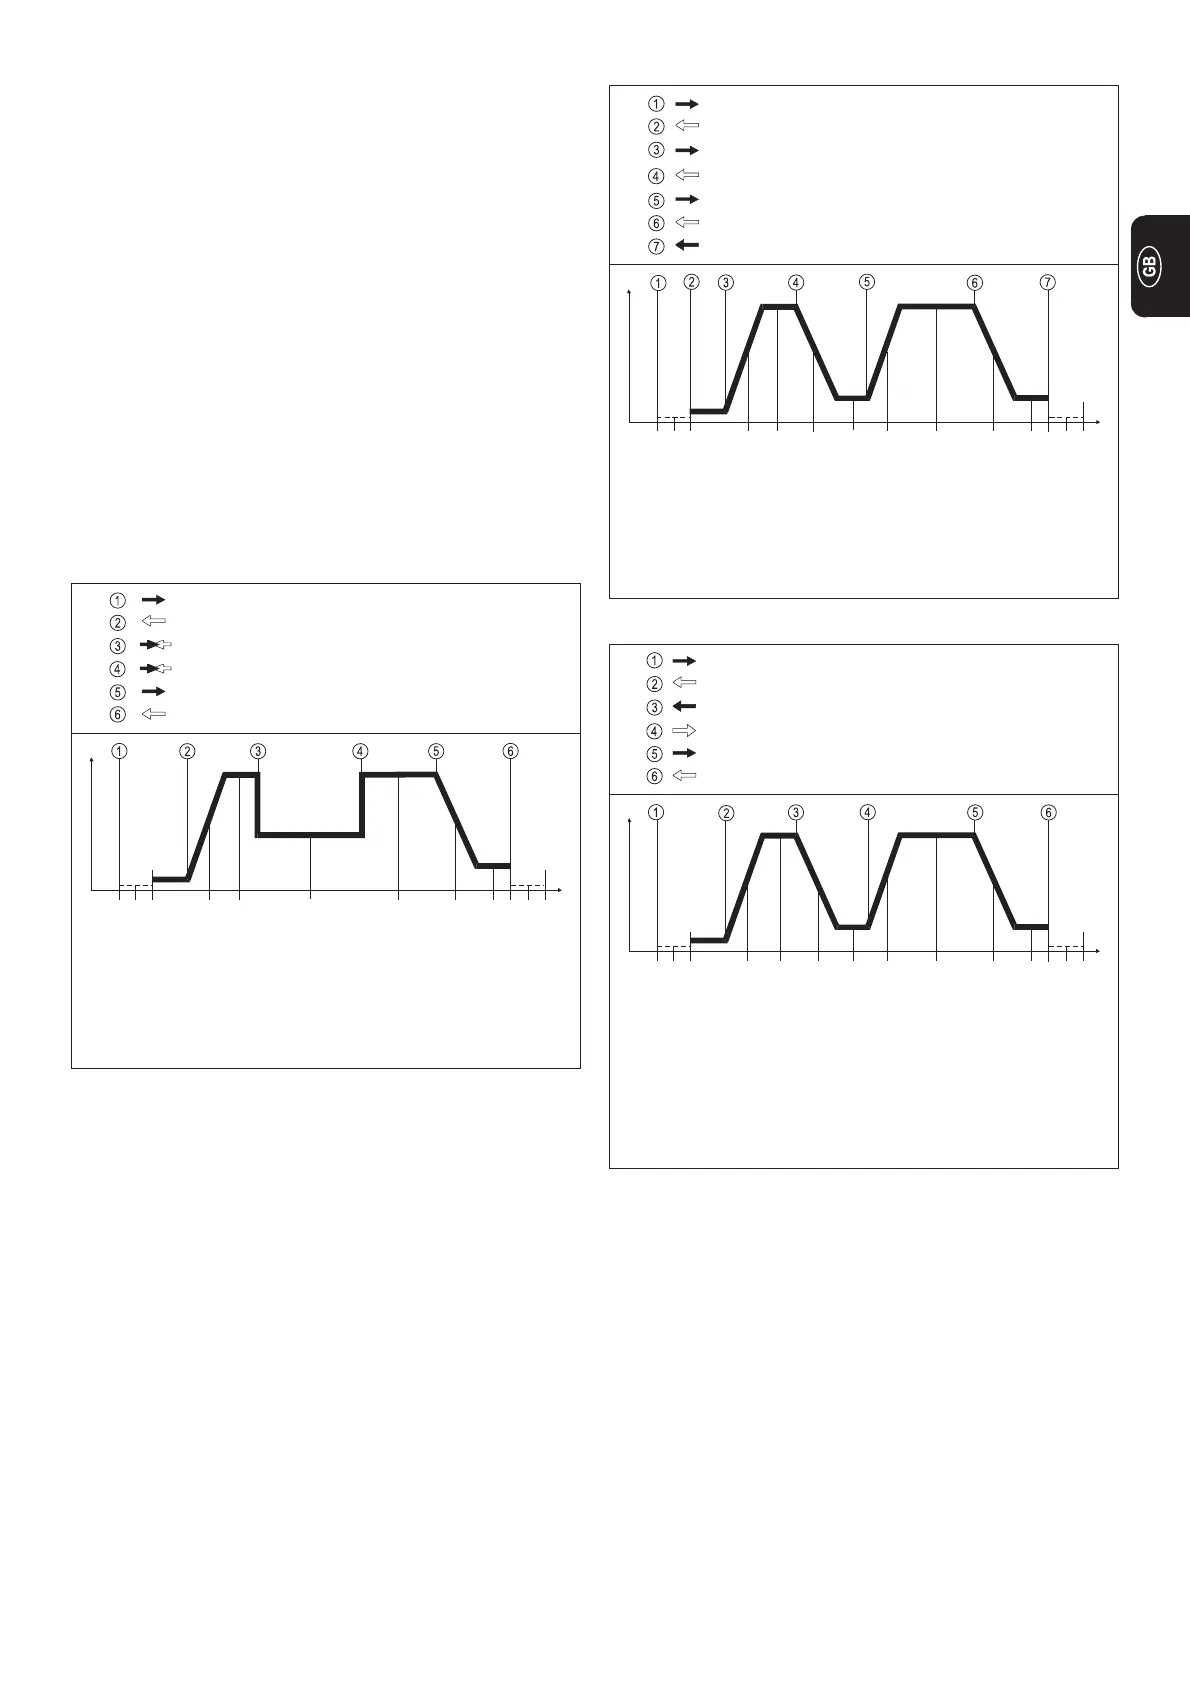
Special 4-step mode - Variants II / III / IV / V (Figs.5a/b/c/d)
- Makes it possible to activate the 4-step mode from TIG
torches with the double-pushbutton function
- In the "PRESETTINGS LEVEL ---" program-level (see "Wor-
king with the program-levels"), parameter TIG, the setting
for SFS must be set to
- "2" for Variant 2
- "3" for Variant 3
- "4" for Variant 4
- "5" for Variant 5
Briefly press forward the torch trigger
Briefly press forward the torch trigger
Release the torch trigger
Fig. 5 Functional sequence in special 4-step mode - Variant I
Pull back and hold the torch trigger
I
S
I
H
I
3
I
t
Pull back and hold the torch trigger
Release the torch trigger
I
E
I
H
Start of cycle
Gas pre-flow time
Current rises via
upslope
Gas post-flow time
End of welding
Welding with pre-set
reduced current I
3
(set-up)
Arc ignites with start-arc
current I
S
Welding with pre-set
main current I
H
Current drops via
downslope
Welding with pre-set
main current I
H
Crater-fill
current
Diagram showing intermediate lowering
Fig. 5a Functional sequence in special 4-step mode - Variant II
I
S
I
H
I
t
I
E
I
H
Start of cycle
Current rises via
upslope
Gas post-flow time
End of welding
Welding with pre-set
reduced current
Arc ignites with start-arc
current I
S
Welding with pre-set
main current I
H
Current drops via
downslope
Welding with pre-set
main current I
H
Crater-fill current
I
E
Current drops via
downslope
Current rises via
upslope
Pull back and hold the torch trigger
Release the torch trigger
Pull back and hold the torch trigger
Release the torch trigger
Pull back and hold the torch trigger
Release the torch trigger
Briefly press forward the torch trigger
Push forward and hold the torch trigger
Release the torch trigger
Release the torch trigger
Fig. 5b Functional sequence in special 4-step mode - Variant III
Pull back and hold the torch trigger
I
S
I
H
I
E
I
t
Pull back and hold the torch trigger
Release the torch trigger
I
E
I
H
Start of cycle
Gas pre-flow time
Current rises via upslope
Current drops via
downslope
Gas post-flow time
End of welding
Crater-fill
current
Arc ignites with start-arc
current I
S
Welding with pre-set
main current I
H
Current rises via upslope
Current drops via
downslope
Welding with pre-set
main current I
H
Crater-fill
current
Diagram showing intermediate lowering
Diagram showing intermediate lowering
Gas pre-flow time
 Loading...