77
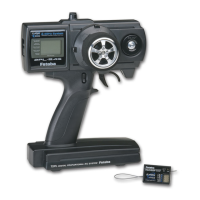
Receiver
Switch
Harness
To Battery
(Red)
Charging
Jack
(Black)
Aileron Servo
(CH1)
Elevator Servo
(CH2)
Throttle Servo
(CH3)
Rudder Servo
(CH4)
7
6
5
4
3
2
1
B
Dual Conversion
FP-R127DF
FM
7CHANNEL
RECIVER
(CH1)
(CH4)
(CH2)
RECEIVER AND SERVO CONNECTIONSRECEIVER AND SERVO CONNECTIONS
Connect the servos to the receiver to perform the functions indicated: Connect the servos to the receiver to perform the functions indicated:
Receiver Receiver
output output
channelchannel
FunctionFunction
11
22
33
44
55
66
77
BB
Aileron -oror-left elevon (for tailless models)
Elevator -
oror-left ruddervator (for V-tail models) -oror-right elevon (for tailless models)
Throttle
Rudder -or-right ruddervator (for V-tail models)
(Not used)
(Not used)
(Not used)
Receiver on/off switch (the plug colored red goes into the receiver)
The diagram shown is for aircraft models only. Additional servos may have to be purchased separately.
CHARGING THE Ni-Cd BATTERIESCHARGING THE Ni-Cd BATTERIES
The transmitter and receiver batteries included with your 4EX system are rechargeable, Ni-Cd (nickel-cadmium, pronounced
ni-kad) batteries. Ni-Cd batteries require special care and charging. Read the charging instructions carefully.Read the charging instructions carefully.
NOTE:NOTE: The batteries are partially charged, but will require a full, overnight charge before the model may be flown.
1. Connect the transmitter charging cordtransmitter charging cord coming from the A/C wall charger to the charge jack in the right side of the
transmitter case. The receiver charging cordreceiver charging cord may be connected to the batteries two different ways: The charge cord
may be connected directly to the battery pack, or to the vacant charge connector (black) coming from the on/off switch in
the model. Charging
“through the switch” is preferred as there will be no need to disconnect the battery.
2. Plug the A/C wall charger into a wall outlet. Note:Note: If the wall outlet can be turned off by a switch in the room, be certain
the switch remains on after leaving the room. Otherwise, the batteries will not be charged!
3. The LEDs (light-emitting diodes) should light red, indicating that current is flowing and the batteries are being charged.
Discharged batteries will take about 15 hours to fully charge. If using an aftermarket fast charger, be certain to follow be certain to follow
the manufacturerthe manufacturer’’s instructions provided with the chargers instructions provided with the charger so you do not overcharge the batteries. NEVERNEVER charge
the batteries at a rate higher than 1,000mA. The batteries should also be discharged periodically to prevent a condition